How to draw an angel with a pencil step by step. How to draw a fallen angel with a pencil step by step Man angel pencil drawing
On the eve of the most important holiday - Christmas, hot topic rises how to draw an angel.
Having learned to portray mythical creatures You can get as close as possible to the amazing and mysterious world.
How to draw an angel. Step by step lesson: No. 1
In this article we will look at 2 lessons on drawing gentle and at the same time sublime angels.
1. According to tradition, the general outline of the figure should be drawn in the center of the sheet
2. At the top of the triangle in the form of an oval, outline the head
3. Let's start with the upper part of the figure: showing the shoulders and chest
4. Then we draw a skirt, because the angel will be in a female form. How to draw a mermaid
5. Having decided to draw a mysterious entity, we decide the question: “How to draw an angel more believably?” Everyone has their own ideas and the drawing will be purely individual. The next step is to draw the hands of an angel
6. Having finished with the main points of articulation of the arms, do not forget about the legs
7. The time has come for the most interesting part - we draw wings for the angel. They are huge, full height
8. If we see an angel, then he appears in the flesh. We draw his hands and thin figure
9. Let's move on to the angel's face. Let it be a pretty young girl with long hair
10. We draw in more detail the details of a kind face, big eyes, a soft half-smile, strands of hair
11. Using bold lines, we indicate folds in clothing, adding volume to the skirt
12. Painstakingly and carefully draw the feathers on the angel’s wings. They are small at the top, long and thin at the bottom.
13. Draw a halo over the angel’s head
14. Using shading we achieve the effect of volume and life
15. To complete the image, all that remains is to use an eraser to show the highlights on the angel’s hair, clothes and wings
Having been patient and having figured out the problem of how to draw an angel, every artist seems to touch the world of magic and the unknown.
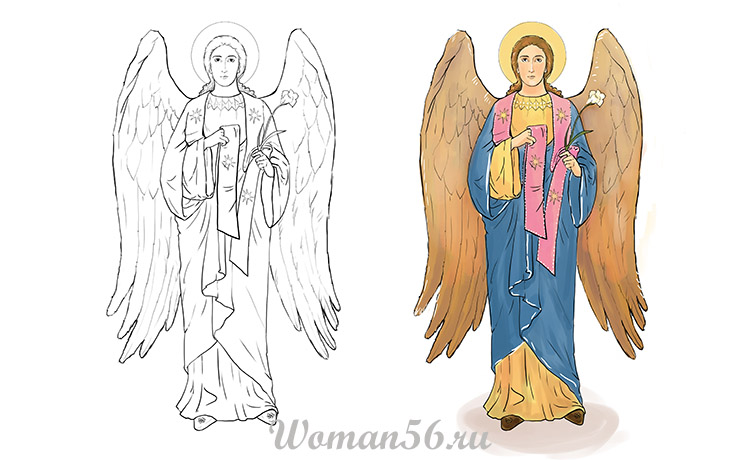
How to draw an angel. Step-by-step lesson: No. 2
According to Christian religion angels have an external resemblance to people. This will help with learning step by step lesson"How to draw an angel."
1. Using horizontal and vertical lines, we indicate the outline of the drawing

2. Using an oval we outline the place of the head, the contour of the figure

3. B mirror image draw two large angel wings

4. We outline the hands with dots and lines

5. Let's start with the details of the costume in the upper part

6. Carefully draw the face: eyes, nose, mouth, and hair

7. Finish drawing the robe

8. Main feature the angel's wings are: all feathers should be drawn very carefully

9. Let’s draw a symbol of his holiness above the angel’s head - a halo

10. Let’s start decorating clothes with patterns and ornaments. Let's draw a flower in our hands

11. When thinking about how to draw an angel in color, we start with the hair

12. Paint clothes with delicate shades of blue and light brown

13. Dye the long scarf in pale pink.

14. Paint the angel’s wings brown

15. Using highlights on clothes, wings and hair, we add volume and airiness to the picture
Attention to detail and patience will help you quickly understand all the features of this lesson.
The most important and main difficulty in drawing an angel is its wings, because the more time you spend on drawing out the strokes of each feather individually, the more spectacular your angel will be.
Angels can be drawn in different ways and with different character depending on what exactly you need,it could be an elegant girl angel resembling a fairy-tale elf, a holy church angel in a cassock, a cartoon angel or a Christmas or anime one.


For beginning artists, I would best recommend a video that shows you step by step experienced master with a light hand that will guide you in your artistic arts and at the same time give a couple of practical tips, which will not be in a simple scheme.
The first option is anime angel.
The second option is classic.
An angel should be simple. After all, this is for beginners. I think for children.
But he must be cute.
Here are some examples step by step drawing angel for beginner children.


These are the angels we turned out to be. Simple and pretty.
If you are a beginner artist, then it is better to take up drawing, armed with instructional diagrams.
First you need to make a sketch. Determine the bends of the arms and legs, the tilt of the head.

Dress the angel in loose and light clothes and sketch the wings.

Draw feathers, curves of clothing.

Define facial features, erase unnecessary lines.

Draw a halo, outline the outline, darken the necessary areas with shadow. All. The drawing is ready.

It’s not easy to draw an angel, like a person; it’s the step-by-step drawings that allow you to do it efficiently and competently, I always follow them. When drawing angels, special attention should be paid to the wings. Happy drawing!


For this purpose, you will need a pencil, a sheet of paper and an eraser, in order to later remove unnecessary contours. First, we need to outline the main and common features to draw an angel. And first he draws a small triangle, then inside it you need to draw an oval, as if defining his face for yourself. Then we draw the angel’s hair. Then you need to draw the features of his face, eyes, nose, eyelids and lips.
Then we begin to sketch out his chest, as well as his shoulders. Then you will need to draw his angel wings, it is not difficult in essence. Just draw smooth arcs first. After finishing drawing, you can color the drawing of your angel in color. This can be done using felt-tip pens or paints
For beginners it is easier to start drawing an angel using geometric shapes. A circle is a face; it is easier to make a compass or outline an object in a round shape. The body is in the form of a narrow rectangle, the arms and legs are trapezoid, the palms are oval, etc.
Use additional lines, such as a cross section inside a circle, to position the eyes, nose, and mouth correctly.
Draw the clothes (cassock) of the angel, add a decoration - a necklace, they are easy to draw - small circles connected to each other.
Then we draw the legs, feet, wings behind the back - longer in the upper part, shorter in the lower part.
Outline the eyes, add eyelashes, nose, mouth, hair. On the left side of the head there is a ring-shaped halo.
Use an eraser to remove all unnecessary lines. Apply shadows or decorate with colored pencils or paints.


Even a novice artist will easily master drawing an angel if he performs all the steps carefully and step by step.

The first step is to draw an oval of the face and apply secondary lines on it.

Then we correct the shape of the angelic face, according to the reference picture.

Draw the nose and eyes.

Then we depict a full mouth lower lip. The line of the lips is curved in a slight smile.

Let's move on to the hair.

Adding detail to the angel's hair.

Draw the neck and shoulders.

We depict wings.

Add feathers and erase extra lines.

Our angel is ready:

It will not be difficult to draw an angel using the following step-by-step pictures.
First, as usual, you need to draw the outlines of the future angel.


I didn’t look anywhere for instructions on how to draw an angel, but did it myself. Whether it is good or not is for the readers and viewers to judge.
I took a drawing from the Internet so that I had something to rely on, and drew these stages that may well be useful to all novice artists.
First, let's try to draw a figure like this. This is perhaps the most difficult thing. But I did not divide this work into any stages, since someone will start the drawing from the head, someone will make a frame - it depends on individual creative habits.

If it works, that's much more than half the battle. And then we will follow the stages. You can see everything there.
The last stage is coloring. I designated it conditionally, only noting that you can use any matching colors. Even the smallest artists can handle coloring.

In order to depict an angel, you first need to draw the silhouette of an adult or child, and then add to the drawing the details that are distinctive when drawing angels, namely: wings, a halo and often a long robe.
On Christmas Eve, it is customary not only to cook and bake various delicacies, but also to make things with children to decorate the house. Most interesting option crafts – a picture with the image of a guardian angel. You can draw an angel different ways, let's look at the easiest of them.
How to draw an angel with a pencil?
Before you get to work, tell your children that angels are messengers of God who help us in difficult everyday situations. It is impossible to see these ethereal creatures, but people assume that they fly to earth in the form of a person with wings on their shoulders.
Prepare:
- Simple pencil
- Markers
- Paper
- Eraser
Let's get started:
- In the middle of the sheet, draw an oval (face), on the sides of which bend small brackets - ears. Place button eyes, a semicircular line on the nose and stretch your lips in a kind smile. Draw long eyelashes, eyebrow arches, outline the hairstyle and neck line.
- Draw two lines from the neck along the shoulder slopes and connect them with each other at the bottom with a wavy line. Add loose sleeves to the silhouette and the dress is ready.

- Raise the pointed wings up above your shoulders, and erect nymphs above your head. Using light strokes, separate the folds of the vestment, and from under the sleeves draw handles that look like children’s mittens. Color the drawing and place it in a prominent place in the children's room or living room.


How to draw an angel - a complicated variation
A figurine of a praying angel is a good inlay for a postcard or gift.
- Mark a child's profile on paper, explaining to the child that while he is young, his angel is also small. Cross the projection of the head with the rays and from the point of their crossing draw: a bird-eye, a dash-eyebrow and curls of hair framing the face.


- Outline the figure of an angel bowed in prayer. Draw hands folded together, bare feet, folds of clothing. Behind the shoulders, draw two wings with inconspicuous lines.

- Add authenticity to the wings by stitching feather stitches. Next, cut it out, glue it onto a cardboard base and use it for its intended purpose.


How to draw an angel - a guide for kids
Take: a coin, a pencil and a red pencil.
Begin:
- Place the money at the top of the sheet and trace it with a pencil to create the character’s face. Place bold dots of the eyes and a crescent of the mouth on it. Draw a flat cake on top of the head - a halo.


- Put a dress on the figure, lowering two diverging lines connected at the bottom by an arc.


- Cross the thin lines of your arms across your chest. From under the hem of the clothes, draw legs peeking out - two segments with circles at the edges.


- Raise your wings on both sides above your shoulders, like the petals of an open flower.


- Paint your face and legs pale pink, and leave your clothes white.

So, even small children can draw an angel. The main thing is to help the children adhere to the correct proportion and carefully reproduce small parts, and the Christmas souvenir will be a success.
The cute angel we want to draw will decorate any gift for children or a birthday card. For brightness step-by-step drawing use pencils, markers or even watercolors.
Necessary materials:
- marker;
- eraser;
- a simple pencil;
- colored pencils pink, blue, yellow, cyan.
Drawing steps:
1. Simple first hard pencil draw the angel's head. Let's designate it as a small circle. The child needs a little help, despite the fact that in your opinion it is easy and simple.

2. Below you need to draw a figure indicating the torso.


4. On the sides of the body we will draw the angel’s arms, dressed in the sleeves of the dress. Let's draw folds on the clothes. Recognizable shapes appear!

5. We finish drawing the hands folded together.

6. At the bottom of the clothes we draw small legs for the angel. In the picture he will be barefoot in full height.

7. Then we show how to draw hair. They can come in different lengths and have any hairstyle you want.

8. Behind the body, on the sides, we will draw the angel two beautiful wings with feathers.

9. Now we will draw an oval at the top of the head. This will be a halo above your head. After this, you need to depict all the features on the face: kind eyes, a sweet smile, a small nose - while drawing them you can also add freckles. We got mostly childlike features!

10. Now that the drawing is almost ready and all the extra lines have been erased, you can start tracing the contours of the angel with a black marker. If you don’t have one, you can use a felt-tip pen, gel pen or even a black pencil.


11. We begin to decorate the silhouette. Let's take it yellow and apply it to your hair.

12. Let’s decorate the angel’s skin on his arms, legs and face with pink.

13. The guardian angel's clothes will be blue. Let's first color it with a gentle shade, and then take a blue pencil and apply it in the darkened areas.

14. Also, don’t forget to color the wings. They will be white, but with a blue effect, so we apply light blue strokes to the wings.

15. At this point we complete beautiful drawing. An angel with wings seems to be soaring in the skies! Your little one will definitely love such an entertaining lesson!


Today I will tell you how to draw an angel step by step with a pencil for beginners, I will say right away that the drawing will take quite a lot of time and is labor-intensive. You can draw different types angels, I chose exactly this one, the drawing of an angel is best suited for beginners or people who have not tried to draw something like this. You may have some minor difficulties when you try to draw the angelic face and wings; by the way, you can make them larger if you wish, but I kept the correct proportions.
As is customary, I will describe each of the steps and try to explain each action. I hope you can do it again. Let's get started.
At the beginning he draws something similar to a flower. Ball on a stick and inside the ball there are two horizontal lines. The ball is the future head; an elongated vertical line with a bend is necessary for the correct proportions of the entire body; we will use it to navigate. And two horizontal lines will be needed in the future for the mouth. This step is very simple.

Now it will be a little more difficult. We make a hairstyle, make bangs on the forehead with teeth. And below the head we begin to depict the body, we will make sleeves, they should not be the same size.

Next, you immediately need to make piles that look out from under the clothes. And one more important point, we depict wings, they are not big since the angel drawn in pencil is still too small for us, i.e. not an adult.

This step is also not difficult, but it is responsible. First we do Nice dress Angel, it was not in vain that we initially drew an arc, so we are guided by it. Secondly, a very important point is drawing a halo, it should not be bulky or small, the location should be directly above the head.

And the final one is one of the most important steps. On the face we draw cute eyes, a nose and a beautiful mouth, we do everything step by step. We focus on two horizontal lines.
Now use an eraser to erase unnecessary lines. The most important thing on the head is to correct the hair on the left, and also erase the vertical line that we did at the beginning.
We draw all the lines with a pencil and that’s it, the drawing is finished.

Now you know how to draw an angel step by step with a pencil for beginners, and I once again practiced drawing it. I hope you don't have any problems global issues and you understood everything from the explanation, as well as the pictures. Practice drawing and we will definitely succeed, try to draw.