How to sketch correctly. How to draw a person? Learning to sketch
Video lesson of drawing with markers "Tangerine mood" Video lesson of drawing with markers "Tangerine mood". Artist-teacher: Irina Shelmenko Irina is an artist, illustrator and sketcher. Graduated with honors from the Moscow State University for the Humanities "Artistic and graphic" faculty. Proficient in various media such as watercolor, acrylic, oil, pastel, etc. But now her favorite material is alcohol markers. Currently draws and leads projects in the direction of sketching and illustration. In this video lesson on drawing with markers, Irina invites you to learn how to draw with markers, clean a few tangerines with her and draw a winter New Year illustration with them! ✔ Draw with alcohol markers; ✔ Work with the form and depict and see a glare, light, semitone, own shadow, reflex, drop shadow; ✔ Achieve realism in the subject; ✔ Draw from nature and work with nature; ✔ Compose a composition and reference for a sketch illustration. ✔ Detail the image ✔ Draw citrus peel texture and leaf texture ✔ How to draw with alcohol markers ✔ How to draw from life ✔ How to create compositional sketches for future work ✔ How to make your illustration / painting realistic ✔ How to draw citrus peel texture and leaf texture ✔ How to make gradients markers The result of the video lesson will be a winter New Year's illustration with tangerines - great idea for any New Year's card! Duration of the video lesson: 2 hours 13 minutes For comfortable learning, make sure you have the following art materials: ✔ MARKERS Alcohol markers from any manufacturer. Irina uses Copic alcohol markers in the following colors: - Copic Y11, Y13, Y15, Y18, Y35, Y23 (yellow) - Copic YR12 (orange) - Copic E11, E43 (beige-brown) - Copic G20, G24, BG99, G94, YG93 (green) - Copic W2, W5, W7 (taupe) - Copic C0, C2, N2, N4, C6 (grey) ✔ LINERS AND pens - Liner 0.1 mm and 0.5 mm, black, waterproof - White gel pen - White watercolor pencil - White pastel pencil - Dark brown colored pencil You can use any other similar media. ✔ SKETCHBOOK FOR MARKERS You can use any marker paper or a sketchbook with special marker paper.?supply=548||a]Doodle&Sketch Sketchbook[||a||], size 14x28 cm, with 200g paper. ✔ PENCIL AND ERASER Any. The video tutorial on drawing with markers will be interesting for both beginner and advanced illustrators. All video lessons from ArtProfessor Irina Shelmenko you can find on her personal page below.
Sketch Lately wins the attention of beginners and continuing artists. Sketches are a unique opportunity to see the world through the eyes of an artist.
A sketch is the best way to reflect reality on paper in a short period of time. How to start sketching? This takes practice and necessary materials to create a sketch.
To get started, you need inspiration and a lack of fear. Inspiration will help you see a certain picture that you want to remember and reflect on paper. And the absence of fear will allow you to quickly switch to creating a drawing and not be afraid clean slate paper. As practice shows, if you are a novice artist, then it is the fear of the result and self-doubt that can slow down any inspiration you have. Try to draw, let creepy images come out at first, with time and practice, high-quality images will appear that you will look at with pleasure.
Further, a sketch is a sketch, a picture that you want to keep in memory, and then enjoy viewing the pictures after some time. To do this, it is best to purchase a special notebook where you will add drawings every time you see something interesting. Such a notebook will encourage you to draw better and more, as you will be able to view the resulting drawings. However, having a notebook does not mean that you will be sketching. If you have inspiration and desire, then at first you can draw sketches on plain paper, the main thing is that it be at hand at a certain time. In the future, the choice must be taken more seriously.
The sketch can become your book of impressions, memories and ideas for the future. If you still bought the necessary sketchbook, then you can collect various tickets, checks, small photos in it, as well as make notes and, of course, draw.

Sketches should be light, fast and uncomplicated, this rule is the main idea of sketches. So, you do not need to have a complete art education to make your sketchbook the epitome of creativity and beauty. The idea of sketches is that the artist draws what he sees, so there is often a small amount of time to create a sketch. It is enough to outline the silhouette, and then work out the details. Let the resulting drawing not be a clear copy of what you saw, but it will convey your feelings and impressions at that very moment.
If you are painting in public place, then do not be shy of condemnation or views from the side. You draw for yourself, and everyone who looks with condemnation may not even know how to hold a pencil in their hands.

How can you draw a sketch? Everything you have on hand is suitable for - liner, pencil, felt-tip pen, pen. At first creative way use a simple pencil, it will allow you to make adjustments to your drawings. Also, a nag will become an indispensable assistant.
Your goal is not to build an academically correct drawing, but to create an interesting illustration that will remind you of a specific point in time. Of course, do not forget about practice and certain skills that you need to achieve before you admire your drawings.
The craft of a good draftsman is based on 2 basic things: the ability to control your hand and the right vision. If you want to create or design websites, then you can’t do without special training.
The next 6 sections of the article, in fact, are the first step in this direction - you will learn how to learn how to draw and where to start. Immediately after that, proceed to the second part of the topic and go on.
This is a translation of a note from Medium by Ralph Ammer (all graphics are his own).
Advice. For the next 6 tasks, use one type of pen and one type of paper (for example, A5).
Hand dexterity - two workouts
The first two moves are about controlling your hand. You should fill your hand, and also learn to coordinate the vigilance of the eye and the movement of the brush. Mechanical practices are great for beginners. You can later use them to try out new tools. They also allow you to relax and take a break from mental or physical work. So, how to start drawing correctly.
1. Lots and lots of circles
Fill a sheet of paper with circles different sizes. Try not to overlap the circles.

Learning to draw circles is not as easy as you might think. Note that the more circles on the paper, the more difficult it is to add the next one. Draw them in two directions and as many as you can.
Advice. Shake your hand when it starts to cramp, do this after each set.

2. Hatching - creating a structure
Fill in a sheet of paper with parallel lines.

Diagonal lines are the easiest for us, as they correspond to the movement of our wrist. Note that the left-hander prefers the opposite direction of strokes than the right-hander. Take a look at your favorite artist (in my case, Leonardo da Vinci) and try to guess which hand he wrote with?

Try other stroke directions. Have fun with the hatching process. Combine different strokes and enjoy how the paper is covered with various shadow spots.
Advice. Do not rotate the paper. It is very important to train your hand in different directions.
So, after we have trained the hand, we need to do exercises on the eyes!
Perception - learning to see
Drawing is primarily about seeing and understanding what you see. People often assume that everyone sees the same thing, but that's actually not the case. You can always improve and develop the quality of vision. The more you draw, the more you see. The following four tricks will make you expand your view of familiar objects. This is exactly what they begin to learn to draw in different courses.
3. Contour - show me your hands!
Do you see these different fascinating contours of your hand? Draw them on a piece of paper. Do not try to recreate everything, choose only a few of the most interesting ones.

Whether you're drawing a person, a plant, or your favorite animal, you create the outline of what you see. Outlines define the body or object and make it possible to recognize the pattern. The task is not to immediately display all existing distinctive features but to learn to see them!
Even if you know the shape of an object, it's still worth taking a closer look and re-examining it.
4. Chiaroscuro - apply light and shadow
Draw a piece of fabric. Start with the outlines, and then use your hatching skills to find the chiaroscuro transitions.

This exercise will help you learn how to convey light and shadow on paper. I must admit that this is not the easiest way for beginners. Keep in mind that it is not necessary to make perfect chiaroscuro transitions. The fabric is a playing field to practice the skills learned in the previous lessons. Plus, you will also understand how to learn how to draw chiaroscuro using only your hand.
Advice. You can do curved hatching to create shape, and cross hatching to achieve deeper shadows that resemble the texture of fabric.

Advice. Close your eyes a little while looking at the fabric. You will see a blurry image of the fabric and increased contrast between light and shade.
5. Perspective - Cubes in 3D Space
Let's draw cubes! Follow simple steps.

A drawing in perspective is a projection of a 3D object into 2D space (your sheet of paper).
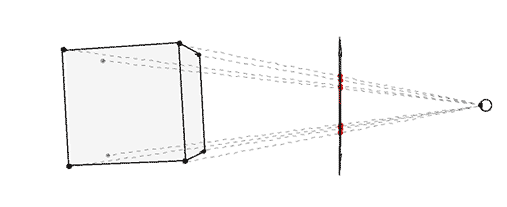
Building a perspective is a separate science, which is unrealistic to be fully considered within the framework of one article. However, we can have some fun with a simple technique that gives us an intuitive feel for the magic of drawing in perspective.
Step 1. Draw horizontal line. This will be the horizon.

Step 2. Put two points along the edges of the line - two invisible vanishing points.

Step 3. Draw a vertical line anywhere.

Step 4 Connect the ends of the vertical line to the vanishing points.

Step 5 Add two more vertical lines as shown below.

Step 6 Connect them to the vanishing points.

Step 7 Now use a black pencil or pen to trace the cube.

Repeat steps 3 to 7 for as long as you wish. Enjoy building! Have fun drawing, then you will succeed. You can shade the sides of the cube.

Advice. When you draw cross lines, it's best to overlap one line slightly over the other, so the shape is more visible.

Mastering perspective drawings will help you create the illusion of depth. And most importantly, you will teach your brain to see and recognize three-dimensional space. This is a great practice for how to start drawing from scratch without any skills.
Even if you decide to ignore the rules of perspective and make “flat drawings”, this knowledge will never be superfluous, but on the contrary will help expand your horizons and sharpen your visual receptor.
6. Building a composition - why here?
Do 5 different drawings one object. Position the item differently each time.
As you create various options positioning your subject on paper, try to trace how this changes its connotation - meaning.

The author Ralph Ammer has a few more interesting articles, but it is this one that you need to watch first in order to understand where to start drawing with a pencil and not only. In the comments, I would like to see your opinion about the pros and cons of the presented methodology. Which exercises really gave you pleasure, which did not? What else do you want to know on the topic or, perhaps, you have your own experience on how to learn to draw from scratch - write all this below.
P.S. Free and complete SEO analysis of the site page - sitechecker.pro. In promotion, not only are important external factors, but the web project itself must be good.
Sketching is a technology of quick sketches with any materials that are at hand, from a regular marker to watercolor. Visual notes and sketches give freedom, happiness, and even fill your life with meaning. The ability to draw with a marker using the sketching technique gives the same wonderful impressions as the ability to breathe, sing, love each other. This is another way to capture the here and now moment and capture it forever with a sketch.
What are the types of sketches?
Now we will analyze the types of sketches.

Tools
Anything can be used to create sketches, even a napkin and a toothpick soaked in espresso. But since we are just starting to learn, it is best to take thick paper (for good drawing) A4 format, no more, pencils of various densities, a marker and an eraser.
An object.
Almost anything can be an object for a sketch, but first you need to take an object that is motionless, independent of simple light sources, accessible. That is, you don’t need to choose animals, it’s better to start with the interior (the first sketches will take a long time to get, the horse will not last that long).
How to draw a sketch?
Let's imagine our object without different elements, as if we are looking at it in the dark. You can practice by turning off your light. What will be the most important? What lines, contours, shadows indicate that this is a stool, and not a bucket or a cactus? Any fantasies? Forward!
Lesson Description:

Try sketching and don't give up, sketching is fun! With the help of lessons and sketching courses, you can learn how to draw beautiful drawings marker. And it is not necessary to pay money for courses, they are now full of them on the Internet, many begin to draw people, especially girls.
Hello friends! In this article, we will define sketching and talk about where this concept came from.
Nowadays, sketching can be considered a separate direction in design and art. However, this was far from the case before. Initially sketches (from English word"sketch" - quick drawing) called sketches made by hand. And important criterion was the speed at which the work was done.
Such sketches were made in a separate notebook allocated for sketches, or even on a piece of paper that turned up under the arm. At the same time, they could be used various materials: pencils, charcoal, watercolor, pastel and so on. As a rule, these were only sketches of future paintings that did not have much value. Thanks to quick sketch by hand, artists could build a composition future picture, pick up basic colors and tools.
However, over time, the situation has changed. So what is sketching these days? Now this is a whole trend in art, which includes both high-speed freehand sketches and detailed illustrations with balanced proportions, on which the designer worked for more than one hour.

Thus, for some, sketching has become an exciting hobby, a way of self-expression and getting away from the routine. And someone went further and began to study academic drawing expanding horizons.
There are even special notebooks for sketches - the so-called sketchbooks, designed both for keeping personal diary with sketches, and to create full-fledged illustrations in the field of design. Previously, sketchbooks often had to be made independently, using special paper for watercolors, drawings or pastels. However, now the market offers a fairly large range of products in this segment.

Currently, there are many areas of sketching. These are sketches in a cafe, and city sketches, and portrait sketching ... Completely different objects can cause inspiration for an artist: both his own working tools, and a cup of coffee with a croissant. Travel sketches are also very popular: people want to capture what they see in long trips, by making just a drawing for a whole spread or a whole collage of sketches with an insert of memorabilia like plane tickets.
However, it should be noted that sketching can act not only as a hobby. Separately, it is worth saying a few words about its application in the field of design. After all, sketches are not just a way to pass the time pleasantly, but for some it is also an element of a working routine. Speaking about the professional use of sketching, we can distinguish such areas as interior design, architecture, fashion sketching, website prototyping, industrial sketching, and so on. Each of these areas has its own characteristics.
Creating professional sketches requires certain knowledge, skills and often takes more than one hour. So, for example, when drawing an interior sketch, a designer must understand the principles of perspective, light and shade modeling, be able to build objects in one or more vanishing points, and also convey on paper various textures such as wood, concrete, marble, glass, metal and so on.
The world of sketching is truly diverse. Everyone is free to choose which direction is closer to him. And we will try to analyze in more detail its individual aspects on the pages of this site.

If you are interested in sketching, you can also check out free lessons or presented in our studio.


