How to draw a sideways face step by step. Draw a girl's face
How to draw a profile - such a question arose in every novice artist. The human face, as you know, is drawn in stages and has geometric proportions. Depending on the gender, the head is drawn in completely different ways.
Profile of a woman
How to draw a woman's profile?
Step 1. First, a square is drawn, which is divided into 4 even inner squares.


Step 3. Line D is made, which must be divided into 4 identical parts and draw a jaw line for the profile along them.

Step 4 The image of the nose line starts inside the square. The beginning is a little above the middle line.


Step 6. The shape of the drawn eye resembles a curved triangle. The line of the mouth is drawn in a similar way. Then you need to connect the nose and upper lip of the woman. Add an eyebrow, an ear.

Step 7. To draw the correct neck - lines E, F are divided in half.

Step 8 Small elements are added.

Step 9. The woman's hairstyle is depicted.
Step 10 Saturate the image with shadows.

Step 11. Having depicted a female profile according to the scheme, you can move on to the real image. Particular attention should be paid to the corners of the nose, lips. Also study the level of inclination of the eyebrows and wings of the nose.
Profile of a man
The shape of the male profile is different. To correctly portray the face, you need to follow the following instructions.
Step 1. A rectangle is drawn. Proportions: width less than height 1/8. The rectangle, as in the previous case, is divided into four identical parts.

Step 2. The line of the nose is - 1/4 - 1/5 of the triangle. Start just above the elevation angle.

Step 3. Proportion: the length of the gap from the chin to the upper lip is equal to the height of the nose line.

Step 4. Lips are depicted.

Step 5. The lines of the triangle of the superciliary arches are drawn outside the drawn rectangle. But the lines that indicate the space from the bottom of the lip to the chin are inside.

Step 6. Proportion: the hairline is equal to the length of the "nose-eyebrow".

Step 7. A triangle of transition from the forehead to the hair is depicted.
Step 8. The beginning of the jaw line from the middle of the rectangle.

Step 9 We depict the chin, outline the shape of the head along with the hairstyle.

Step 10. The eye, as in the previous case, is slightly above the middle line.

Step 11. The eyebrow line is low, just above the eye.
Step 12. You need to add a few short lines: a) above the eye (1); b) lines of nostrils (2); c) lip folds (3).

Step 13. Hair, neck, back lines of the head. Ear - at the level of the nose, protrudes slightly beyond the vertical drawing of the middle of the rectangle.

Step 14. We draw shadows, we hatch.

The person depicted in profile is beautiful and unusual. If the artist is fluent in the technique of drawing, the portraits will come out of indescribable beauty and will please the most demanding client.
Face profile - amazing outlines that can convey the whole essence of an individual, create a sketch of the entire human appearance. But this is a tedious and difficult task. Therefore, in order to draw a face profile, a novice artist needs to know how to do it.
Relationship between and the shape of his head
When interested in how to draw a face in profile, the artist must first determine the type of head shape of the person he has chosen as a nature. Often this fact depends on the race of the individual that the draftsman is going to depict. What is it expressed in?
Facial angle
This angle is determined between the imaginary lines, which are auxiliary in the figure, the horizontal and the line connecting the point directly under the nose with the eyebrow protrusion.
For Caucasoids, this angle is almost straight, for Mongoloids it is sharper, somewhere around 75 degrees. Negroids have the sharpest angle, it approaches 60 degrees.
Neck shape
In Caucasians, the shape of the back of the head is round, almost close to the correct circle. In Mongoloids, it is more elongated, reminiscent of an oval. Among the Negroids, the back of the head in profile has the shape of an even more elongated oval than even among the Mongoloids.
Although race can not always serve as an accurate criterion, these data are quite generalized. Individual features are inherent in each individual person: there may be a European with a significantly sloping forehead, and an Uzbek with a Caucasoid shape of the skull. Negroids are also different: the shape of the head of representatives of one nationality of Negroids can be close to Caucasoid, and for another nationality the shape of the skull, reminiscent of a Mongoloid, will be characteristic.
Master class: “Draw the profile of a child’s face”
In order to depict something correctly, the artist must not only have the skill of drawing, but also carefully study the structure of what he is trying to convey to the viewer. For example, when depicting the profile of a child's face, the draftsman needs to know that the facial angle in children is different from that of an adult. In particular, for a boy, this angle will not be straight, but obtuse, that is, the line connecting the point of the protrusion of the eyebrows with the point under the nose with the horizontal forms

- Before starting to draw child's face in profile (pencil drawing), you need to make auxiliary constructions. First draw a circle.
- Then three horizontal lines are drawn, they do not have to be absolutely parallel to each other, but the angle of inclination upwards is very small. The bottom line is the tangent to the circle, and the top line is the diameter.
- Now you need to build vertical lines: one is the diameter, and the second is the line of the front angle, which is 115 degrees with a vertical diameter (its value depends on the age of the boy and his individual features). The face angle line is tangent to the circle - this is important.
- It is necessary to draw a profile line in such a way that the chin and forehead lie on the line of the facial angle, the ear is located between the upper and middle auxiliary horizontal, the nose is between the middle and lower.
- The eye is depicted approximately at the same level as the ear.
- Auxiliary lines must be removed with an eraser, and circle the main outlines with a pencil. You can finish the hair, put shadows on the face - this already depends on the skill of the artist and the goals set for him.
Girl profile
You need to draw a female face profile in almost the same way as a male one, only it should be more elegant. Auxiliary constructions are made similarly to the constructions for the image of a child's profile: a circle, three horizontal lines, three vertical ones. Moreover, the extreme vertical and upper horizontal are diameters, and the lower horizontal and extreme vertical opposite to the diameter are tangent circles.

It should be noted that the vertical tangent is the face angle line. And if the artist set himself the task of depicting the profile of a girl of European appearance, then this angle should be as close as possible to a straight line. How younger girl, which is drawn, the dumber the facial angle will be.
Nose line in human profile
You can conduct such an experiment: make a person count, and then quickly, without hesitation, give an answer to the question: “Name a part of the face!” 98% of respondents will answer that this is the nose.
This is because this part of the face determines almost the entire image. It is possible to enlarge the eyes with the help of cosmetics, give a different shape to the eyebrows, draw lips, but it is almost impossible to change the nose without the intervention of surgery.
It is no wonder that it is precisely the image of the nose in the profile that the artists attach the most great importance. The nasal line is also associated with nationality person. Physiognomists prove that a nose in particular can tell more about a person's character than he knows about himself.

For example, it gives out a person who is conservative, highly intelligent, often arrogant. And open, sociable and friendly people have short noses.
The pointed tips of the nose indicate a vindictive person, with laziness. The long tip of the nose, hanging over the upper lip, betrays a traitor, a hypocrite and a liar - this is what physiognomists say. However, as in all statements, generalized and approximate results are also given here, and among individuals there are often people who do not correspond to the specified characteristics.
When drawing a face in profile, each artist must be careful, study the structure of the human skull, know the rules for its image - this is what this article is devoted to.
One of the most complex types art is . The physique must be studied in detail in parts. We have already considered some elements. Before you start, be sure to read these few recommendations from professional artists:
- First you need to think about the approximate location of all elements
- For sketching, take a sharpened pencil of medium hardness (I used HB and 2B, write in the comments which pencils you used), which will allow you to sketch thin lines.
- Do not erase the sketch lines until the desired result is clearly visible.
- Keep Proportions
- Note that the face has a pointed shape at the bottom and a more rounded one at the top.
- Practice! The more you train, the better you will learn to convey the necessary emotions and nuances of human facial expressions.
And now let's move on to the lesson.
How to draw a person's face step by step:
Step one. The face of this oval shape. First, make an oval and divide it with lines. The vertical line exactly in the middle crosses it, and the horizontal lines are arranged as follows. The first divides the face just below half, and the second still half from the remaining lower part of the face. We can't give exact measurements because everyone's faces are different. But the task of these lines is to outline (this is vertical), as well as the location of the lips (horizontal bottom line). Keep in mind that these will need to be erased later, so don't press too hard on the paper with the stylus. If you press hard on the paper, it will deform, and the drawing will look like a girl who is preparing for plastic surgery. (Will )  Step two. Make indicative strokes at the place where. And also add lines for , and halfway between the nose and chin. The line that denotes lower lip make wider.
  Step three. Let's move on to drawing. They are located just above the nose. The outer edges of the nose indicate where the inner corners of the eyes will go. Make a sketch as shown in the picture. Note here one more important factor. Human anatomy is arranged so that the distance between the eyes is equal to the size of another eye. This is indicated by the red arrow in the figure. Now let's add the eyebrows. Tip: even if one eyebrow is raised and the eyebrows are the same height, start drawing with inside(points closer to the nose). To get an idea of how high the brows are, add another imaginary eye above the left eye - this should give you more or less the correct height for the brows.
  Step 4 Let's add a mouth. In the previous lesson, we already covered some points. For example, we tried to depict . But there is one more important point, a lot of questions from novice artists about how big the mouth should be? Draw mentally two lines from the inner corners of the eyes down. This will be the approximate size of the company, with a smile it can be a little wider.
  Step 5. Now we erase the auxiliary lines that we made in the first two steps. Let's see what we got. In principle, the sketch is ready. Now it remains to decorate, add shadows.
  Step six. Give the shape of the face more specificity. Pay attention to the cheekbones and the shape of the chin. This woman has a strong chin, but try not to make it too strong or she will turn into a man. Draw black pupils, and add eyelids. requires focus. This is the mirror of the soul.
  Look closely at the animation. You will see in what sequence it is best to do this.
 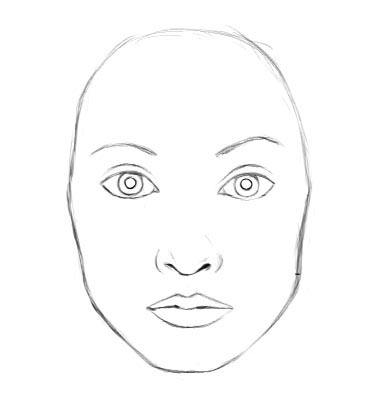 Step last. With a simple pencil add shadows to give the drawing volume and make it more realistic. That's all. More about other parts human body we will cover in the next lessons. Leave also your work, and write comments about how, Only we have such lessons, see for yourself.
Now to get complete picture creation portraits of women Let's talk about how to draw a girl's face in profile.
I present to your attention a simple scheme.
Draw a circle and draw a vertical axis that will bisect the head and outline the width of the face in profile. Now split the ball horizontal lines. Line (1) just above the middle will represent the eyebrow line. The line just below the middle is the line of the eyes. Half the distance from this line to the bottom of the ball will define the bottom line of the nose (2), coinciding with the line of the earlobe. Double distance 1-2 and find point 3 which will define the position of the jaw. Now sketch out the remaining elements of the girl's face in profile, according to the above drawing.
Here are more examples of drawings of a girl in profile: 

Let me tell you a little more about what I think. It seems to me that, in addition to possessing purely technical knowledge, the artist must treat the construction of individual features with great trepidation. human face which give it beauty, originality and individuality. He must feel the beauty in the process of creating a drawing and not allow creativity to sink to the level of an ordinary craft. True artist simply cannot allow his technique to become a routine procedure - a hackneyed guideline that will always draw a human head in the same unchanging manner. It is necessary to constantly experiment with all sorts of options for self-expression. Some images of the human head are the most successful at the sketch level, others require full detailed study and a reliable resemblance to real character. So it might be interesting how contour drawing head, and its tonal study. Only one thing is indisputable: the result of your work should in no case resemble stamped products - the author's drawing cannot look like it "came off" the assembly line. Remember that the most important thing in drawing a head is to work out own style, since this is not only an image technique, but also its own way of thinking.
Good theoretical preparation at the very beginning of training can create the most profitable terms for development creativity artist. However, under no approach is it possible to achieve a reliable image of a human head if there is no correct construction and three-dimensionality is not reproduced. Portrait resemblance is born from an understanding of anatomy human head and own specific analysis. My goal is to demonstrate general principles conducting such an analysis, as well as talk about certain nuances that accompany the construction of a drawing of a female face.
Now we will learn how to draw a girl's face in Photoshop. Based on the images of the wonderful author mannequin-atelier.
Draw the main light and shadows. It is not necessary to detail them at this stage - we will deal with this a little later. Here it is important for us to designate the overall composition and determine the main sources of light. In this picture, we will have several of them.

With lighter and brighter shades, we begin to draw the general texture of the hair. By the way, if you do not know how to draw hair correctly, then I strongly recommend that you study our two lessons on drawing hair - and.

At this stage, we add details to the face, dilute smooth transitions with sharp ones so that the face does not look “soapy”. We also need to lighten the base art layer so that it looks like the hair is being illuminated by a light source behind the girl.

We continue to detail our drawing. We make the strands of hair even clearer, add individual broken hairs. We draw eyes and lips, giving expressiveness to the girl's face, do not forget about the hands. Remember that shadows should fall from each object, if required, so be sure to draw a shadow from the strand framing the girl's face.

We work on the smallest and most imperceptible at first glance details - the crease between the nose and lips, eyelashes, small highlights. If desired, you can work out the texture of the skin. All this will give the picture a coherent and finished look.


