We draw an illustration for a fairy tale - step by step photos. Drawing an illustration for a children's book What does it mean to draw an illustration


Today's article will be devoted to drawing aircraft. We will learn how to draw passenger planes, military and old. We will analyze both complex drawing methods and simple ones.
So get your pencils, eraser and paper ready, let's get started.
The simplest drawings
Let's start with children's drawings. Of course, adults can also draw such drawings, but in this article we want to pay more attention to more complex works.
These examples are very simple and do not require a step-by-step explanation, so watch and draw :) 


passenger plane
Let's start with complex aircraft, namely the complex way of drawing a passenger aircraft. However, we are sure that you will cope with this lesson and learn how to draw cool!
Such aircraft are most often found in everyday life. The beauty of drawing them is that when drawing a landscape, you don't have to go into too much detail on them. He flies far in the sky and is hard to see. But now we will figure out how to depict them close up.
We will work on the drawing in stages. Below is a picture and if something is not clear to you at some stage, you can look at the final result and figure it out.
Stage 1
We will work from the general to the particular, so we outline the contours with a pencil. Choose a pencil that is not too greasy and do not press it very hard, as we will have to erase some lines in the future.
So, we draw a large oval, draw one line along the entire length of the oval (the line of the windows of the aircraft). At the very end, we draw two lines - the tail, and under the large oval we draw a small one - the right engine. 
Stage 2
We have a sketch, now it's time to detail it. We draw the nose and tail of our iron bird and connect them with a line from above. 
Stage 3
We work on the lower part of the tail and depict the engines that are located under the wings. 
Stage 4
We depict the left wing above the engine. We will not depict the right wing, since it is not visible from this angle. 
Stage 5
Our drawing is almost ready, it remains to add small details such as doors, windows and lines on the tail. 
stage 6
Great! We're all set! Color and add a background if desired.

The second example of a passenger aircraft
For greater clarity, we give another example from a slightly different angle.
We outline the main part, tail and wings. 
We are working on the form. 
Orange line of windows. 
Engines and tail. 
Now the wings. 
Portholes. 
And now we take paints or felt-tip pens and paint.
If you feel the strength in yourself, you can add chiaroscuro.
old plane
Let's work on the old versions of the flying birds, namely the cornflower.
Corn groves were used absolutely everywhere, in the war, for rural purposes, for transporting people. Therefore, by painting a machine gun on the nose, you will get a military aircraft, by painting sprayers from below, agricultural.
We will draw the most common. Let's get started!
First, let's sketch the wings and the main body. If you look at it from above, you get a cross. 
Blades, tail and stripe running in front of the wings. Pay attention to this strip, it is rounded, because the body of our maize is rounded. This is very important, so the volume in the drawing is conveyed.
We depict the wheels and connect the upper and lower parts of the wings.
Now we draw the cockpit and proceed to the most important thing, the patterns on the body. Bright cornflowers just look very nice. You can redraw our pattern or come up with your own. 


So, we are all set. Now choose brighter colors and paint.
It turned out not super complicated in execution, but a beautiful drawing :)
Military aircraft
Let's start drawing military equipment, namely fighters. Compared to previous flying birds, this bird bites :) It is much smaller, faster and more maneuverable.
The easiest way to draw fighters, and indeed any technique, is to draw straight from the side. Below are two simple examples. 

Fighter #1
Let's try to draw a more complex drawing than the examples above?
We make a sketch, we should get a sharp figure with two triangles at the end. 
We begin to detail our sketch. We are working on the cockpit and the left wing, the right wing is not visible from this angle. 
We bring to mind all the elements that we have already drawn. 
We paint a strip on the nose of the aircraft. Please note that it must be rounded, so, as we said earlier, we convey the volume of the picture.
Also, we add missiles under the wing, we have a military fighter. 
Well, at the final stage, you can add some numbers or inscriptions and colorize. Also, if you want, you can draw an evil face with teeth on the nose, this is often done on military aircraft.
Fighter #2
Let's briefly analyze the second example, from a different angle and in a different, so to speak, pose.
Let's make a simple sketch. 
We are finalizing the forms of our sketch.
We are working on the front. 
Adding small details. 
And finally, coloring. 
Video lessons
See how to draw an illustration for the fairy tale "Silver Hoof", "Gingerbread Man", "Goat Dereza", "Golden Key" and others. Learn how to draw Santa Claus, Snow Maiden, Baba Yaga.
Thanks to parents, educators, fairy tales become the first books for kids. It will be interesting for the children to learn how to portray the characters of their favorite fairy tale or scene from a magical story.
How to draw an illustration for the fairy tale "Silver Hoof"?

If you're looking for winter tales, Silverhoof is perfect. See how to draw a scene from this interesting Bazhov story.
Draw a house first. Draw two parallel vertical lines that will soon become the corners of the house. At the top, draw two lines that will turn into a roof.

Since the fairy tale "Silver Hoof" is winter, draw a roof and snow on it. Then draw walls, windows. One will be with shutters. Explain to the children why these elements are needed.
To show the presence of snow, draw a wavy line near the bottom of the house.

On the roof of the house there will be a silver hoof goat. First, it must be depicted schematically. To do this, draw three slightly uneven circles. The top one will soon become the head, the second will turn into the front, and the third into the back of the animal. Connect the pieces and then trace around this diagram to define the character more clearly.

Draw the missing details. Erase the guide lines. Remember to depict one of the front hooves so that it is raised. Draw horns, eyes, ears, nose, legs with hooves. Mark several points on the roof of the house. Soon they will turn into gems.

Now you need to draw Christmas trees. After all, the house is in the forest. Draw a few dashes to show how fluffy the snow is. Draw the stars and the moon in the sky.

Here's how to draw the fairy tale "Silver Hoof" with a pencil. If you wish, then color your masterpiece. Draw snowdrifts and snow on fir trees with white, blue, gray paint. Then you will see where the shadow is. Behind one of the snowdrifts, you can draw a girl who is watching such a miracle. Make the house and characters more colorful, and add color to the environment. The painting is complete.
- see also
Illustrations for the fairy tale "Kolobok" in stages
Show your child how to draw the characters in this story.

- First you need to draw a circle in the lower left corner. Inside it draw the eyebrows, eyes, mouth and nose. This is the main character of the fairy tale "Kolobok".
- On the right, draw a hare, but first - its schematic representation. To do this, draw a large oval, which will become the body.
- The head is pear-shaped, as it is in profile. Ears, hind legs, tail are oval. And the front paw consists of two small ovals, so you can see that it is bent.
- The next step is to remove the extra lines. Then put touches on the hare to show what kind of fur coat he has. In some places, leave lighter spots so that you can see, here the shadow falls less.
- Yellow bun. Color it in this way, make the mouth red, and mark the blush with orange. You can draw grass and a landscape of the forest.
- For the next illustration for the fairy tale "Gingerbread Man" you will first need to depict two details. The upper one is pear-shaped with a snub nose, and the lower one is oval.
- Now draw two round ears at the top and four paws below. At the third stage, outline the features of the muzzle, claws, erase the excess. At the end, draw the Bear with a brown pencil, and his tummy and the inside of the ear with yellow.

The next illustration for the fairy tale "Gingerbread Man" is visible in the picture.

The image begins by drawing geometric shapes. This is an oval that will soon become a body. Position it horizontally. A little higher and to the left, draw a slightly elongated circle, which we turn into a muzzle. To do this, draw a sharp nose and two triangular ears.
Then draw the tail and paws. In the third step, designate the breast, tummy, eyes and the tip of the tail. Don't forget to erase the extra lines. Then it remains to paint the fox red, leaving a little white in the area of \u200b\u200bthe chest, abdomen and tip of the tail. And make the bottom of some paws darker.
- See also how to organize
"Grey neck" - illustrations for the fairy tale
Introduce the children to this story. After all, this story awakens the best feelings, brings up kindness in children. Drawing a duck is not difficult, especially since this skill will certainly come in handy for kids in the future. After all, sometimes they will need to portray this bird.

Drawing step by step is easy. First you need to draw a small circle and a figure that looks like a horizontally located drop. Now add a beak to the head, which is shown to the left. The wing almost repeats the shape of the body. Draw an openwork edge on it, as well as on the tail, to show that these are feathers. Then draw the nostrils, eyes, make the feathers on the chest more corrugated.
In the next step, this will allow you to color this part so that you can see it is a gray neck duck. The breast and wing are the same color. Draw the beak and paws in orange, and the head and body of the bird in light brown.
- see also
Illustration for the fairy tale "Goat Dereza"
This skill will also come in handy when you need to draw a mother from a magical story.« Seven goats." As you can see, this character's head is oval and slightly turned down. An elongated triangle with a beveled top emerges from it.
Since the arms are on the chest, at this stage you need to make them oval. On the next one, you will add tassels and outline the sleeves. Draw the bottom and top skirt, apron. Then depict the horns, ears and the base of the headdress. Don't forget to draw the hooves.

- How to do
How to draw a Little Mermaid - step by step illustrations for a fairy tale
This skill will definitely come in handy when you start reading a fairy tale of the same name to your child. To draw the Little Mermaid, use the presented step-by-step photos.

First draw a rounded head. To then maintain symmetry, drawing facial features, draw a vertical strip, but not completely. In this step draw the neck and body up to the waist. On the next one, using the previously drawn line, draw symmetrical eyes, and below - the nose and mouth. Draw the tail. Then remove the extra lines and make the face more expressive. Draw hair and scales on the tail. Show your child how to color a mermaid to make it look so bright.
How to draw a fairy tale "Golden Key"?
This is also easy to do. Draw a round head, in the place where the shoulder will be located - a small circle. Mark the line of the body. This curve will help to create a back and a leg that is slightly back. Draw the second at a short distance.
Draw the cap of this character. To draw Pinocchio further, depict his eye and ear. Draw hair that looks like shavings. Dress this character in shorts and a jacket. Give him the golden key. It remains to add colors, after which the picture is completed.

The second character in the Golden Key fairy tale is Karabas Barabas. To draw it, first draw a round head, just below is a powerful body. We do not draw the neck, then the figure of Karabas Barabas will seem even more massive.
In the abdomen, draw a semicircular line so that you can see where the shirt ends and the trousers begin.
Draw the arms, legs, then the beard and face of this negative character. It remains to decorate it.

Here's how to draw a fairy tale« Golden Key".
How to draw Santa Claus and the Snow Maiden in stages?
On the eve of the New Year holidays, this skill will be very relevant. After all, children at school will probably be given such a task. They can portray Santa Claus and the Snow Maiden to make a postcard and give it to their parents or friends.

- Let's start with Santa Claus. Draw a narrow triangle that will soon turn into his fur coat.
- At the top, instead of a point, draw a semicircle, which will soon become a face. Draw a vertical line in the middle of it so that the facial features are symmetrical. From above, draw the edge of the cap and itself. Draw the collar, sleeves, staff and beard.
- To draw Santa Claus further, in the second step, add facial features to him, mittens, make his beard more fluffy. Mark the places where there will be felt boots, a belt.
- In the third drawing, this character becomes more and more realistic. Show that the edge of the fur coat is fluffy. To do this, you need to make the lines in these places more intermittent. Modify the beard in the same way. It remains to paint the robe of Santa Claus, draw pink cheeks for him. Now we move on to the image of his granddaughter.
- To draw the Snow Maiden, first also draw a triangle, but at the top, instead of an acute angle, draw a neck, head and schematically depict a hat. Since the face of Santa Claus's granddaughter is turned to the left, move the vertical line here as well, which will help make it more symmetrical.
- Then swipe horizontally to understand where the eyes will be located. Draw the nose and mouth below. Depict the girl's hands and clutch. Make this accessory more fluffy, as well as an edge on a fur coat and hat.
- Draw a hairstyle, facial features. To draw the Snow Maiden further, all that remains is to decorate her. Usually this girl flaunts in a fur coat and a blue hat.

How to draw Baba Yaga?
When a child draws an illustration for a fairy tale, it may be necessary to depict this character as well.
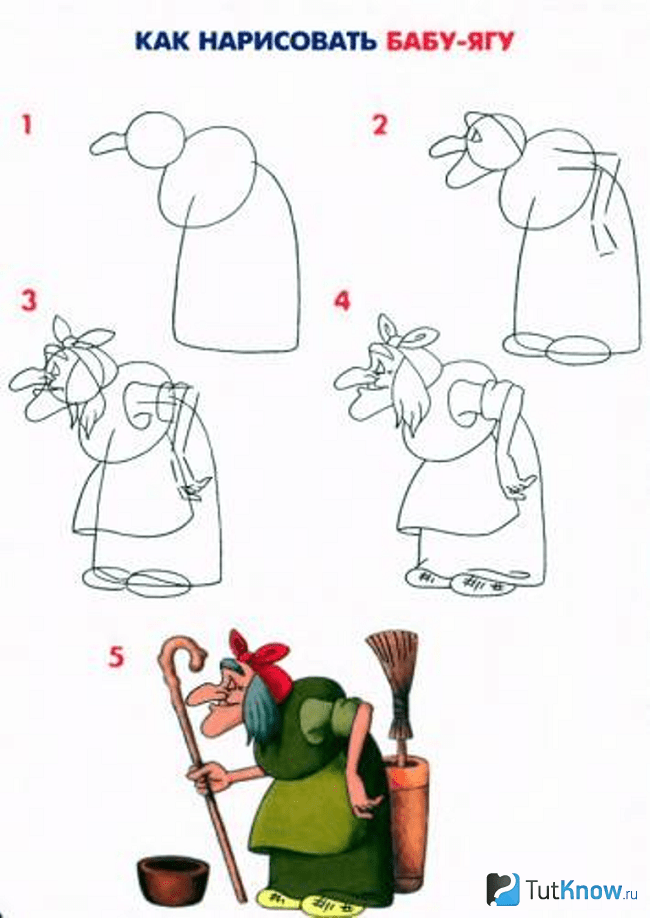
- First, sketch this granny. The circle will become the head, the oval the hunched back. Draw a long skirt just below it, and draw a hooked nose at the top.
- Grandmother's chin is elongated. This will be seen in the second picture. Draw her hand, slippers, eyes, this will need to be done in the second step.
- On the third draw hair, scarf with strings at the top. Mark where the apron and sleeves are. At the next stage, draw the bottom tooth of Babe Yaga, draw a picture on the slippers, mark the fingers of the hand.
- It remains to decorate this character. You can draw a mortar with a broom, as well as a stick and a wooden plate.
How to draw a knight, a princess - step by step illustrations for a fairy tale
- There are magical stories where these characters appear. To draw a fairy tale with their participation, let's start with the image of a girl.
- Draw her round head, thin neck, body and bell-shaped skirt. To depict facial features, first draw auxiliary lines.
- Draw hands and hair. In the next step, add a pattern to the dress. You can steal it with bows. Make your hair lush and your eyes more expressive.
If a child draws, then he can "dress" the princess at his discretion. After all, girls love to invent outfits.

It remains to depict the crown, the fan and you can begin to draw a knight.
Draw two figures that will become his ammunition. The top rectangle is the helmet. The next picture shows that you need to finish the arm and legs. Gradually add more and more new strokes. Draw protection for the knees and elbows. It remains to decorate this hero and rejoice at how quickly you were able to draw a knight.

Animated films are often made based on fairy tales. This also applies to the next hero.
How to draw Winnie the Pooh step by step

Draw an oval. It will repeat the figure of this character. Divide it in half with a horizontal line. At the top draw a semicircle, right below it mark two eyes and a nose. Also draw a characteristic drawing here, with which you will then mark the places around the eyes. Draw ears, paws.
This is how to draw an illustration for this fairy tale in stages with a pencil. You can see what needs to be highlighted with a simple pencil, and which areas should be left white.
It is very interesting to do such creative work. You can add other features to the drawings, draw the heroes of magical stories against the backdrop of a forest, a palace.
See how to draw an illustration for the fairy tale "The Frog Princess".
And if you need to draw the heroes of the fairy tale "Turnip", then watch the second master class.
- Article
I still receive letters with the same constancy: “I want to become an illustrator, where do I start?”, “How can I learn to draw?”, “What if I can’t draw, do I have a chance to become an illustrator?”
At first glance, the questions are rather strange. You don’t know how to draw, you don’t want to start and try, you don’t even want to learn how to draw - which illustrator are you? Why do you need it? But everything is not as simple as it seems at first glance.
Recently, I came across on the net a higher private school in Hamburg, which trains only illustrators in a narrowly focused way. On the very first pages of "About Me" they report that an illustrator is a designer who can draw.
I felt funny because I am a graphic designer and received, without false modesty, a good education. Over the years of training, we were relentlessly told that any designer should be able to draw, handle a camera, understand typography and understand art.
Along with such subjects as typography, we were taught drawing and photography - things that were reflected in my ideas about illustration. I devoted several sections to the influence of photography on illustration in my book "Profession - illustrator. Learning to think creatively" at once.
The saying that an illustrator is a designer who can draw seemed very strange to me. At first, I decided that people simply do not know what modern designers are taught. But then I think I understood what they were about. Namely, that an illustrator is a professional who owns a wide variety of skills and image techniques, which can often already be called rather design ones.
Indeed, the modern illustrator is no longer tied to traditional visual techniques: he does not have to work only with paints or pencils on paper. He doesn't even have to be very good at drawing. It is enough to be able to handle paper and scissors, wood and chisel, fabrics and a sewing machine, to be able to draw only at the level of contours and sketches, and at the same time be no less successful and marketable illustrator than colleagues working in traditional techniques.
Today I would like to draw your attention to the techniques of modern illustrations.
To questions like "Where should a future illustrator start?" I already answered, and below you can follow the link to my answer. And to the question whether someone will become an illustrator if he has not learned to draw traditionally, academically, I will affirmatively say yes. Because if paper and chiaroscuro are not given, you should try yourself in some kind of unconventional technique, if in spite of everything you want to do illustration professionally.
For inspiration, I will show you a beautiful book - a collection of works by illustrators and artists working in non-traditional illustrative techniques.
Book on American Amazon:
German Amazon book: Illustration Play: Craving for the Extraordinary
The cover is made on very beautiful, textured paper with real stickers. 

And this is what the content looks like - a list of presented illustrators. 
Illustrations made with a burner. Author: Genevieve Dionne 

Illustrations-installations from various materials. Author: Stephanie Dotson 

Illustrations-installations made of paper and wood. Author: Aj Fosik 

Illustrations on old packages, envelopes and more. Written by Melvin Galapon 


In this fashion illustration tutorial you will learn how to draw proportional face for fashion sketch V. With this simple and very handy technique, you can greatly improve your skills in drawing faces. Let's dive into the lesson.
Materials used:
- Mechanical Pencil (0.5);
- Ruler;
- Markers of 3 colors (for skin toning).
You can choose both expensive and cheaper sets:
- an expensive version of Copic a set of 12 colors;
- inexpensive option Bianyo (there are sets of 12/24/36 colors);
- budget version of Manga 12 colors.
First you will need to draw a 3x5 cm frame. As for my sketches, I use a 1.5x2.5 cm rectangle. You can draw a larger or smaller head. Just remember that 3x5 is the ratio of width to length.
Look at the image below. I divided the rectangle with two lines: vertically and horizontally. Then I divided the lower part into 3 equal parts. Now follow the instructions in the picture below.

EXERCISE: To practice, draw nine rectangular frames and sketch faces on them. Pick a celebrity and try drawing her face using this technique. Share your best results in the comments below.
FASHION FACE ILLUSTRATION: VIDEO INSTRUCTIONS
In the video below, I used a different frame size but applied the same technique. Therefore, do not pay attention to the sizes and follow the instructions to draw a European, Asian and dark-skinned model.
In this article, I go into more detail about markers and other materials that I use in my fashion illustrations.
In the video below, I explain how to make a very dark skin tone using a cocoa highlighter. However, usually when I paint a dark skinned model, I use "Cinnamon" for the highlights, and "Burnt Sienna" for the shadows. You can watch this video later 😉
Here is a video of a sketch of an Asian type of female face.
Of course, these three models are just examples. You can play with facial features and skin tones and draw an endless number of different faces.
This article shows how the size, shape, and even placement of the eyes can affect the mood and style of your sketch.
This tutorial will help you learn how to draw a 2D illustration using standard Photoshop brushes. We will go through all the stages of creating an illustration, from sketch to background, gradually working through, drawing all the details. All of these techniques can be successfully applied to other illustrations, as well as in the design of other types of projects, such as logos, for example - drawing and painting skills always come in handy. This illustration was created using Photoshop CS3 and Wacom Graphire 3.
1. Sketch
I started with a sketch. Having decided on the forms, I paid attention to the color scheme, highlighting the main and background colors. To do this, try to imagine the picture as accurately as possible. On a blank sheet of Photoshop, I sketched color spots. I do not like to work on a flat canvas - color transitions help to give the right mood to the work. I added a general background fill. You see, a lot of green grass came out - the good old song comes to mind about “... we dream of grass, grass near the house ...” Try to imagine yourself in such a place: that oak tree that you often climbed as a child grows near the house ...

2. Adjusting the brushes
Details will be added with a brush. In this illustration, I'm using only standard Photoshop brushes. If you want, you can download others and work with them. Let's set them up to work. Here are the brushes I will be using:

3. Color choice
Let's define the main colors with which we will work. Here is my palette for this illustration. As usual, I want to draw something brighter. For the background, I chose shades of yellow and blue. The rest of the colors are for the landscape. Save your palette as a separate file. And while you draw, keep it open at hand.

4. Working on objects
I decided to remove the old car that first stood near the house. She doesn't look that good there. The car is an optional object in this illustration. So, I erased the car, and drew my oak - and you, maybe draw another tree. To do this, I applied the main spots of paint with a hard round brush, and then schematically traced the details with the same brush, but smaller. You also need to create a separate layer for the grass and draw it in general terms too. 
5. Meadow
We continue to draw the grass in more detail, using both a small hard brush and smoothing the transitions with a soft one. Subsequently, I can change the grass, add flowers - red, blue or yellow. I'm not thinking about it yet, but the green grass will definitely come in handy in this illustration. 
6. Working with the palette
When choosing a color, I usually do this: 
7. Wood
See how I draw wooden fence boards. In this lesson, I do not draw different types of wood, there are only 2 types - for the door and for the fence. 
8. Canvas size
For high-quality drawing of details, you need a large canvas. If you see that the size you have chosen is clearly not enough, at this stage you can still increase it. For our work, we need a canvas of at least 2000 or 2600 pixels. 
9. Drawing with a small brush
We draw the details with a small brush. Take a look at how I work with roof detailing: 
10 Grass
Now I will create a couple more new layers of grass. I again fill the areas with the main color, and then work out the shadows with its shades. I also draw bunches of blades of grass in separate layers. Why draw grass in different layers? To make it easier to make changes that you later have to make. It is much easier to correct mistakes if the main elements of the work are in separate layers. In addition, somewhere you can save time and effort by duplicating successful layers with blades of grass in different places of work.
You ask how to draw grass? Yes, just take a brush, pick up color - and draw a blade of grass. Then change the color - and draw the next one, just like in my example. And so many times. 
11. Clouds
It's time to start detailing the clouds. In order to draw the cloud, I outlined its shape on a separate layer and then set the layer to overlay to achieve the effect you see in this picture.
My sky consists of two layers: in one - the main colors, and in the other - all the bright places and gaps. Try to achieve harmony by changing the shape of the brush and painting the clouds with different strokes.
We need to set shadows and light. When in doubt, look at cloud shots. Check Google for different types and shapes of clouds. 
12. Clouds
I also want to add bright sun rays and gaps in the clouds, reminiscent of lightning. After going through several options, I settled on the following. While the highlights are still quite rough, but I'll finish with them later. I note that each of the elements is on a separate layer, which allowed me to quickly select them and easily make all the manipulations with shades, brightness, etc. : Ctrl + click on the desired object selects the corresponding layer, and Ctrl + click on the preview of this layer in the layers panel gives us a selection in the form of a layer object. 
13. Adjustments
That's what really matters. By choosing the appropriate shade, you can change the whole atmosphere of the illustration. now I'm changing the colors in Color Balance. Then I'll adjust the brightness and contrast. As you can see, the result is obvious. 
13. Summing up
Merge all layers into one. You can add the finishing touch by applying the Smart Sharpen filter to the resulting image to sharpen details. This helps a lot in bringing out small details like highlights.
It's time to close Photoshop Hope you enjoyed it! 
This lesson has been translated for you by Hatice Bayramoglu. We will be glad if you dare to show off the results)) Success in your studies!
Comments
- DeVeL
December 9, 2011 at 18:20Somehow not quite a lesson. Rather, just making of, and not the most detailed.
- Islam
December 17, 2011 at 06:53 pmBut I think you can still call it a lesson, just follow the logic and everything will be ok.))
- Vladislav
March 25, 2015 at 04:53 pmI am a project manager at the Children and Parents Against Cancer Charitable Foundation. www.deti-lipetska.ru
Our foundation is starting to publish a newspaper where I want to publish my fairy tale. Here is a link to the first three chapters:
lipetskblog.ru/blogs/blog...ste-glava-tretya
The tale is unusual because it is written for children who have fallen under the heavy millstones of a serious and painful illness. Therefore, the tale is a little sad but with a powerful life motivation.
Need illustrations! But since our fund is charitable and the newspaper is free, I ask you to show complicity and offer your own versions of illustrations for free. We, in turn, will definitely indicate this in each printed chapter of the tale. Thank you!..
Send us an email [email protected]
Katya Answer:
November 5, 2018 at 5:52 pmI can try) =)
Leave a reply
:o");" src="http://www..gif" alt=">:o" title=">:o">");" src="http://www..gif" alt="]:->" title="]:->">!}


