How to draw leaves with a pencil step by step. How to draw autumn leaves Complete the leaves
Tree leaves are perhaps the most beautiful of natural decorations. That is why leaves can often be seen in paintings of the most different artists– from beginners to professionals. If you don’t yet know how to draw leaves, this article is for you.
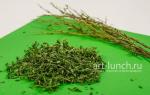
Don't be confused by the fact that there is only one in the photo. Oak Leaf. Having learned to draw it, you can easily draw any other leaves - the main thing is to correctly understand the principle.
How to draw leaves quickly and easily
To begin, draw the outline of the leaf. To do this, approximately in the middle of the paper sheet, draw a vertical strip, slightly curved - this will be the middle. And add a drop-shaped detail to it. This is the basis of the future oak leaf.

Now it's time to turn this sketch into a more detailed drawing. To do this, right inside the drop-shaped part, draw carved wavy lines - like a real oak leaf. In some places you can slightly go beyond the edges of the sketch outlines - or, conversely, not reach them. It doesn't matter. Your drawing should not exactly repeat the photo. After all, no two leaves are exactly alike. You also need to change it a little bottom part leaf - making a stem from a simple line.

There is very little left. Erase any extra pencil lines left over from the sketch using an eraser. And then draw the veins of the leaf. It's very simple - just draw several straight small lines on each side to the vertical line in the middle.

That's all! Now you know, how to draw leaves. Moreover, not only oak ones. In the same way, you can draw leaves of maple, birch and any other tree.

Draw with pleasure!
Hi all!
Today we will talk about how to draw autumn leaves(and not only autumn ones). I will show you diagrams for drawing leaves.
So, how to draw a maple leaf?
I offer several options and several schemes.
To begin with, I would like to draw your attention to the fact that all large veins should go into the stalk.
Moreover, the midrib divides the leaf exactly in half.
Drawing a maple leaf (diagram No. 1)
To draw Maple Leaf, start with an oval. Divide it in half with a vertical line, outlining two halves. Draw each half more clearly. Add cloves along the edges of the leaf and get a maple leaf.
Drawing a maple leaf (diagram No. 2)
Start by displaying the leaf shape. Please note that the maple leaf has five main veins that converge into one “knot”. Mark each vein. Connect them with lines to make the sheet even. Then draw the jagged edges.
Drawing a maple leaf (diagram No. 3)
Let's start with a square. Let's divide it in half, depicting the spine. From the middle of the sheet we draw three veins, as shown in the figure. And then around each vein there are teeth.

Drawing a maple leaf (diagram No. 4)
We start with the veins. We draw them as shown in the figure. We mark the deepest cuts in the sheet with dots. Then we draw the spine. And then – the most protruding parts. Smoothly connect them to the designated points and get a maple leaf.

How to draw an oak leaf?
Very simple. We start with a narrowed oval. In the middle of the oval we draw a vein that goes into the root. Then the edges of the sheet, which look like waves.
Drawing an oak leaf (diagram no. 2)
We start with the shape of the leaf and divide it in half, drawing the vein that goes into the root. We form the borders using a wavy arc. Give it a clear shape and edges.

Today we will learn how to draw leaves. This master class is suitable for everyone, starting with young children.
Each has its own personality - leaves. They come in different shapes, sizes, colors. There are also those that have no leaves at all. These include coniferous trees.
To draw leaves of a simple shape, you will first need to draw a simple sketch. He will determine appearance each leaf, their sizes and small details in them. Of course, each leaf is unique and does not have complete similarities with others from its tree. Therefore, if you cannot accurately depict each leaf, then do not worry. After all, this will bring them even closer to the natural and natural look, as nature intended.
Necessary materials:
- colored pencils of yellow, orange, green, brown tones;
- a simple pencil;
- black marker;
- eraser.
Drawing steps:
1. Draw a large circle on a piece of paper.

2. To it in the lower part of the left side we will add the tip of the sheet in the form of a triangle.

3. But with right side in the upper part we will draw a tail of a leaf to the circle.

4. Add a center line in the middle of the sheet.

5. From the central line, which runs from the tail to the tip of the leaf, draw small veins to the sides. There may be several of them.

6. Thus, on the left side we will draw a small leaf. It will exactly resemble the right leaf, but it will be smaller and look like a mirror image.

7. The outline of each leaf along with small details We begin to outline with a black marker or felt-tip pen.

8. Apply a different color to each leaf. A large leaf will be green and fresh, but a small leaf will be autumnal and already yellowed. Therefore, we use a light green pencil for the right sheet of paper, and a yellow one for the left one.

9. For the brightness and volume of the drawing, we additionally use other shades for each leaf: for a large one - a dark green pencil, and for a small one - an orange tone.

10. Draw the tails of each leaf with a brown pencil. This pencil can also be used additionally to color an autumn leaf.

Now the drawing is ready, and our lesson has come to an end. Having learned to draw leaves on your paper sheet, you can later use your acquired skills to create autumn picture with a landscape or still life.

If you find an error, please highlight a piece of text and click Ctrl+Enter.
Drawing tree leaves with children should begin by studying their shape. The most convenient time for this is summer and especially autumn. After all, in the fall the leaves become so beautiful and colorful. And there is no need to tear them from the trees - the leaf fall itself throws such beauty at our feet!
Compare the leaves of several tree species with your children, find similarities and differences in them.
The shape of the leaf plate is different, of course. And the similarity is that almost all the leaves are symmetrical about their center. This center is the vein into which the cutting passes. From this main vein, smaller veins extend to the left and right, and they are very small. The location of these small veins on the leaves of different breeds trees can vary greatly.
Examine the leaf plate and try, together with the guys, to determine which geometric figure the most similar leaf is an oval (oak, alder), a triangle or “heart” (linden, birch, poplar), a thin and long rectangle (willow), etc.
A tabletop table will help you introduce children to different trees.
We draw this geometric shape, dividing it in the center with the “main” vein, which turns into the stalk.

We will outline the teeth along the edges, like on a leaf. And then we’ll color the leaf.

When painting leaves with paints, it is better to start from the edges. Outline the leaf with paint of a suitable color, and then from the edges to the center smooth lines paint over the entire leaf. The veins should usually be a little lighter. Here's a "tricky" way to highlight these places. Take a clean brush, moisten it with water and brush it over the areas you want to be lighter. Take a paper towel and press gently. The paint will be absorbed into the loose paper, and light spots or stripes will remain on the drawing.
Oak leaves - step-by-step drawing with children
An oak leaf is a rather elongated oval, and closer to the stem it becomes narrower. The edges of the leaf look like waves.

Scheme step by step drawing with children of oak leaves.
Maple leaves - step-by-step drawing with children
The maple leaf is one of the most difficult for children to depict. Even a “simple” geometric figure into which this leaf can be fit presents a certain difficulty. This is a polygon. The thing is that the maple leaf has as many as five “main” veins. They diverge like an open fan from one base point. And around each such vein there is, as it were, its own independent leaf. The edges of the leaves are also not simple - they are sharp teeth, and between them there are smooth lines-depressions.

Scheme of step-by-step drawing of maple leaves with children.
Branch with lilac leaves - step-by-step drawing with children.
Drawing branches is already difficult for children artistic task. Before you begin, carefully examine the branch and ask the children to say how many leaves are on the tree, are they all same size? What about the colors? Please note that the leaves are directed differently relative to the branch. Drawing branches with leaves involves working with perspective in any case, so it is more suitable for children school age. You can draw with preschoolers.

Scheme of step-by-step drawing with children of branches with leaves.
Instructions
Now take a maple leaf in your hand and look at it carefully. Pay attention to the veins, color transitions, and the location of the handle.
Now take colored ones and, looking at your model maple leaf, try to convey all the gentle transitions of color that nature has endowed maple trees with. You probably use several. To create a smooth color transition, rub the transition areas with a piece of paper.
Video on the topic
If you decide to learn how to draw leaves without aids, pay attention to the shape of the maple leaf. As you can see, this is a complex sheet consisting of several simple ones. First, learn to draw one simple leaf and, after you master this technique, the whole leaf will be easy for you.
Sources:
- how to learn to draw trees in 2018
- how to draw a maple leaf with a pencil in 2018
At the leaves maple very beautiful and varied colors, from green to yellow-orange tones. Leaves maple have complex shape. You need to learn how to draw a separate leaf, and then repeat the drawing, copying the technique of drawing leaves. Let's draw a maple leaf.
You will need
- - paper;
- - Maple Leaf;
- - leaves;
- - watercolor paints;
- - palette.
Instructions
First make a print from . Take a leaf blank paper And . Color the front side yellow, orange, and red. Turn the front over onto a clean sheet of paper. maple and press with your hand. The result is a very beautiful, neat print. maple. Watercolor brown paint draw the edges of the sheet and draw veins and lines. Add a stick.
Now proceed to the detailed drawing. Draw an open circle. Spend one, ending it at the base of the open circle. Then place a point from the straight line to where the open circle ends and draw 6 lines (sectors) around the circle to get the shape. Count together with the first line - you should get 7 lines. Place dots in the middle of each sector, not necessarily in a neat order. Now draw the leaf shape from the beginning of the bottom point maple. The top has the shape of a triangle. Connect it to every point in the sector. Draw a straight line from the closed circle.
Now on the edges maple draw detailed, similar, different shaped angles. Start from straight lines (sticks). You can stretch them or narrow them and have different lengths. Then draw on 7 lines different sizes veins, they should start from the bottom in small lines, gradually lengthening to the size of each. Erase the extra lines.
Color the maple. First add yellow to the palette watercolor paint, dilute a little with water and paint over the entire maple. Take orange paint and mix it with yellow. Apply this color without touching the veins and lines from beginning to middle maple. Add more orange to make the color a little darker than the original and paint the remaining edges on top of the beginning. Then use light orange to outline the yellow edges and lines. maple so that there are outlines. Maple is ready.
Video on the topic
Autumn, “the charm of the eyes,” is the most picturesque time of the year, pleasing the eye with a variety of colors. Experienced and not so experienced artists love to depict it in their paintings. And one of the obligatory attributes of the golden autumn is maple trees. leaves.

You will need
- - Maple leaves;
- - paper;
- - pencils;
- - paints.
Instructions
Find the right size maple leaves. They should not be too dry and fragile, as they may simply crumble during the drawing process. In addition, dried ones do not convey all the brightness of autumn colors. You should not collect leaves. You will need to apply them to the paper, it will get wet and yours will be ruined.
Place the maple leaf on the canvas and redraw it, holding it with your free hand so that the leaf does not slip and the drawing does not turn out uneven.
Once the outline of your leaf is ready, carefully examine the veins on your maple leaf - the model. You should not redraw all the interlacing of veins, otherwise it will be difficult for viewers to understand what kind of mesh you have in your drawing. Redraw the largest veins with simple ones.
Now take colored pencils or paints and, looking at a real sheet, try to convey on paper all the colors that you have awarded. Pay special attention to the transitions of colors one into another. Achieve similarity to the original by mixing several colors that blend into each other. If you are coloring a drawing with pencils, rub the transition area with a piece of paper - the color mixing will be smoother and more natural.
Take a couple of maple leaves and paint them. One can be made red-green, and the second – bright orange. Now place them on the paper with the painted side. Remove carefully, being careful not to smear the paint. Your autumn leaf fall is ready!
If you want to be able to maple without using aids, pay attention to its structure. The maple leaf is complex, consisting of repeating elements. As with other complex leaves, you just need to learn one element and duplicate it several times in your drawing.
Video on the topic
Sources:
- pencil drawing of a maple leaf
Leaves of different plants - a popular element of embroidered or woven ornaments. They are constantly found in paintings, and not only in still lifes or landscapes. It’s not very often that you come across paintings without a twig or flower. Before you draw anything large, you need to learn how to draw leaves pencil.

You will need
- - paper;
- - pencil;
- - tree leaves or pictures.
Instructions
Consider several different leaves. Notice that there is a noticeable thick vein running down the center of almost all of them. Compare the shape of the leaves of different plants. Among them there are round, oval, . There are also carved ones. A novice artist may think that the lines are too intricate. This is not entirely true. If you look closely at a maple leaf, you will see that it is also built around a central vein.
Start with a round leaf. For example, let it be an alder leaf. Place the paper in a way that suits you. Draw the central vein. It divides the round leaf exactly in half and does not reach the second edge a little.

Draw a circle, imagining that the vein is an axis of symmetry. It's good that the line is a little uneven. In nature, leaves rarely have perfectly even outlines. You can even make barely noticeable teeth along the edge. Several thinner ones extend from the central vein. Please note that from the side of the petiole, the angle between the main vein and the lateral ones will always be obtuse, and the thin lines themselves are located almost symmetrically.
The maple leaf fits perfectly into the square. Sketch thin pencil this geometric figure or just imagine it. Perpendicular to the bottom side of the imaginary square, draw a central vein.

Pay attention to how the side veins extend from the central vein. The lower ones are located at right angles to it. Their total length is approximately equal to the side of your imaginary square. Between them and the central one there are 2 more lines, approximately at an angle of 45°. Guide them through. Two more thinner and shorter veins extend from the middle of the inclined veins.

Mark the sharp ends of the maple leaf. Of course, you shouldn’t measure the angles using a protractor, but they should be approximately the same and quite sharp.
Draw the outlines. It is most convenient to do this from the point where the central vein connects with the two lower ones perpendicular to it. Please note that the line starting from this point describes a not entirely smooth arc. Its convex part is directed downwards. The line itself is uneven. Strictly observe symmetry in in this case no need.
Learning to Draw Simple Leaves different shapes, try to depict a complex one or even a twig. A compound leaf consists of several identical small ones. The role of the central vein is played by the petiole, to which single leaves are attached. Place this line randomly.

Mark the central veins of the single leaves. They depart from the main line at a slight acute angle. Like a single leaf, the obtuse angle is on the side closest to the branch.

Please note that a compound leaf must have one unpaired leaf. It is the same as the others, but its axis continues the central vein.