Brick lining of the chimney: design options. Technologies for laying a brick furnace and lining a metal firebox
A stove in a sauna is one of the irreplaceable things, and perhaps the most basic. It creates comfort in the steam room and heats the entire room. Metal and cast iron stoves have many advantages. But there is also a significant drawback, although it can be corrected by reading about how to line an iron stove in a bathhouse with bricks. A brick “case” can also be made for chimney pipes in a bathhouse.
Difficulties in working with metal
The metal heats up quickly, and if touched there is a risk of serious burns. Of course, these shortcomings can be eliminated. Nowadays, there are many materials for insulating stoves and chimney pipes in the house and in the bathhouse.
A brick stove in a bathhouse is often lined with tiles or tiles, and other materials are also used. You can simply cover an iron stove in a bathhouse with bricks with your own hands; a similar finish is suitable for chimney pipes. By using brickwork, you can improve the design of the bathhouse itself and increase the heat output of the stove. This article is devoted to the question of how to line a metal stove with bricks in a bathhouse. Moreover, it is possible to line not only an iron stove; lining of pipes is also often practiced.
Preparatory work
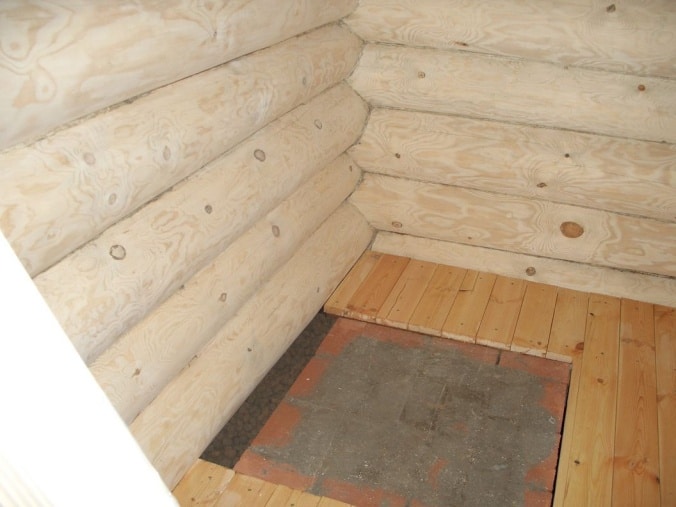
Before you line an iron stove in a bathhouse with bricks, you will need to do some preparatory work. A metal stove lined with brick must have a good foundation for installation. This is a fairly heavy structure and must be securely fastened.
- First, you need to make sure that the base of the installation can support the weight of the brick lining of the stove and chimney pipes. If not, you should make an additional foundation for the stove - columnar or solid. This work can be done with your own hands.
- Carefully mark the surface of the masonry of the stove and chimney pipes. Please note that between the wall and the metal surface there must be distance about 10 cm. A small distance will reduce the service life of the metal surface, but will speed up the heating of the brick. But the big one is the opposite.
- Monitor the fire safety of the stove structure in the bathhouse. If the floor in the bathhouse is made of wood, you should line it with a sheet of metal and put asbestos cardboard on top. If the fastening site consists of non-combustible materials, this should not be done.
Columnar foundation
A little later we will look in detail at how to line a metal stove with bricks in a bathhouse, doing the work with your own hands. For now, we need to make a base that will support the weight of the stove, chimney pipes and brick cladding. If it is not possible to install a strip foundation, it is worth using a columnar structure. This foundation provides for the installation of pillars at the intersection of walls or other points of increased load. It is economical, reliable, does not require additional waterproofing, and is used for installing lightweight structures. Building a columnar foundation with your own hands is quite simple.
This is a system of posts that are installed at the corners of the brickwork.
The procedure for doing the work yourself:
- We mark the corners for installing the stove (there will be posts here).
- Digging holes 50 cm deep.
- We fill up the river sand layer 10 cm, it will be a sand cushion.
- Prepare the solution. We take cement grade 300 and sand in a ratio of 1:2. Stir until sour cream thickens.
- Place 8-10 cm of sand mixed with crushed stone (you can use any stones and broken bricks).
- Let it harden, lay out the brick columns 5-10 cm above floor level, the figure shows a concrete column that is placed on a pillow. Both options are acceptable, only the finished column is concreted in the pit after installation.
- We install the beam of the lower trim. It would be best to lay the channel around the perimeter of the installation and weld the edges together. Or you can use concrete pillars that are laid on the brick.
After installing the columnar foundation with your own hands, you can cover the metal stove with bricks.
Regular foundation
If you are not satisfied with the foundation described earlier, you can make a strip foundation with your own hands.
- Digging a hole depth 25-30 cm.
- We make the solution as described earlier, with the difference that we bring it to a liquid state.
- Place it in a hole and fill it with crushed stone or waste bricks.
- Let's ram it.
- We wait for it to dry and do it laying bricks in 1-2 rows.
Attention: when making any type of foundation with your own hands, we use a building level in our work. After completing the work, parallelism to the earth's axis should be achieved perfectly.
After the preparatory work on installing the foundation, you should consider how to line the stove with bricks in the bathhouse.
Chimney sealing
Before starting work, you need to make sure that the chimney is completely sealed. To seal leaks, a special sealant is required. High temperature sealant can be purchased at a hardware store.
It is more convenient to buy sealant in a tube; it is applied using a special gun. It is less convenient to use sealant packaged in tubes. You can also find a two-component sealant; its components are mixed before application. A two-component sealant must be prepared with precise dosage; in addition, such a sealant has a limited shelf life. Therefore, to perform independent work, it is more convenient to use a one-component sealant. To seal chimney cracks, it is recommended to use a heat-resistant sealant that can withstand temperatures up to 1500 degrees.
We produce furnace lining
Let's start lining the stove and chimney pipes with bricks. But before this, you need to make a clay solution; it is most suitable for this type of masonry. The durability of the structure will depend on the quality of its preparation. It should not be liquid, it should be made in plastic form. Masonry using such a solution can withstand up to 1000*. It is divided into two types: skinny and fat. In our case, we need a skinny one.
Making the solution correctly
To prepare such a solution, experts advise using fine mountain sand. To begin with, we pass the sand through a sieve with a mesh size of about 1.5 mm, clearing it of debris and small stones. This material allows you to make a fairly thin seam. Preparation:
- Take the clay and pour it into a solution container for 3 days. It “sours” and gains elasticity.
- Add water and mix the mixture until smooth. During the kneading process, we break up the lumps using a tamper. We go through the entire mixture with our hands, remove unnecessary stones and knead large pieces. The resulting mixture should fall freely from the surface of the trowel or shovel. Try placing a layer of mortar on the brick and then lifting it after 5 minutes. If the bottom brick does not detach from the masonry, this indicates that the mixture was prepared correctly. If a wooden surface (the handle of a shovel) is placed in the correct solution, it will remain covered with a slight layer of solution. A very greasy solution will leave a thin film, a thin film will come off without leaving a trace.
How to properly brick a stove
When we have prepared the required solution, we can line the stove with bricks, and also line the chimney pipes.
- Do not forget, the stove should be located at a distance of at least 30 cm from the walls of the bathhouse. This is what the norms require fire safety.
Attention: this distance can be reduced by gluing asbestos cardboard sheets to surfaces made of wood. Fire safety regulations allow this.
- Make masonry only with high-quality bricks. Do not use hollow, slotted or sand-lime bricks for lining the stove and chimney pipes. This type of product has low heating capacity; you will not be able to create the desired temperature in the bathhouse. You can use high-quality old brick, after cleaning it.
- It is advisable to select material with the same height.
- The stove is lined, the thickness of the masonry is half a brick, no more. This best option for warming up.
- When working on the first row, do not forget to leave two half-brick holes. They will provide free air ventilation and additionally increase the heating of the room.
- We start laying from the corner. We lay the first row with a whole brick. To start the second we use three quarters. So we change all the subsequent ones. This is required for high-quality fastening of the masonry.
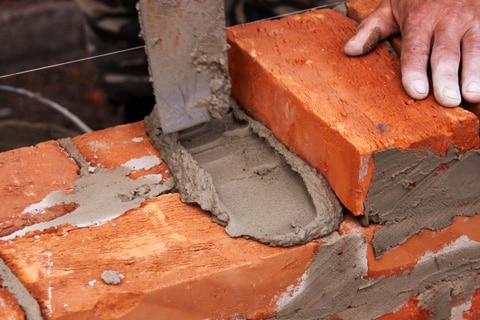
- Wet the brick before working. A layer of mortar is applied to the masonry site. Laying a brick. Using a trowel and hands, we seat it. The seams must be filled completely. Excess solution is removed immediately.
- When working, be sure to use a plumb line to avoid bending corners.
- Check the parallelism of each row with a building level.
- You need to start laying out the next row after the first one is completely completed.
- All additional elements for the stove and chimney pipes are installed immediately during laying.
- You should also leave a half-brick hole in front of the firebox door; it will be needed for servicing the stove.
Attention: to ensure the reliability of the masonry, corner cuttings should be placed along the edges of the holes; they will provide additional strength to the walls of the masonry and will be hidden by a seam.
- We lay out the walls to the level of the heater. Maintain a gap between the masonry and the stove; good ventilation must be ensured. If this is not possible, leave additional holes as in the first row.
We figured out how to line an iron stove with bricks. If desired, it is possible to decorate the structure with tiles or tiles, add decorative patterns, simply plaster or
For the construction of modern chimneys, the most various materials- from fireclay and ceramics to stainless steel, however, structures made of brick in the old fashioned way are considered one of the most reliable and durable. In addition, a classic brick chimney will perfectly complement the appearance of any building.
For laying the chimney, choose a solid red brick with smooth side faces and edges. When lightly tapped with a hammer, high-quality brick produces a characteristic ringing metallic sound. As for the masonry mixture, for the construction of a chimney it is better to use not a lime-cement mortar, but a clay-sand mortar.- The brick chimney structure consists of the following sections:
- The head pipe is the part of the chimney that runs from the stove to the first cut. A special smoke valve is installed here, thanks to which you can control and regulate the draft.
- Fluffing (cutting) is an expanded section of the smoke exhaust duct that protects the ceiling from fire.
- The riser is the flat attic part of the pipe that reaches the level of the roof.
- Otter is the second extended section of the chimney, designed to protect the structure from precipitation.
- The neck is the outdoor, flat part of the pipe located above the otter.
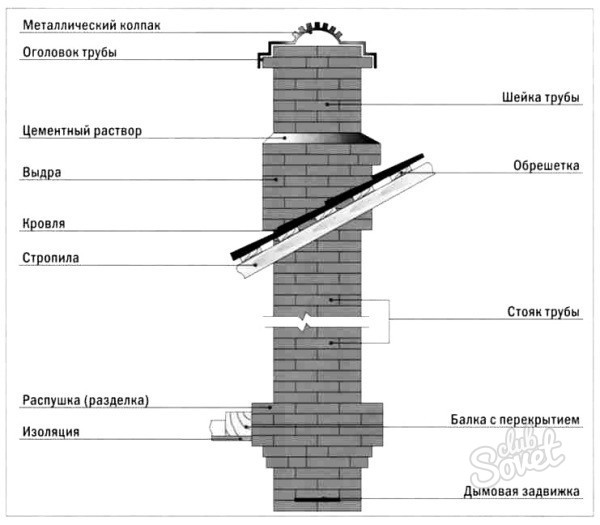
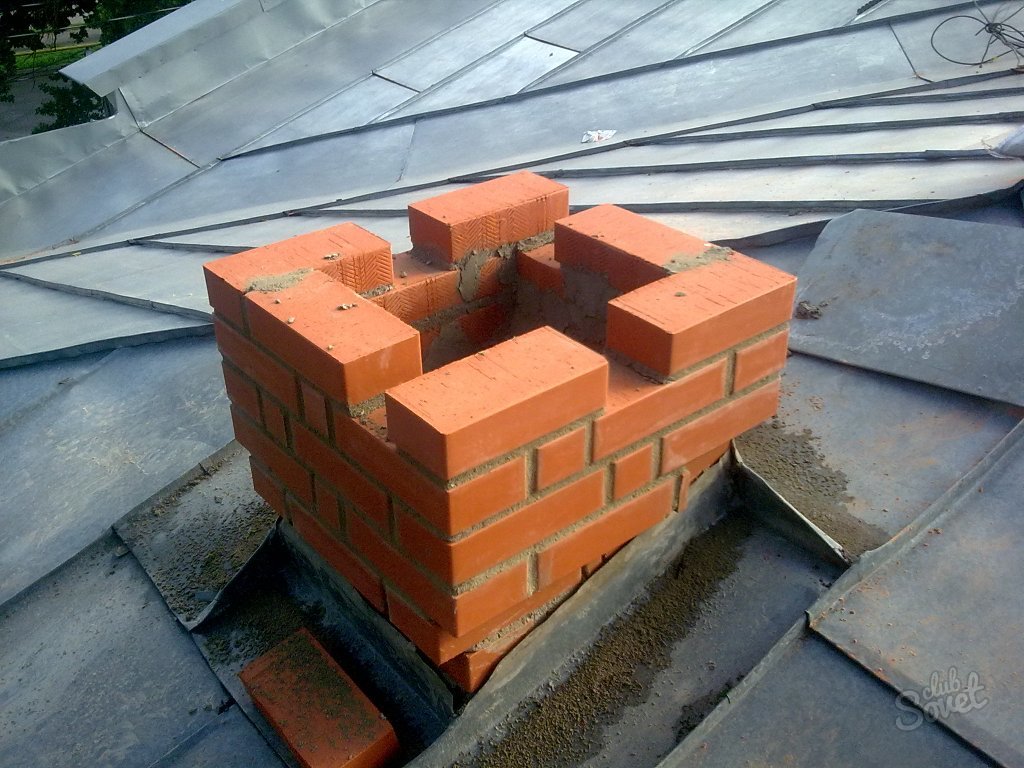
Installation of a chimney is conventionally divided into several stages. The first stage of work is the construction of the lower part. First of all, the superstructure pipe is constructed. Laying is carried out using the ligation method - this means that the bricks are laid so that they overlap the vertical seams between the bricks of the subsequent and previous rows. The optimal dimensions of the internal chimney channel, the so-called well, are 14x27 cm.
![]()
Important nuance! Please note that throughout the entire construction, the internal channel of the chimney pipe must maintain its original dimensions. An erroneous expansion or narrowing of the internal cavity can cause a violation of draft and smoke in the room!
Do not forget that even a new brick chimney needs timely cleaning and regular maintenance.
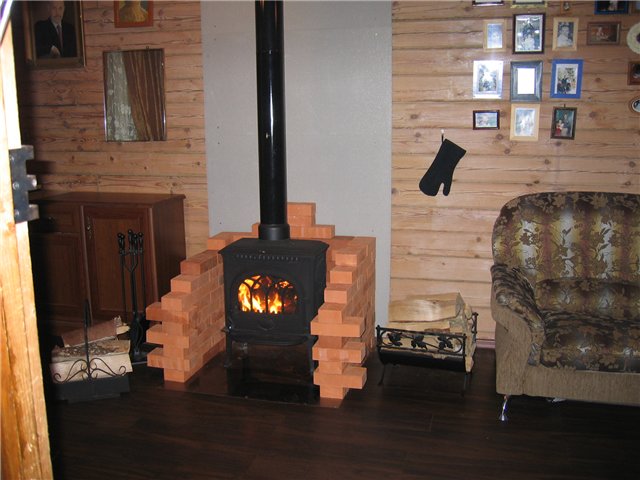
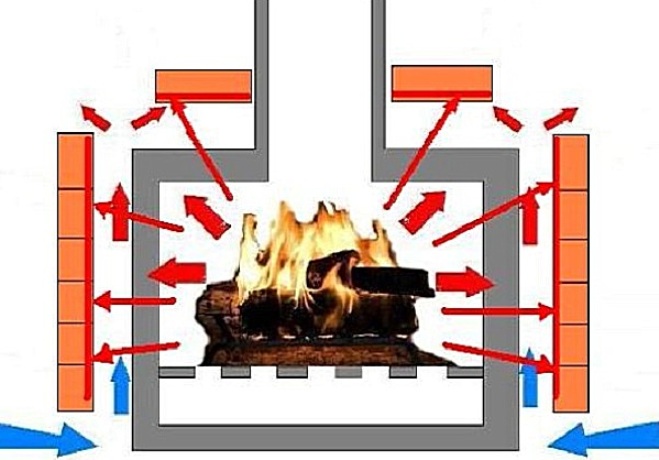
Now on sale big choice metal furnaces of various designs and price categories. Metal stoves are used for heating private houses, temporary structures, at construction sites for heating workers, security guards and other purposes. The use of metal stoves in home baths and saunas is also increasingly gaining popularity, although in this case a brick stove is considered more traditional, but it cannot always be used for a number of reasons. The main advantages of metal stoves are their compactness (since not every room can install a brick oven), ease of installation, fast heating. The main disadvantage is that after stopping the fire, it cools down quite quickly. This drawback can be eliminated by lining a metal stove with bricks. This will greatly extend the heat transfer without increasing the size of the stove too much. If you made a metal stove yourself, then by lining such a stove with brick, you will give your stove a decorative look.
Having basic construction skills, you will be able to line an iron stove with bricks yourself; for this you will need the following materials and tools.
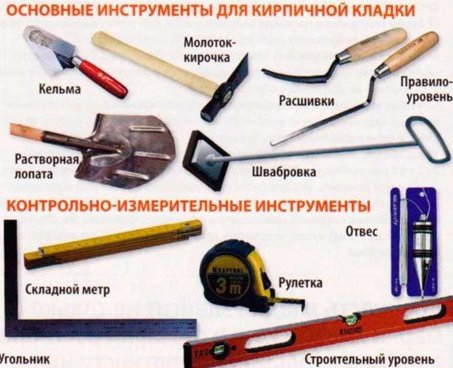
Required Tools
- Master OK
- hammer with pick
— jointing
- building level or cord - mooring
- rule
- container for mixing the solution
- an arrangement consisting of a slat (maintains the evenness of the masonry), a holder for the slat and a wedge.
Necessary materials
— Fire brick. It can be smooth or with a relief pattern, it must be High Quality, without voids. The amount of brick depends on the size of the kiln and the additional area around it. You also need to take into account the base for the stove; it will be better if the base is laid out in two rows. If you plan to line the chimney pipe with bricks, take into account its dimensions. Don't forget that you need to have 5...10% spare bricks. For achievement best result, you need to lay bricks on the wide side, and not on the end of the brick. Roughly, the number of bricks (pieces) is calculated as the ratio of the area of the surface to be laid to the side area of one brick, plus bricks for the base.

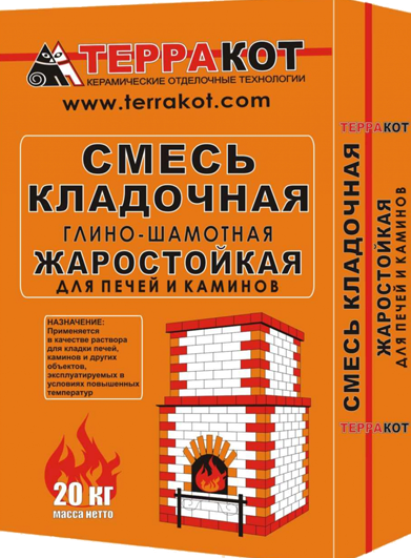
— Mortar for masonry. The result largely depends on the quality of the solution. You can prepare the solution yourself, or you can buy a ready-made mixture. You can purchase the mixture at hardware store, it is sold dry, you just need to dilute it with water in accordance with the instructions. If you decide to prepare the solution yourself. To do this, take clay dug up from a depth of 0.5 m, soak it overnight, and then dilute it with clean sand in a 1:1 ratio. The resulting solution needs to be checked: let it dry and then evaluate the quality of the dried clay, it should be homogeneous, without cracks. As a rule, clay mortar is used when building a furnace; in our case, it is better to use a ready-made mixture.
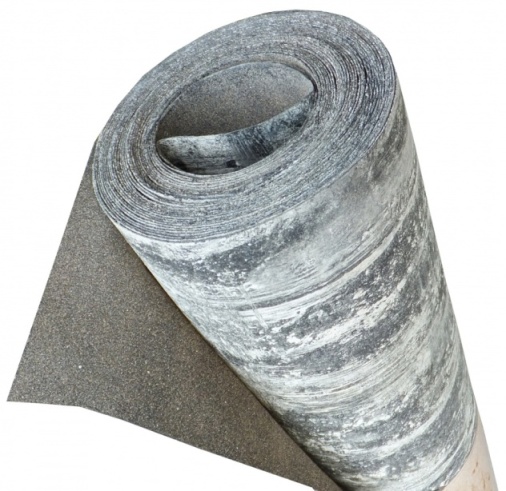
— Waterproofing material. As a rule, roofing felt is used for waterproofing. Its size should be 10...15 cm larger than the base of the stove.
— Metal corners or strips for jumpers, if provided for by the design (if the design provides for complete closure of the furnace, including the upper part).
Preparatory process
As a rule, the correct installation of a metal stove is carried out on a rigid, non-combustible base. If it is installed in violation of fire safety standards, then such a site must be prepared in the following sequence.
1. If a metal furnace has already been installed, then it must be dismantled while the site is being constructed.
2. If the floor is concrete and quite hard, then the installation site of the stove must be waterproofed. For this, a sheet of roofing material is suitable, the size of which should be 10...15 cm wider than the area of the base.
3. The base for the stove is made of a continuous row of bricks laid out in one or two rows, checking the horizontality with a building level.
4. Leave the base until the mortar has completely hardened (indicated in the instructions for using the masonry mixture).
5. Place the stove on the base and connect it to the chimney.
6. Install 4 bars vertically at the corners of the base, checking their verticality with a level; we will be guided by verticality during laying.
7. If the floor is wooden or not strong enough, then you need to remove part of it and install a strip foundation, which should be 5...10 cm larger than the size of the future stove. To do this, you need to dig a pit 30...50 cm deep around the perimeter of the future walls of the stove. A layer of sand and a layer of crushed stone are poured into the bottom of the pit and thoroughly compacted. The thickness of each layer is 7...10 cm. Then you need to install wooden formwork and a frame made of reinforcement and fill it with concrete mortar (a solution of cement and sand in a ratio of 1:3). After the concrete has hardened, a layer of soil 12–15 cm thick must be removed from the site and crushed stone must be poured into the free space and reinforcement mesh must be laid. Fill with concrete solution, 5...7 cm thick, level and leave until completely hardened. The frozen foundation must be waterproofed with roofing felt (see above) and a brick base must be laid in in this case One layer of brick is enough. Such a foundation is only necessary if the walls of the stove will be laid out to the ceiling and the chimney will also be made of brick. And if the brickwork is only the height of the stove, then the construction of such a foundation is not necessary.
Safety precautions when installing the stove
When installing any stove, you must follow safety precautions:
- if the stove is installed in a wooden house, then the stove must be separated with heat-resistant materials, for example, asbestos board, isover or ceramic tiles and other fire-resistant materials;
— the distance between the stove, chimney pipe and wall must be at least 20 cm;
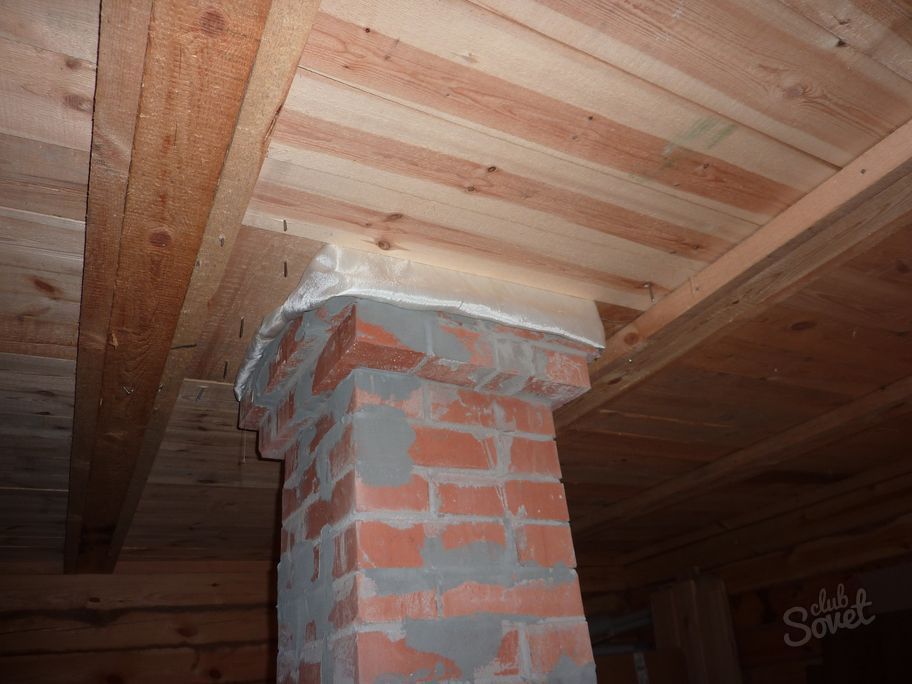
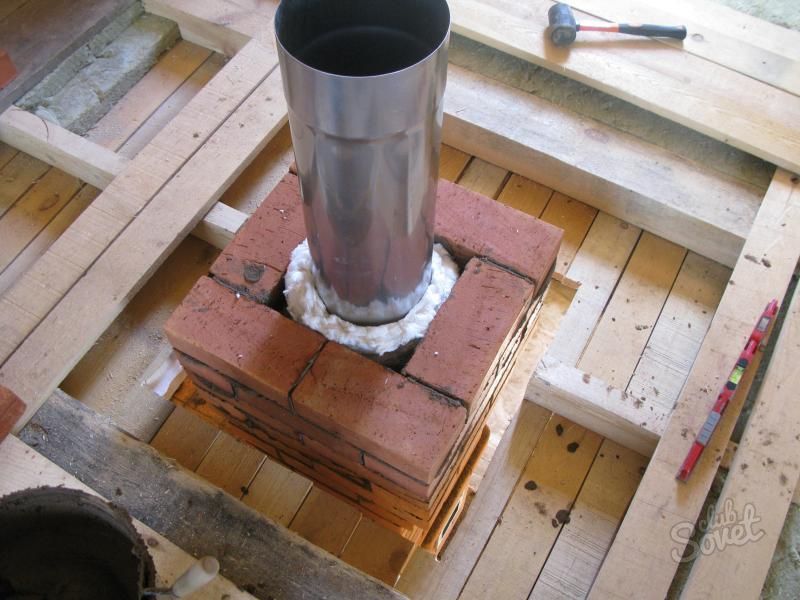
— at the point of contact between the chimney pipe and the ceiling, it is necessary to provide gaskets made of heat-resistant materials.
The process of lining an iron stove with bricks
![]()
1. Before starting laying, you need to soak the brick in cold water for 30 minutes, this will improve the quality of the masonry and make it more durable.
3. It is recommended to cover the stove with half a brick. In this case, the heat will be retained longer than when laying in a “quarter brick” (when the brick is installed on a narrow edge), although the consumption of bricks is greater. In addition, “quarter brick” masonry is more complex and requires some experience and more careful control over the verticality and horizontality of the masonry.
4. Between the bars installed strictly vertically, you need to stretch a horizontal cord, which during the laying process will move higher and is a guideline for the horizontality of the masonry.
5. The first layer of masonry must be laid out especially carefully, since the direction of the entire wall depends on it. Having laid out the first row, you need to remove excess mortar; if necessary, the bricks are leveled with a rubber hammer.
6. You cannot start laying several rows at the same time.
7. The width of vertical seams should be 5...7 mm, and horizontal 8...10 mm.
8. In each row or every other row, it is necessary to provide openings the size of half a brick for ventilation and active heat flow into the room; sometimes the masonry is made “lattice” with big amount holes.
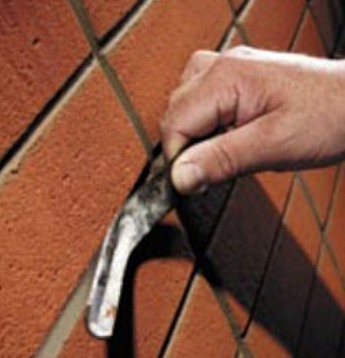
9. While the mortar remains wet and plastic, having laid out several rows, you need to “join” the seams, and immediately remove the excess mortar, and wipe its remains with a damp cloth.
10. When lining the stove doors, you need to check that the brickwork does not interfere with opening them. If necessary, you need to use an iron strip if the doors are large enough.
11. The masonry can be finished at the height of the stove, or you can cover the chimney with brickwork. In the latter case, it is necessary to provide ventilation holes around the chimney.
12. The finished masonry should dry well, preferably naturally without the use of heating devices, in this case the risk of cracking is reduced.
Brick oven in country house, in the country or in a private bathhouse - it’s always comfort, warmth and rustic aesthetics with romantic evenings by the hot fire. Such a stove will heat you even in places far from civilization with its gas pipelines and electrical communications, and will allow you to save a lot on utility bills. If it is impossible to build a brick building, even lining a metal stove with brick will give an excellent effect. Its environmentally friendly warmth will add health and longevity, just like our grandfathers and great-grandfathers did in ancient times.
Which is better - brick or brick lined?
Before installing a brick stove in a house or bathhouse, the question arises, what is the best way to do this - build it out of brick right away or cover an existing metal one? Each of these options has both its pros and cons:
- Laying a brick stove provides a longer cooling period after the fire goes out and a long service life - the brick does not burn out the way that can happen with metal over time. But its design requires participation in the construction experienced craftsman, as well as more complex chimneys.
- If you have a metal stove, especially a steel one, which cools much faster than a cast iron one, you can line it with bricks to increase the heat capacity and maintain air humidity that is comfortable for breathing. But as experience shows, such a move is beneficial for a very small room (bathhouse) and in the case of a long stay in it - longer than one day. Such a fireplace will take both a long time to cool down and a long time to heat up, not immediately warming up the cold house, and for a visit to the dacha in winter for just one day, such inertia is useless.
Russian stove
INTERESTING! Using a ready-made metal stove with a brick lining will save fuel due to long-term temperature retention and the secondary combustion function that modern fireboxes are equipped with.

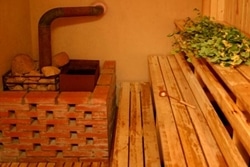
Brick cladding in the steam room
Preparatory work
Regardless of which method of constructing the furnace you choose - building from brick or covering a metal device with brick, you will first need to make preparations: properly arrange the installation site and select the materials necessary for the work.
Preparing the site
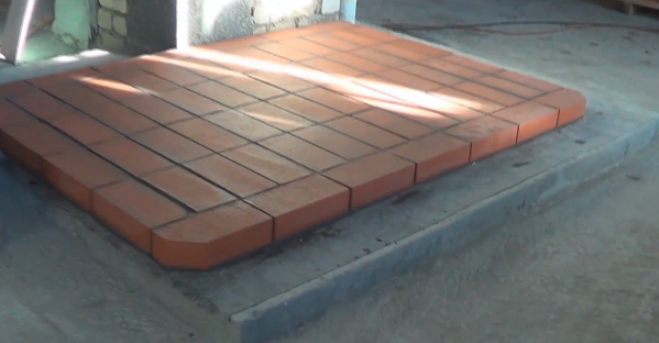
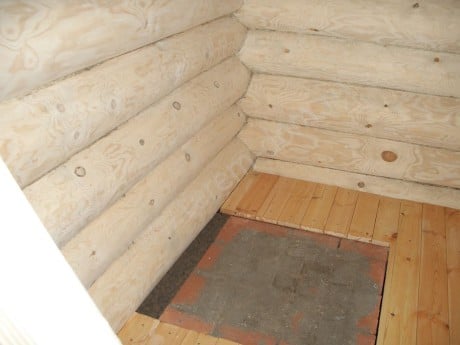
A brick structure usually has quite an impressive weight, so any technology for laying a brick oven necessarily includes the construction of a stone or brick foundation. This is also done to ensure better fire safety. The dimensions of the foundation should usually exceed the length and width of the future masonry by 10-15 cm.
You can build a suitable foundation in one of the following ways:
- A solid foundation implies the construction of a pedestal on which the rest of the structure will be supported. This work is carried out in several stages:
- Construction of a stone “pillow” in the ground - the base of the foundation. To do this, a hole up to 25–30 cm deep is dug in the ground, which is filled with crushed stone and waste bricks, and then filled with a solution prepared from grade 300 cement mixed with sand in a 1:2 ratio.
- The cabinet itself is laid on top of a well-dried base in 2 layers of brick.
- A columnar foundation means the construction of several columns made of brick or the installation of ready-made ones made of concrete:
- After marking the places where the posts will stand, you need to dig holes for them 40-50 cm deep.
- The holes are first filled with river sand to about ¼ of the depth, and then, similarly to what was described above, they are filled with crushed stone below ground level at about 8-10 cm and filled with cement mortar.
- Brick columns are laid out while constantly checking their position with the level. When installing concrete pillars, their bases are concreted.
- A concrete slab, channel or brick platform is installed on top when there are no empty spaces between the pillars.
IMPORTANT! When building a cabinet or columns for the base of the stove, do not forget about waterproofing both the “bottom” of the structure, which directly touches the ground, and the places where the main brickwork begins.
Selection of materials
To lay a brick stove, use simple or special stove bricks, which can be:
- Ceramic;
- Silicate;
- Full-bodied clay;
- Fireproof (or “fireclay”).
Ceramic and silicate options are usually used for cladding, and for lining a metal stove with bricks, building a firebox, chimneys and pipes - solid clay, which heats up well, can withstand temperature changes from low to very high, is strong and moisture-resistant.
ATTENTION! If you are going to use coal or gas as fuel, the combustion temperature of which is slightly higher than that of firewood, then it is better to use refractory bricks for the firebox. It is created from fireproof fireclay clay and can withstand up to 1500-1800 0 C.
You can also use one that has already been used. In this case, it must be especially carefully cleaned of the remnants of the old solution.
How to cover a metal stove
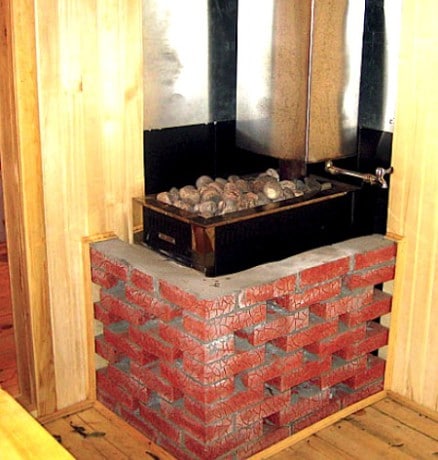
Lining the stove with bricks begins with marking the perimeter of the future structure. In this case, a distance of 10 cm between the metal base and the laid out wall is considered optimal. If it is larger, then most of the heat will go to heating this distance, and the wall will warm up more slowly. A smaller gap shortens the life of the metal.
Solution
The masonry mortar can be prepared in one of the following types:
- From cement mixed with fireclay clay,
- Made from cement mixed with porcelain tile adhesive,
- Made of clay and sand.
Old masters prefer clay mortar. There are a great many types of clay in nature. Each of them has its own properties, so the proportions of the composition will be different in each case. If there is too much clay, the dried composition will crack, and if there is too little, it will not set well. For the sample, you can prepare a solution in which sand and clay are almost equal and dry it. The results of this experiment will indicate what changes need to be made.
INTERESTING! Modern technologies provide the opportunity to use the simplest solution - a ready-made “kiln mixture” prepared on the basis of red clay.
Installation
The work is carried out taking into account following rules:
- It is better to soak the brick in water in advance, this will increase the adhesion of its surfaces to the solution substance.
- The masonry is made half a brick thick, starting from the corner of the structure. We start the first and each odd row with a whole, each even row with ¾.
- We completely fill the seams with mortar, and remove the excess immediately.
- We check the parallelism of the rows with a level, and the verticality of the walls and corners with a plumb line.
- It is worth leaving holes here and there to ventilate warm air and warm up the room faster.
- Be sure to leave an opening in front of the firebox door for maintenance.
- Masonry stops at the level of the heater.
Do-it-yourself stove laying
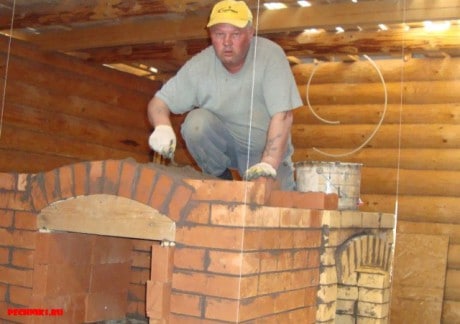
Laying a brick stove can be a real art in the presence of an experienced stove maker who has not only the skills of proper laying, but also the ability to design brick products.
Design
The design of the stove can be different and depends on your wishes and its purpose:
- “Dutch” can be used purely for heating. It takes up little space and is equipped with a ducted, ductless or combined chimney.
- In the “Russian” you can cook food and bake pies, as it is equipped with a stove and oven. It also has a bench located above the firebox and a channel chimney system.
- The “Swedish” with a couch or fireplace has a stove, an oven, a section for drying mushrooms and fruits, as well as a complex chimney system.
Correct masonry
The mixing of the mortar and the laying itself are carried out similarly to the case of lining a metal firebox. Here, for greater strength and accuracy of the structure, you can use metal corners and so-called “studs” with a diameter of 16 mm. With their help, both the internal frame and the entire external finish are formed.
ADVICE! When the masonry width is no more than 1 m, to create perfectly even seams, you can use iron rods with square section(pre-lubricated with machine oil), on top of which the solution is placed and new row. Then the rods are carefully pulled out without further settling of the laid row.
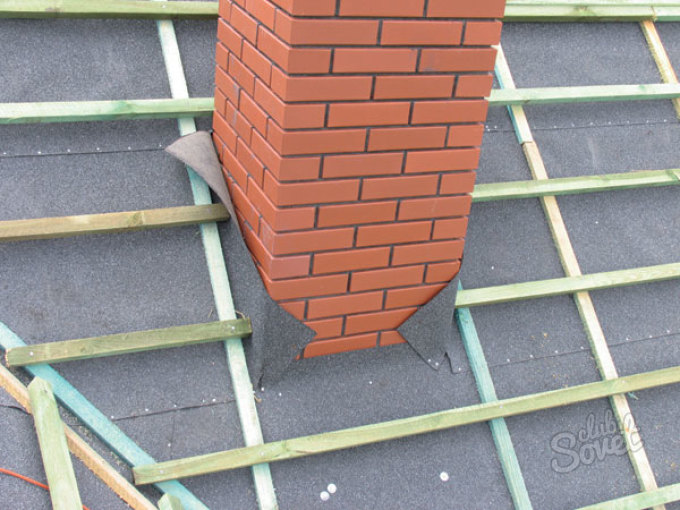
When installing the pipe, you should not forget that the distance from it to the elements of the rafter system of the house should be at least 15 cm.
Design
Maximum creativity It will have to be applied by those who lay brick stoves with a claim to architecture and style. Here are the possible:
- Arches,
- Columns,
- Curly elements and much more.
To lay out the arches, you can use templates cut out from plasterboard according to pre-prepared drawings. Shaped brick elements can be cut using a grinder.
Desire, imagination and a little knowledge will help you create a hot miracle in your home - a brick stove according to ancient designs, decorated in modern style. All that remains is to insulate the house itself - and you will be provided with warmth and comfort in any weather.
Video: lining a metal stove with bricks