Salt dough crafts for the new year (58 ideas). DIY Christmas decorations from salt dough in kindergarten
Made with a child. Colored and shiny, a little uneven and this makes it even more touching and memorable.
On New Year's Eve, every adult, not to mention children, wakes up with a desire to create cute little things that bring a feeling of comfort and warmth to the house ... And although the shops are full of factory-made toys and New Year's accessories, I want to do something of my own, unique, inimitable.
Elegant toys for the New Year's green beauty can be made from paper, fabric, thread. And you can use salt dough - another interesting and quite affordable material. How to make for the New Year? This is what will be discussed now.
How to make salt dough?
First, you need to prepare the right salt dough. To do this, prepare in advance one measure of fine salt and two measures of flour. Dissolve the salt in warm or hot water, and when it has cooled, gradually pour the salt solution into the flour, stirring constantly. You can add a little sunflower oil to the dough - it will make the mass more elastic and less sticky. However, it is more difficult to mold something from dough with the addition of butter, since its pieces do not stick together well. This option is good for simple single-layer crafts.
The dough should turn out quite steep, holding its shape. Let it stand for the gluten to disperse, and get to work. Salt dough Christmas decorations are easy to make with cookie cutters.
DIY Christmas crafts
Figures made in this way are very reminiscent of traditional gingerbread and create a feeling of home comfort. You can make cute hearts, Christmas trees and stars: just roll the dough into a thin (about 1 cm) sheet and invite your child to make figures out of it.

If there are no ready-made molds, you can cut them out of cans from drinks, bending the edges inward so that the baby does not get hurt. Even simple round pendants that can be made using a glass, a glass or a small jar will look beautiful. Don't forget to make a hole for a loop in each figure.


Lay out the cut out figures on the grid and let them dry well; if drying on a dense, flat surface, periodically turn the crafts over. You can use the oven by carefully drying the workpieces at a low temperature.

We paint the dried figures with bright colors, cover with sparkles.

On top of the crafts, you can cover with a transparent varnish - this will give them a beautiful gloss.

We thread a ribbon or a thick thread - and the decoration is ready.

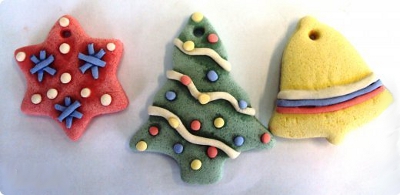
Salt dough Christmas tree.

Salt dough heart.

You can paint Christmas tree decorations from dough with paints.


From the imprint of a child's hand, a charming Santa Claus is obtained. The craft is made in the same technique. Let the piece dry well.

We apply a layer of white paint.

We paint the craft and cover it with varnish. Santa Claus is ready!

You can make a wonderful New Year's decoration "pig with wings" from salt dough.

Do-it-yourself New Year's crafts from salt dough made in this way for children will become especially expensive, and the children will be happy to join the process of decorating the main symbol of the New Year.
DIY Christmas crafts from salt dough (video)
Salt dough Christmas decorations (sweet and pink):
Salt dough is a popular and affordable material for children's creativity and DIY crafts. Just like plasticine, you can sculpt products of any level of complexity from salt dough, so children of any age can make crafts from salt dough. The recipe for making salt dough for modeling is very simple, the ingredients for it can be found in every home.
Salt dough recipe. How to make salt dough
You will need:
Flour - 2 cups
- salt - 1 cup
- water - 250 gr.
Wheat flour is needed, the most common, without baking powder, dyes and other additives. Salt - "Extra". Water - ordinary cold.
How to make salt dough: mix flour and salt, add water, knead the dough. The degree of readiness of salt dough can only be determined by hand. If the dough crumbles, add water. If, on the contrary, it stretches too well and sticks to your hands, then there is a lot of water, and you need to add a little flour. Roll up the ball, make a few indentations in it with your finger. If the dough does not spread and holds its shape, then it is ready. In the process of kneading, it is recommended to add vegetable oil. Now the dough will not stick to your hands, dry out quickly and become covered with a crust during work. However, it should be remembered that the best is the enemy of the good! If there is a lot of oil, the dough will get dirty, and the final drying may take a very long time. For our recipe, a couple of tablespoons is enough.
Well, the dough is ready, now you can proceed directly to the process of sculpting from salt dough.
Salt dough Christmas crafts. Salt dough Christmas decorations
In this article, we will tell you about how to make Christmas crafts and Christmas decorations from salt dough. We tried to pick up such crafts from salt dough, which, on the one hand, are easy to manufacture, and on the other hand, the end result is beautiful.
Salty dough. Salt dough crafts
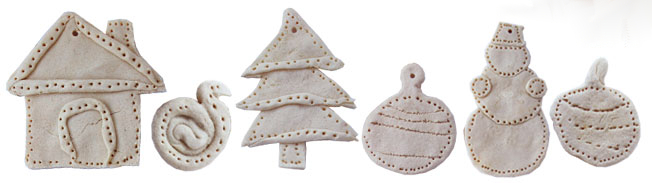
For making Christmas decorations from salt dough, you will need figured cookie cutters. With their help, even a kid can cut out figures from a rolled out layer of dough.
The resulting figures from salt dough can be left as is, but it is even better to decorate them. For example, like this.
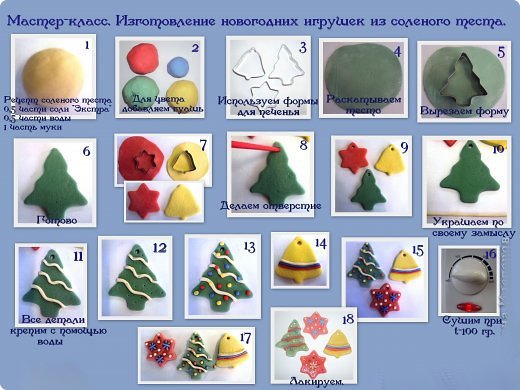
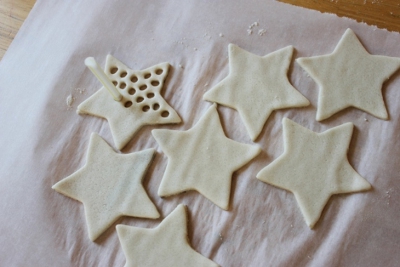
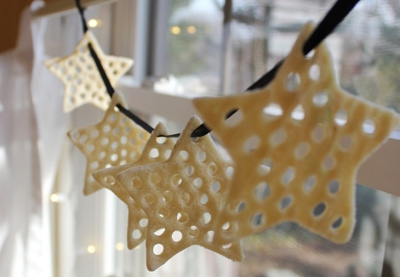
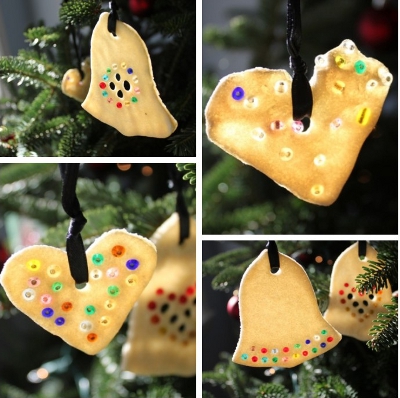
You can use a cocktail tube to make many holes in the dough and then you will get lace figures.
Or decorate crafts from salt dough with beads. Just keep in mind that if you use plastic beads, etc., then you will not be able to dry finished salt dough products in the oven, otherwise the beads may melt.
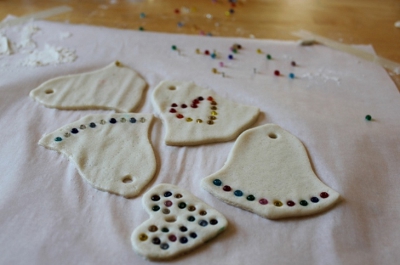


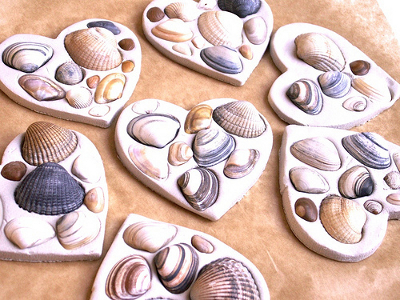
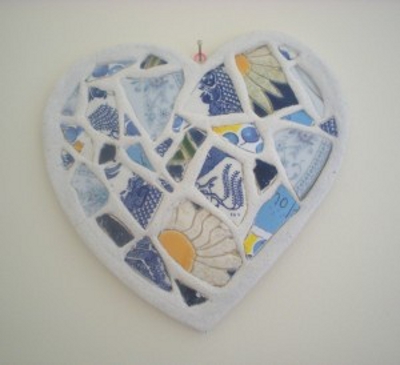
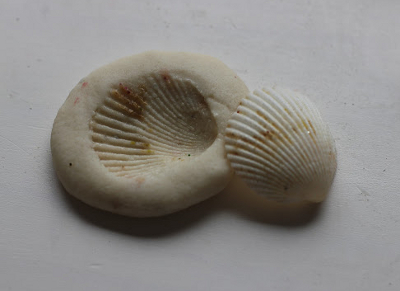
Instead of beads, you can use different cereals, shells, buttons, and even broken dishes to decorate New Year's crafts from salt dough.

You can give a festive look to Christmas decorations made from salt dough with the help of beautiful ribbons and threads.

Note: if you do not have a suitable mold, then you can cut out a stencil from cardboard and cut salt dough for crafts on it.

Salt dough molding. Salt dough photo
Ready-made, already dried salt dough products can be decorated with sparkles by applying them to a layer of glue.


Salt dough crafts. Salt dough master class
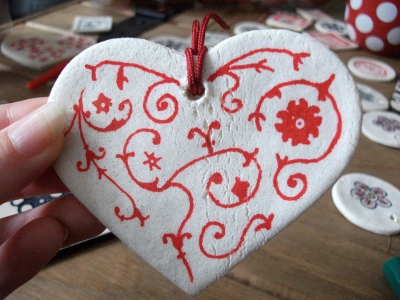
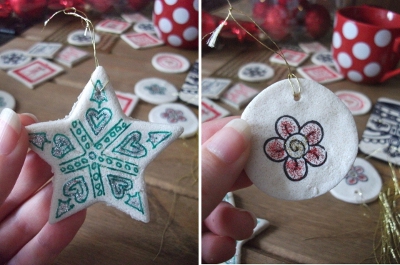
Christmas decorations made of salt dough, painted with colored permanent markers, look beautiful.

Salt dough products. Salt dough molding
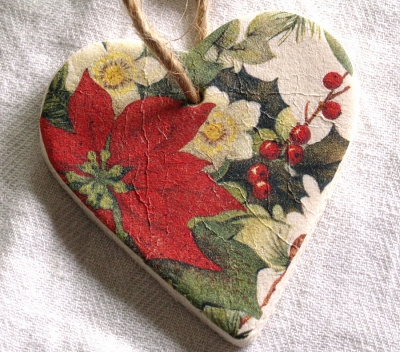
You can decorate New Year's crafts from salt dough using the decoupage technique by pasting them with beautiful pictures or decals. For decoupage, you can use pictures cut from New Year's napkins. For New Year's decoupage, ordinary PVA glue, diluted with water in a ratio of 1: 1, is suitable. Cut out pictures or a pattern from New Year's napkins, peel off the top layer and stick it on the finished salt dough craft. Apply another layer of glue on top.

Salt dough figurines. Salt dough crafts
Here are some more examples of decorating figures from salt dough.


Christmas decorations from salt dough. Salt dough molding
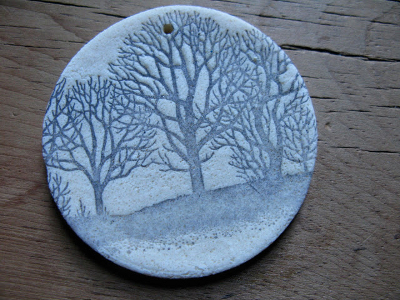
A simple and original way to decorate salt dough products is to make prints on them. Prints can be made with all kinds of objects with an interesting texture that you can find at home.

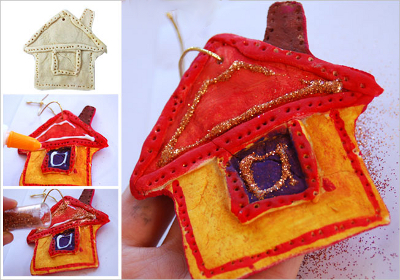
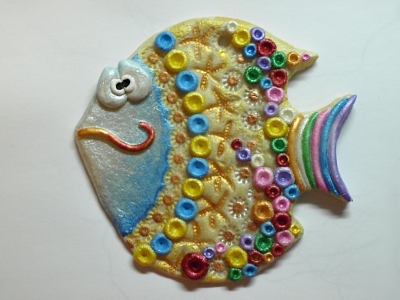
The "Fish" salt dough craft in the photo below was made using various textured items that the author of the craft found at home. For a detailed master class on making this original salt dough craft, see the link
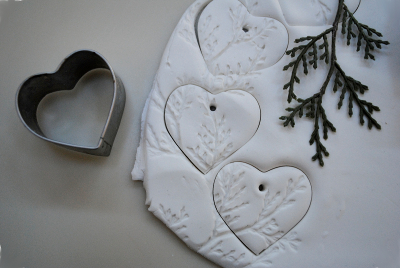
For making Christmas decorations with your own hands from salt dough, natural material is also suitable: twigs, shells, leaves with thick veins.

When making New Year's crafts from salt dough with your children, you can use purchased stamps for children's creativity. The ink is suitable for both black and color.
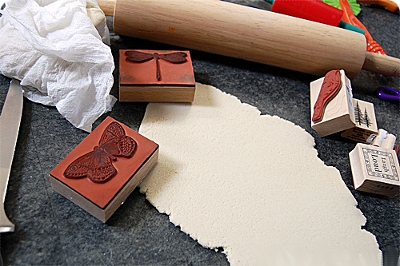

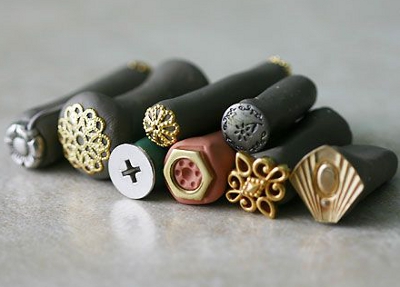
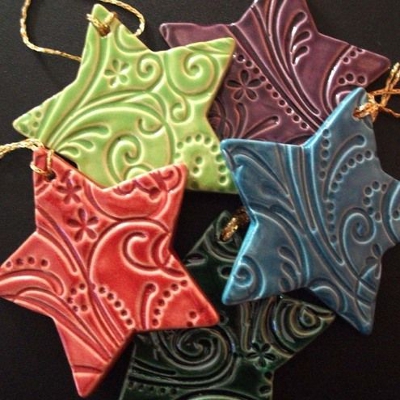
Do-it-yourself Christmas decorations stars, a house and a cockerel in the photo below are also made from salt dough using patterned dies. By the way, you can make stamps for children's creativity yourself. Read about how to make stamps with your own hands on our website in a special article.


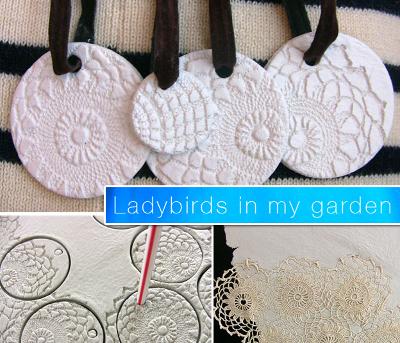
An interesting way to make Christmas decorations from salt dough is offered by Ladybirds in my garden. With the help of textile or paper lace, openwork prints are created on salt dough, from which figures are then cut out using curly molds or a simple glass.
Christmas decorations made of salt dough with prints of children's hands or feet look touching. On the back of the salt dough craft, write the date the imprint was made.
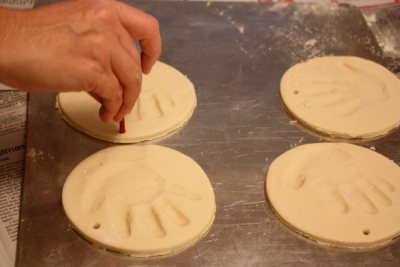
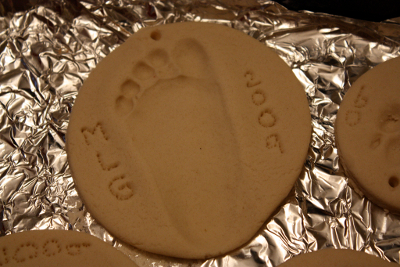
From fingerprints and palm prints on salt dough, you can make such memorable Christmas decorations with your own hands: a Christmas tree and Santa Claus.


Salt dough crafts. Salt dough figurines
Finishing our review article on the topic "New Year's crafts from salt dough", here are some more interesting New Year's crafts that can be made from both salt dough and plasticine.
1. New Year's mosaic of beads and glass beads
To make this original Christmas decoration, you will need:
Plasticine or salt dough
- plastic lids
- beads, beads
- gold paint (optional)

Paint the caps with gold paint, then fill them with plasticine or salt dough, lay out a mosaic of beads and glass beads on top. Making such New Year's crafts is possible even for kids.
2. DIY craft for the New Year "New Year's candles"
To make this Christmas craft, you will need:
Salt dough or plasticine
- cardboard base from a toilet paper roll
- corrugated paper in red, yellow and orange colors
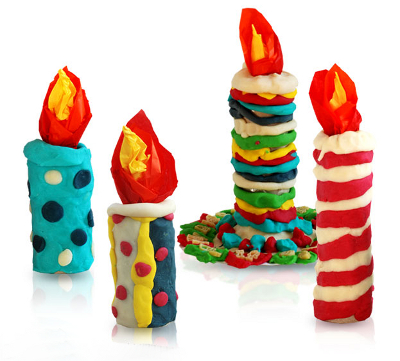
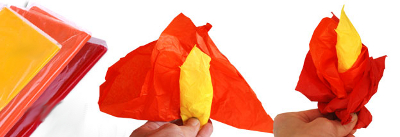
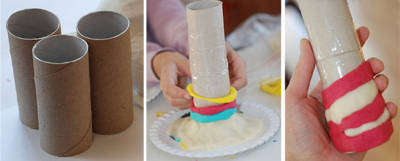
Make rings from plasticine or salt dough of different colors, then put them on a cardboard roll. Make a flame out of corrugated paper, insert it inside the candle.
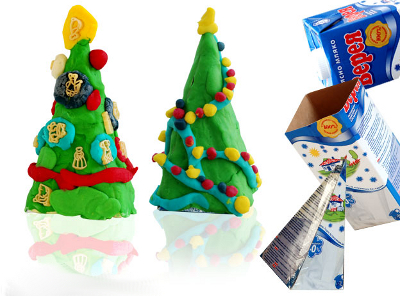
3. Christmas crafts for children "Herringbone"
You can make a pretty Christmas tree out of a cardboard package for milk, kefir or juice and plasticine (salt dough). See the photo below for a master class on making this craft from salt dough.


See also articles on our website:
4. New Year's compositions from plasticine
An interesting master class on creating New Year's compositions from plasticine by cutting is posted on the Country of Masters website. Look at the Christmas tree below. It is assembled from separate branches, cut from one plasticine blank, and then decorated with plasticine Christmas toys made using the same technique.

Images of burning candles will help decorate the New Year's composition. The Country of Masters will teach you how to make original twisted plasticine candles. This composition is complemented by a chrysanthemum flower and a small plasticine snag.

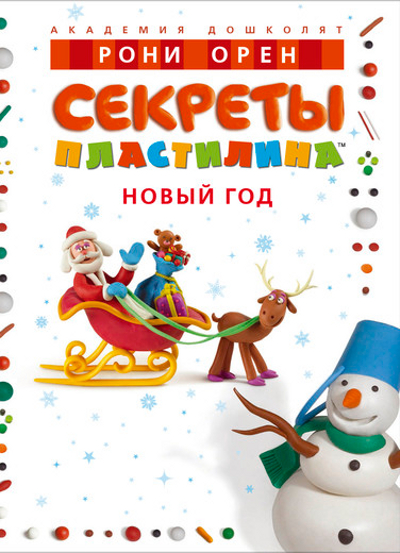
For everyone who is interested in plasticine crafts for the New Year, we also recommend the book by Roni Oren "Secrets of Plasticine. New Year".
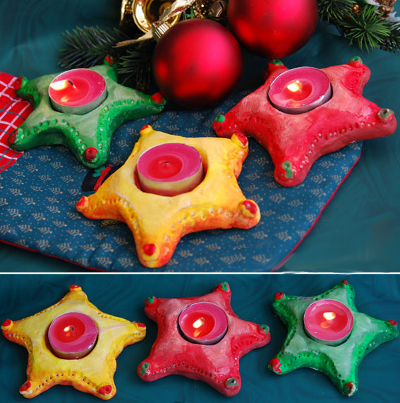
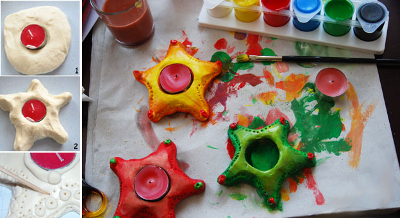
5. Salt Dough Candlesticks
6. New Year's salt dough mosaic
Salt dough is an excellent material that is also suitable for making DIY Christmas toys for the Christmas tree. At the heart of the craft is a mold that can be replaced with ordinary household items. Decorate such toys with paint, beads, buttons and other decorative materials.
Several simple and more complex crafts with photos and step-by-step descriptions, as well as video materials can be found in the article.
Probably everyone knows how to make salt dough on their own. Just in case, here's the recipe:
- 2 cups of flour;
- 1 glass of extra salt;
- a little more than half a glass of water (ordinary from the tap);
- 2-3 tablespoons of vegetable oil.
NOTE
It is hardly possible to do without oil at all - the dough will inevitably stick to your hands. However, you don’t need to add too much of it either, because then dirt can stick to the craft, and most importantly, it will dry much longer than usual.
We act like this:
Step 1. We take a bowl, first we fill it with salt and add half of the indicated amount of water.
Step 2. When the salt dissolves, add flour, and then the rest of the water.
Step 3. At the last stage, add vegetable oil. It is not necessary to do this, however, the dough with butter will not stick to your hands, which is good news.
Step 4. That's all - put the dough in the refrigerator, wait 2-3 hours, and our raw materials for modeling are ready. In the meantime, we stock up on a good mood and study what New Year's figures can be made from such a test.
The technology for making toys from it is quite simple and consists of 3 main stages:
- First, the base is molded using a mold.
- Then it is painted with gouache, decorated with decorative elements (beads, buttons, shells and many others).
- After that, it is dried naturally or in an ordinary oven.
In general, it is best to dry the crafts in the oven, especially since such a process is very fast, and the heating is not very strong.
At higher temperatures, it is also possible to brown toys (up to 200 ° C). However, this is already a more risky path, so it is better to constantly be near the stove.
And the total “cooking” time should take no more than 15-20 minutes. Therefore, most often they choose a comfortable range of 70-130 ° C. Then the models acquire the necessary strength and at the same time do not crack due to overheating.
And most importantly: any products made from salt dough are strictly forbidden to be eaten!
It is especially important to follow the kids, who now and then pull all sorts of gizmos into their mouths - necessary and not very necessary. There are 2 threats here - actually inedible "cookies" and small decorative elements that adorn finished toys (beads, beads, etc.). Be careful!
Salt dough toys and crafts: do with children
Kids have a genuine interest in salt dough, because the creation of toys from it is a kind of combination of applied art and culinary skills. In addition, modeling is a great way to develop fine motor skills along with origami, making pasta toys, etc.
In the simplest case, almost any kid can make New Year's toys from salt dough with his own hands. We take gouache, cookie cutters, as well as a rolling pin. We act like this:
Step 1. Roll out the dough into a layer up to 1 cm thick.
Step 2. Cut out a few details with a mold.
Step 3. We make a small hole in the center in advance, tighten a beautiful ribbon, for which we will then hang the toy on the Christmas tree.
Step 4. You can leave it as it is and just dry it in the oven until a beautiful blush. Spread out on parchment paper rather than on a bare baking sheet. Dry until the oven is completely cool.
Step 5. We tie the ribbons - and you're done.


But what if there are only 3-4 molds in stock? No problem. Take cardboard, draw or print any figure, and then cut the dough with a sharp knife along the contour.

Salt dough is a very convenient material, because in many ways it resembles plasticine, which even the smallest ones can easily handle. And sometimes you don’t even need to use molds for work - just put your hand on it, and then cut along the contour or in a circle and color it as your fantasy tells.

How to decorate salt dough toys
At the stage of creating a model, it can be decorated with various decorative elements. They should not be plastic, otherwise you will have to dry the toy without an oven - the beads can simply melt.
The result is an interesting, beautiful toy made of salt dough, which is easy to make with your own hands.


And here is the version with gouache.

What other elements can be used for decoration? Variety. It can be cereals, shells, buttons. Thanks to various combinations, even from one mold, you can make many toys that are not similar to each other.


And another simple, but at the same time interesting way of decorating - an ordinary ribbon or thread. To tie it, you need to think in advance about the location of the holes on the workpiece.

Another simple way to decorate is with sparkles. Apply a thin layer of glue to the surface of the dried workpiece (you can use a regular pencil) and glue the sparkles. It turns out a truly festive toy for the Christmas tree.


And acrylic paints are very good.

And so that the craft pleases not only the eye, but also the sense of smell, you can decorate it with fragrant elements - cloves and cinnamon sticks. It turns out an interesting combination of flavors that resembles mulled wine.
Such a toy will always attract attention. Please note that during drying it is better to choose the lowest temperatures (about 50 ° C). You can completely dry it first, and then glue all the decorative elements.

And it’s very good to see everything with your own eyes - the video will help with this.
Do-it-yourself voluminous toys: the best models
From this material, you can also make voluminous toys. You can’t hang them on a Christmas tree, but you can put them under a New Year’s tree or on a table.
Christmas tree
First you need to make a cone out of cardboard - this will be the base of the tree. And then a layer of dough is applied to it, from which branches are then fashioned. You can see the whole process visually on the video.
Candle and candlestick
You can also make Christmas candles on a cardboard basis. We turn the sheet into a tube, glue it and stick it around with dough. We form a tongue of flame and decorate a candle.


And you can make candlesticks for real candles - we use the same molds for stars or hearts, only we make them more plump.


wicker basket
And another interesting voluminous craft that can be used to beautifully present a gift is a wicker basket. You can do it in different ways - one of them is shown in the video.
The second one is in the photo. It is made of several identical elements - ears, which are fastened together with an overlap and attached to the base in the form of an ordinary circle.

Father Frost
What is the New Year without the good Santa Claus? Making it from salt dough is much easier than it might seem. The figurine consists of a semicircular base, which then turns into a muzzle.
Separately, we sculpt and paint the cap, which we attach to the upper third of the face. We make a beard from small sausages, and cheeks, nose and eyes - from ordinary circles, painted in the appropriate colors.


Christmas tree toys with artistic painting
From the test, you can mold both simple and rather complex figures. In form, they practically do not differ in any way, the only difference is in the design. The material provides a good opportunity to try yourself as an artist.
The dough is white and paint adheres well to it. It is enough to use any template - and you can get real little masterpieces.


And for decoration, the technique of squeezing out a certain pattern on the workpiece is used. You can do this by hand or use a template, as well as special stamps that can be purchased at a hobby store.


As a result, such relief images are obtained.


You can also mold a Christmas tree, and make toys on it separately. Moreover, some of them do not even need to be made - just make a few depressions and paint them in different colors.

New Year's salt dough mosaic: step by step instructions
You can approach the creation of any toy creatively, and then even the most ordinary craft will look very original. For example, let's take the most common ball that can be made even without a mold - for example, using the bottom of a bottle.

Now we act like this:
Step 1. Cut out the circle and divide it into many small, unequal parts, which can be either square or triangular and even trapezoid.

Step 2. Now we paint each piece in New Year's paint - blue, red, yellow, lilac - whatever you like.

Step 3. The result is such a kind of stained glass window.

Step 4 Now, while all these parts are drying, let's make another circle. It should be slightly larger than the first in diameter - for example, by 1-2 cm.
And we transfer all the elements to it in the same sequence. They need to be slightly pressed into the base - you get a beautiful embossed craft.

Step 5. Now we dry the workpiece in the oven. We can also tint with white or decorate with sparkles to make an artificial snowball.


Here are some interesting toys you can make with your own hands from salt dough. Perhaps they can decorate a separate Christmas tree - for example, in the kitchen.

After all, toys are made in the same style and in such quantity that they are definitely enough. And most importantly, you can develop your own forms by depicting beautiful figures on cardboard, and then transferring them to the dough. And the freedom for creativity and imagination is limitless here.
Happy New Year!
Salt dough for modeling is a safe material for children's crafts. You can make cool Christmas decorations of any shape from it. Let's see a few master classes prepared by designers.
salt dough recipe
For crafts from the dough, take:
- 1 glass of salt;
- 1 glass of flour;
- water;
- colored gouache.
This is the easiest salt dough recipe ever. To improve it, add 5 tablespoons of sunflower oil.
IDEA! Paint can be replaced with juice (cherry or beetroot). If a child eats a piece of dough during modeling, he definitely will not be poisoned. The dough can be colored already at the end.
How to cook dough at home? Step by step:
- Throw all the components into a deep plate. First dry, then only water and oil.
- Mix everything so that the dough turns out like dumplings. It shouldn't be oak.
- To make the mass faster, turn on the mixer.

IDEA! If the toys are small or you need to make small parts, make the dough separately with PVA or starch. Perhaps there was some glue left after wallpapering. Use it instead of PVA.


How to make DIY salt dough crafts
Salt dough, the recipe of which will be easy even for children to master, is a very flexible material, but in terms of composition it is absolutely safe. Add food coloring or generally natural (fruit or vegetable juices) to it. Even if you leave the child alone for modeling, nothing will happen to him.

Sculpting tools:
- rolling pin;
- working flat surface;
- ball pen;
- brush for drawing;
- cup;
- threads;
- medium size needle;
- silicone baking molds;
- any stencils for patterns;
- paint (acrylic or gouache);
To prevent gouache from cracking, add glue to it.


We cover the figurine with paint and varnish

The dye is added not only at the stage of kneading the dough, but also during modeling. Just divide the dough into several parts (1 part = 1 color), make a well in the center and add the dye. When sculpting, it will be distributed evenly throughout the piece.
 With a regular brush, you need to paint the grooves from the paw
 When the figurine is ready, cover it with varnish, so the paint will definitely not roll and brighten. The aerosol form will facilitate the coating process.

If the varnish is liquid, cover the toy in several layers. Thick cover in one layer. It can also be matte.
IMPORTANT! If you properly dry the toy, you can do without varnish. It is needed if you are not quite sure that you did everything right.

What can go wrong?
- Cracks or bubbles appear after drying. So, you dried the figurine incorrectly. Most likely, the temperature is high when the oven door is closed. Try sanding these areas with sandpaper.
- Cracks may appear after painting. Let the craft dry completely and only then paint. Dry the figurine in natural conditions, sand the cracks with sandpaper and paint again.
- If any part of the figure broke off, glue it with PVA.
- Store figurines in a dry place at normal room temperature. They can be folded into any cardboard box, then nothing will definitely happen to them by the next holiday.
Simple salt dough Christmas decorations for beginners
Let's see a few step-by-step master classes and figure out how to make simple but interesting Christmas tree dough toys.

Idea 1. Gingerbread men
Try making gingerbread men with the kids. It will be a lot of fun. Do the most difficult stages of work, and let the dough be kneaded by yourself. Show what kind of face the little man will have, let them try to repeat.


Idea 2. Flat multi-colored figures
 We will need: flour, salt, water - for the dough; blender; dyes for its color; molds in the form of circles and hearts; rolling pin; ribbons, twine or thread, a sharp object for holes and decorating figures; baking parchment


Idea 3. Snowflakes with patterns
How to save on holiday packaging and make it yourself look in the article
What else can be molded from salt dough to decorate the Christmas tree? Let's try to make snowflakes.
 Take the same composition for the dough, acrylic paint in three colors (we have white, black and blue). Of the tools - a ballpoint pen, a stationery knife and a round object for extrusion. Useful for markers

Idea 4. Shiny figurines
Plus products from salt dough in their weight - the toys are very light. The branches will not bend.


 You can make a lot of toys and thickly decorate the Christmas tree with them. It will be very beautiful
Option 5. Circles with flowers


Idea 6. Silver stars
 Let's try to make shiny stars for the Christmas tree


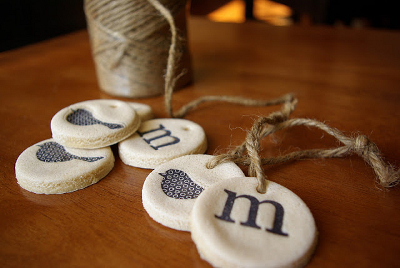
Idea 7. Name tags for gifts
Labels can be not only in the form of hearts, flowers or rectangles. For a New Year's gift, try making a house or a snowflake.
IMPORTANT! What to give to relatives and friends for the New Year and Christmas 2018, read the article
Idea 8. Lace plates Children are very interested in making voluminous figures. You can start with simple vegetables. To make segments on the pumpkin, use faux string


New Year is a wonderful time and the best time to enjoy communication with family and children. Kids love Christmas crafts and homemade Christmas toys. Messing with dough is also one of the favorite activities for children. By combining both, you can decorate the Christmas tree with wonderful unique toys.
In this article:

You will need:
- 1 part fine table salt;
- 1 part white table flour;
- 1/3 of potato starch;
- water for kneading.
Mix all dry ingredients in a bowl and knead the mass, gradually pouring water. The mass should be of a pleasant consistency - not stick to your hands, and not be too tight (do not break or crumble).


After the salt dough is ready, decide when you will paint the products. You can paint the mass immediately, or you can paint the toys after baking.


How to dry Christmas crafts?
A few words about drying. To make the dough firm, you can simply wait a few days, or bake it in the oven. You need to preheat the oven to the maximum temperature, then put the salty crafts laid out on a baking sheet. Then you need to turn off the oven, and do not open it until it has cooled completely. You can bake on a very low heat (like croutons), but then you have to make sure that they do not burn. Another little secret - so that the figures do not stick, cover the baking sheet with a baking sleeve.

Of course, not all salt dough crafts can be dried in the oven. For example, decorated with beads or beads, you need to dry naturally.
How to paint the finished product?
There are several ways to make products multi-colored. Dry cosmetic pigments and water-soluble food colorings, which are used to make handmade soap, are best suited for this. If they are not, then you can use Gouache, or watercolors.

After the salt dough is colored, it must be carefully rolled out with a rolling pin, and cut out the desired figures with molds. Dough products of different colors look very interesting (as in the picture). It is a great pleasure for kids to engage in this kind of mixing.

Another way is to make crafts from white dough, and then decorate them - there are many ways. Kids will do it with gouache, older children can draw beautiful patterns with felt-tip pens or a gel pen.


Acrylic paints are a great decoration! If you make an ornament on crafts with silver paint, they will look like! The paints with brilliant pigment look very advantageous!


decor ideas
In addition to coloring, there are many ways to decorate future toys. Just do it before you dry them. For example, cut different holes with a straw.

Or make prints and imprints with stamps or some figures.


Decorate with beads, beads or sequins!

Dough crafts decorated with cosmetic glitters look very festive! It is necessary to cover the dry finished product with PVA glue, and then cover it with glitters. You can buy them at any nail fashion store, they cost from 60 to 120 rubles.


