Plastic bird feeder. DIY vertical bird feeders - master class and photo
Taking care of our smaller brothers, in particular, birds, during the winter cold is extremely important, since it is very difficult for them to find food in snowdrifts. While blood-red bunches of mountain ash still hang on the trees, birds can frolic and chirp merrily, but as soon as these meager supplies run out, sparrows, titmouse and other representatives of the winged brethren find themselves in a very difficult situation and it is the duty of every person to help them survive. An excellent option would be to make bird feeders with your own hands, which will not require any special investment, or excessively hard work, or additional professional skills. Even a child can organize a simple bird feeder using available, improvised materials, as well as using their own ingenuity and imagination.
original do-it-yourself feeder from improvised materials: photo attached

Previously, a bird feeder was presented in only one version, capital, as a small house made of plywood or even wood with a roof. Now everything has become much simpler and no special carpentry skills in order to understand , how to make a bird feeder is not required at all, you can just show your own creative thinking by giving out a couple or two original ideas. Moreover, today there are so many improvised materials literally lying around underfoot that you can find something you need even in a simple pile of garbage.

In fact, everything is not so complicated, the main thing is that there is a desire, but it is worth considering a few fairly simple rules, as well as taking into account some nuances if you want your little feathered friends to fly in for a long time to profit from your feeder. Moreover, the construction of a bird feeder can be turned not only into a useful activity that will help the birds, the whole family can be gradually involved in the process, along with children and the elderly, which is very close.

The main requirements that can be presented to a quality bird feeder:
- A good feeder, which is designed for a fairly long service life, must necessarily have a waterproof roof that will not allow precipitation, for example, snow, rain or drops in a thaw, to spoil the food intended for our smaller brothers. After all, once wet, it can simply become completely unsuitable for food, and the feeder itself can fall apart under the influence of moisture if it is arranged without a roof.
- All materials that are used in the manufacture of the feeder must have water-repellent properties so that all the same moisture cannot damage the integrity of the structure.
- The materials that an original do-it-yourself bird feeder will require should be well tolerated by fairly significant temperature changes, because under the winter sun it can be like a terrible frost, up to minus 20-30 degrees, and plus temperature.
- The bird feeder should be spacious enough, with a wide entrance hole, so that the birds can not only freely climb inside, if this is provided for by the design, but also turn around and take off.

All of the above means that it is not at all necessary to limit your own imagination to wood or plywood, from which feeders are most often made. And now you can see such original and beautiful products on the trees from things so familiar to us that you just start to wonder how everything is, in fact, simple, and why such an idea didn’t come to your mind. Let's figure out how to make a bird feeder with your own hands, while not spending a lot of time, and also without investing any financial resources at all.
Cardboard bird feeder: even a box of candies will come in handy!

If you miss the classic version of feeders made of wood or plywood sheets, which we called classic by default, then the most ordinary cardboard that is in any apartment can serve as the optimal and most affordable material. And if not, then you can still find it by rummaging through the "gash" well. For example, almost everyone has a box that once contained delicious sweets, but then they ran out, and it became a pity to throw away a beautiful box. It is this box that can help the birds find food during snowstorms, and making it will be as easy as shelling pears.

- Ideally, cardboard for the feeder must be laminated, that is, smooth to the touch, one that is covered with a special polyethylene film. Such cardboard will not go sour in the rain, and will serve faithfully almost until spring, especially if the winter is quite frosty.
- Take a simple candy box and make small cuts on opposite ends of the box lid, which will allow you to bend it, like the roof of a house.
- So that the cardboard from the lid does not unbend and does not interfere with it, it is best to fix it with thin strips of adhesive tape or glue, and working with the first is much easier and less laborious.
- Under the lid, bent by a slide, you need to place a tray from under the sweets, but you can simply throw away the plastic mold with recesses into which the confectionery was placed.
- Next, it remains to fasten the entire structure with strips of adhesive tape or glue.
- Passing a rope through the roof and hanging a brand new, brand new feeder on the nearest tree will not be difficult at all.

In order for the cardboard box feeder to last longer, it can be completely sealed with tape strips, however, you need to take wide rolls, preferably of a construction or industrial design. With sufficient diligence, such a design will really cope with its main task until the very spring, when the birds themselves will be able to get their own food. Moreover, exactly according to the same principle, a feeder can be built from a box of juice, paint, and the like. Just take a good look at what is available and you will definitely find what fits best.
Diverse bird feeders: photo, do-it-yourself original ideas, simple solutions
It is clear that without human intervention, nature itself is able to “feed” its birds, but people are so actively engaged in the environment that it has become very difficult for the birds to seek food on their own. Indeed, if we are talking about villages and villages, then this is not critical, but in the conditions of large cities, the winged and chirping brethren have a much more difficult time. Therefore, it is worth turning on your imagination and on the way, if the simplest structures, such as a candy box, do not appeal to you, you can go further and come up with thousands more creative solutions that will not only help the birds, but can also surprise your friends and acquaintances.
He drank milk - handed over the container? Excellent milk carton bird feeder

Great ideas come when you least expect them. Apparently, once drinking milk from a bag, someone suddenly discovered that it is very dense and is not afraid of temperature changes. In addition, milk bags do not get wet, which is another very significant plus.
- Take the package in which the milk was sold and wash it thoroughly with warm water so that there is not even a trace of milk left in it, otherwise it will start to sour, and the feeder will smell unpleasant.
- Bend both upper corners of the bag, and also cut off their very ends, just so that the twine prepared in advance or just a clothesline, lace, thick nylon thread and so on can crawl through.
- Thread the string through the holes and tie off the ends. Thus, a loop was obtained, which will allow you to hang the feeder on a tree. The places where the twine comes into contact with the bag can be glued with glue or tape.
- In the wide parts of the milk package, cut two large holes, for example, square, so that a few centimeters of rim remain on the bottom at the bottom. It is necessary to make it so that the birds can easily get inside, because the holes opposite should be large enough.
Information
A milk carton feeder is simple, completely affordable and does not require any special professional skills in manufacturing. Some people recommend pasting the packages on top with colored paper, but this is not very advisable, as it will get wet and spoil the entire appearance of the structure.
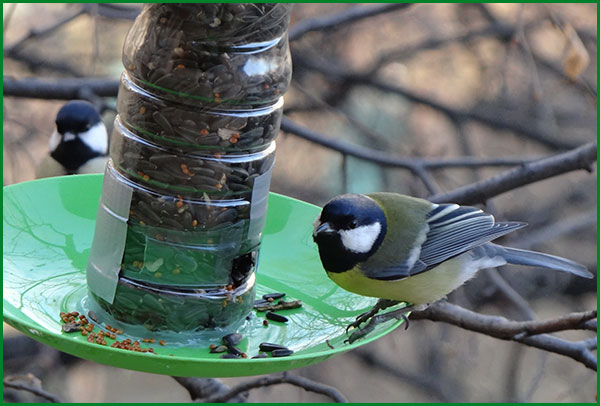
5 liter plastic bottle feeder: spacious, simple, durable
However, whatever one may say, cardboard, wood and even milk bags are all somehow flimsy and unreliable. What are the available materials that cost literally a penny, but nothing else can compare with them in terms of durability and reliability. Of course, we will not talk about new space technologies now, since it’s not a hat according to Senka, but we’ll remember a simple container in which we most often buy purified water in a store - 5-liter bottles, which are definitely in every home.

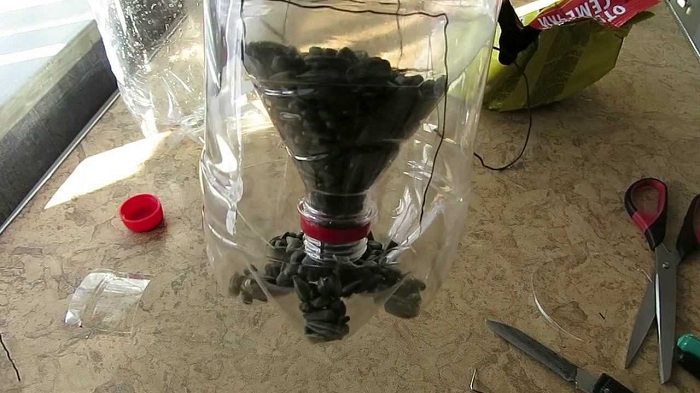
It is worth saying that the feeder from a 5 liter plastic bottle will turn out to be so spacious that the birds will not fight, since there is enough space for everyone. If it’s still crowded, then you can make several feeders and hang them in the yard or outside. Moreover, the main advantage of such a feeder can be the automatic feed mechanism, and you should not be afraid of complex and abstruse words, in fact, everything is extremely simple. For the construction, we need two bottles, five liters each, scissors, a knife, twine or twine (clothing rope), and even, perhaps, all the same, good old adhesive tape, on which we now hold everything.
- The first bottle needs to be cut off just the same place where it begins to narrow, that is, remove its neck, thus making a kind of bucket.
- The second bottle is inserted neck down into the first, but in its bottom you must first make a “hatch”, not completely cutting it off. Moreover, you can fix this impromptu cover with the same adhesive tape.
- With wide strips of cattle, fasten the top, inverted bottle to the bottom, so that there is a gap of several centimeters between the bottom and the neck.
- Cut holes in the bottom bottle through which the birds will access the feed. Depending on the size of the birds, it is worth making holes of different sizes.
- It remains only to pour grain, berries, crumbs and other goodness through the top cover, and the feeder is ready.
Such a bird feeder from a plastic bottle, the photo of which can be seen above, will serve for more than one year, and the food will gradually come in as the birds peck at it. You can even hang such a feeder on a tree with the help of a handle, which is most often found on such large plastic dishes, and attaching a string to it will not be difficult at all.
How to make a bird feeder from a bottle: new ideas - ice feeder

However, it can be done much easier. Someone came up with such an original and bright idea, which is simply a sin not to put into practice. Moreover, apart from a plastic bottle of any capacity, we don’t need anything else, except for scissors and a rope to fix the feeder on the branches of a tree.

- Take plastic bottles and carefully cut off the bottom so that you get a not very deep bowl.
- Everything else can be thrown away, it will not come in handy, and fill the bowl with a variety of “goodies” for birds, for example, rowan berries, seeds, grain, fir cones and needles.
- Pour all this goodness with water and put it in the freezer for an hour or two, or, in case of severe frost outside the window, just on the street.
- When everything freezes, feel free to cling to the twine and hang out the makeshift feeder on the street, the birds will be happy to pick out the “sweets” from the ice.

It is wonderful that such feeders can also be made separately from the form, that is, the “bowl” itself. The ice can be taken out and by drilling a hole in it, you can simply hang out such an attractive candy for the birds for everyone to see.
Gelatin sweets for feathered comrades

Another fresh and original idea is the creation of a variety of gelatin "sweets" for birds, which look extremely funny, but there is really a lot of sense from them. Moreover, such feeders on the streets of the country are becoming more common, that is, people also really liked such amazing creations.

For work, you only need the most ordinary, edible gelatin, the food that you prepared for the birds, as well as string and scissors. Of course, a dish, for example, a metal bowl, will not hurt to knead the future feeder. First of all, you need to dilute the gelatin as written in the instructions, only with a slightly smaller amount of water.

Next, when the mixture has cooled a little, pour out the food so that it seems like a lot and mix thoroughly with sticky gelatin. To give the feeder an original shape, it can be poured into a mold, for example, for baking, then it will also turn out beautifully. After the gelatin has completely hardened, you can safely tie a rope and go watch how the birds will take out grain after grain from the gelatinous mass.
The feeder for tits does not lose its relevance in the spring. By hanging the device near your home, you can daily see how the birds jump in it, picking up food. Small live lumps serve as harbingers of warm days and bring joy with their chirping.
Where to get a feeder?
You can buy a factory product, or you can make do-it-yourself bird feeders. Juice boxes, plastic bottles, glass jars and many other materials are suitable for them. Here, as they say, it all depends on your imagination.
Children are especially fond of birds. Therefore, making do-it-yourself bird feeders with children is doubly interesting.
Depending on how old the child is, you can choose simpler ways to make a titmouse feeder. For example, cardboard or a plastic bottle or can can serve as a material.
Feeders for tits, the photos of which are presented in this article, come in different types.

But there are some nuances here. Any feeder must be made so that it is not ruined by sparrows.
Basic rules for manufacturing
- The tit feeder must be equipped with a lid, otherwise the feed will get wet in the rain or snow and deteriorate.
- The hole should be of a normal width so that the bird can get in and out without difficulty.
If you want to make a do-it-yourself tit feeder with the expectation that it will last a long time, then it is better to resort to making a wooden house.
From a plastic bottle
How to make a bird feeder from a plastic bottle?

It should be noted that this is the most common material of manufacture. At the same time, the process does not take much time. A plastic bottle feeder can be simple or self-filling.
For the manufacture of the first option, a plastic bottle of any size is taken. A hole should be cut in the bottle, and a string should be attached to the cork or neck.
A do-it-yourself self-filling bird feeder is made from two plastic bottles that have the same diameter. In the first bottle, cut a hole and remove its top. The second bottle must be filled with food and placed in the first neck down. The feed is poured automatically according to the principle of connecting vessels.
The feeder for tits from a plastic bottle at the site of the cuts should be devoid of sharp notches. In case of their occurrence, it is advised to glue the edges with adhesive plaster, insulating tape. You can burn the edges of the plastic with fire.
A plastic feeder from a bottle is suspended by a string or on a hook by means of a rigid fixation. To prevent cats from attacking birds, it is better to hang it higher from the ground. For the convenience of the birds in the bottle, it is advised to make a through-type hole and insert a branch that will replace the perch.
Making a feeder from a plastic bottle and wooden spoons
Often, a tit feeder is made from solid plastic bottles with wooden spoons.

This design is not comfortable and requires a slight tilt of the feed spoon. For this purpose, holes are made in the bottle. One of them is located above the other. The level of the feed should be above the level of the spoon.
Metal can fixture
How to make a do-it-yourself bird feeder from a tin can?
For the manufacture of such a model, a coffee or cocoa can, on which a plastic lid is screwed, is suitable. The plastic lid should be cut off and glued to the jar so that the grain does not spill out of it.

The bottom of the can is removed by constructing a plastic barrier (from the remains of the lid) on the back of the can. The rope should be passed through the resulting cylinder or through a hole that is drilled at the bottom.
Feeder for titmouse from a bag of juice or milk
Such bags are an excellent material for making a bird feeder. The packaging is coated with a moisture-resistant coating. These boxes are easy to cut. A tit feeder from a bag is made in the same way as a fixture from a plastic bottle. To this end, you should mark the hole with a marker and cut it out with a clerical or kitchen knife.
By the same principle, a cardboard feeder is made. Here, individual parts are cut and glued together. Such a device is not resistant to moisture. Therefore, the feeder is advised to place under a canopy. Can be sealed with tape or other protective material.
Wooden bird feeder
Do-it-yourself wooden houses and feeders for tits are durable and reliable. This is the best option. Any person who owns tools such as a hammer and a saw can make them on their own.

The basis of the structures are wooden boards, lining trim, pieces of plywood and other materials that remain after the repair. Let's start describing the technology.
Do-it-yourself bird feeder, the drawings and dimensions of which are planned in advance, is made in a certain sequence.

Manufacturing steps
- The basis of the bottom and flooring is a plywood sheet. For this purpose, three parts are cut out: the size of the bottom is 300 * 240 * 3 mm, the roof is 280 * 212 * 3 mm. Racks, crossbar and other elements should be cut out of it. Details are polished.
- With nails and a hammer, four corner posts are attached to the bottom.
- The sides are fixed. They are attached to the bottom and racks in the corners.
- Crossbars are placed on top of the racks and nailed.
- Roof rails and a connecting rail are attached to the crossbars.
- Next, the roof deck is installed.
- The feeder is decorated and varnished.
The result of the work done is a beautiful comfortable feeder for titmouse. It will last quite a long time. To protect against moisture on the roof, it is recommended to stuff pieces of linoleum, waterproofing film or other moisture-resistant material.
In general, feeders can vary in their configuration. People who know the technique of wood carving and painting can bring artistic elements.

The construction of a feeder is a very interesting activity in which the performer can act as an architect and designer and show their creative skills.
factory made
Such products are presented in two forms: open and closed, on a support leg or suspended with a conventional mount on the back wall. Each factory-made outdoor feeder is equipped with a roof that does not allow food to spoil in bad weather, and easy access allows you to watch the birds. All models differ in exclusive design and will become fine decoration of a garden or a country site.
Sitting under the roof, it is comfortable for birds to peck grains. The proposed ready-made houses can be a wonderful gift for bird lovers.
What to feed tits?
Tits mainly live in the forest, but with the onset of cold weather, it becomes more and more difficult for them to feed themselves. Due to hunger, a small number of birds survive until spring. These birds are very necessary for gardens and orchards, as they eat harmful insects, so our duty is to protect them from starvation. The titmouses realized that people take care of them, so in winter they can be seen near houses.
A bird feeder should contain not only seeds of sunflower, melon, pumpkin, watermelon, cucumbers, but also peanuts and pine nuts. You should also include meat in your diet. In the warm season, birds feed on insects, especially butterflies and caterpillars. On frosty days, unsalted lard, chicken or rabbit meat, butter, grated cheese are perfect as an additional top dressing. Salt and spices should not be added to birds.
Many feed birds with small pieces of white bread. Birds eat it with great pleasure. No need to give titmouse fresh white bread. In particular, black bread is not suitable for feeding. From it, birds can experience indigestion, which will lead to inevitable death.
Warning
If you began to feed titmouse in winter, then this business cannot be suspended. Birds get used to a certain feeding place and every year they fly there for the winter. If the feed supply is abruptly stopped, the birds may even die.
Do-it-yourself house for tits
How to build a house for tits? It is made in the same way as a birdhouse. The board is taken with a thickness of 20 cm. On the one hand, it should be unpolished. The main difference is the taphole diameter. For titmouse, 35 mm is suitable. The inner and outer walls are made rough with notches. This gives the chicks the opportunity to get out of the house without difficulty.
Houses for titmouse are hung in 4 titmouses are hung out on a plot of 10 acres. The distance between the structures should be about 20 m. Tit mounds are hung on houses and trees. The house is attached with an inclination towards the notch. Letok should be located with
A variety of materials can be used for the feeder, and these can be simple improvised means.
Design features
Before starting the construction, it is necessary to consider its design.
Design features:
It is also important to take into account that birds remember the locations of canteens and can fly from very long distances, so you should be responsible in choosing a place and add food regularly.
When the features are known, you can start making drawings. A well-constructed drawing will avoid many mistakes and save on materials. A drawing of the correct dining room can be peeped on the Internet pages.
Making a feeder
Necessary materials
 If you decide to make a dining room, the design is selected, then you can think about the materials used. The most durable and safe wooden feeders - it is not for nothing that birdhouses are made of wood.
But for the manufacture of feeders, you can use other improvised materials. Easy to make are canteens from plastic bottles.
But it is worth remembering that do-it-yourself plastic bottle feeders can be toxic and short-lived.
Bottle feeder.
 To make such a design, it is necessary to prepare a plastic container with a capacity of 5 liters with a lid, scissors and electrical tape. From the sides of the bottle it is necessary to cut windows. When the holes are ready, you need to secure sharp cuts and glue them with tape.
The feeder is ready! It remains only to tie the thread to the lid to secure the structure to the tree. In just a few minutes, an original lightweight and comfortable design is obtained.
Advantages of wooden products
 Plastic breaks down quite quickly, so you should pay attention to a more durable material - wood. This design takes a little longer and requires some effort, but a do-it-yourself bird feeder made of wood has its own advantages:
- The product is durable yet lightweight.
- The tree is easy to process and fasten together.
- Safety. Such a feeder will not emit toxic substances and will be safe for both birds and the environment.
The simplest homemade design consists of a bottom, four racks and a roof. A roof is needed to keep rain, snow and wind out of the feed. It is the roof that will help protect the food, and it will remain fresh for a long time, which means that the tits will eat it without a trace.
 For building homemade feeder you need to stock up on a small piece of plywood, the amount of material depends on the size of the final product. Blanks are first drawn on plywood, and then carefully cut out. Carving is the most time-consuming part of the construction. You can cut blanks with a jigsaw or a hand saw.
The next step is to sand all the details with sandpaper. This process must be carried out quite carefully, because the safety of the entire structure depends on the safety of the parts.
Now you need to decide on the type of fastening of parts. You can fasten parts with nails or glue. Each method has its pros and cons. Nailing will allow you to create a more secure fastening, but there is a risk of injury. With such fastening, it is necessary to be careful and inspect the entire structure for the presence of nail tips. If there are any, then the birds can get hurt about them. If the carnation crawled out from the back side, then it is cut down or bent.
 When fastening parts with glue, it must be remembered that, on the one hand, this method is simpler, because you do not need to wield a hammer and nails. But it is worthwhile to understand that from constant exposure to moisture, the glue can collapse, and the structure will fall apart. And it is worth remembering that some types of glue are toxic and can harm titmouse.
When the parts are fastened together and the feeder is built, you can paint the building with durable paints.
This fun activity can be given to children. In general, you can build a beautiful original bird feeder with your children and have fun on a winter evening. This activity teaches children to love nature and take care of its inhabitants.
bright polka dots
For this feeder you need to buy a sheet of fiberboard.
- Cut out the bottom of the square shape and glue the glazing beads around the perimeter. You need four side walls: two identical squares - the right and left parts, the front and rear blanks must have an acute angle on top, so that you can then fix the roof.
- On the front wall, do not forget to cut a hole through which the birds will enter the house.
- Roof - two identical parts with wavy edges. All fiberboard blanks are assembled using self-tapping screws.

Bird feeder in lacquered wood
- Prepare the bottom of the product - a rectangle measuring 18x24 cm. Attach the sides around the perimeter so that the food does not spill out of the feeder.
- Fix four vertical racks, and fix the roof of semicircular rails on them.
- To prevent the material from getting wet in rain and snow, varnish the surface of the wood.
The decoration of the finished product will be artificial leaves of different shades.

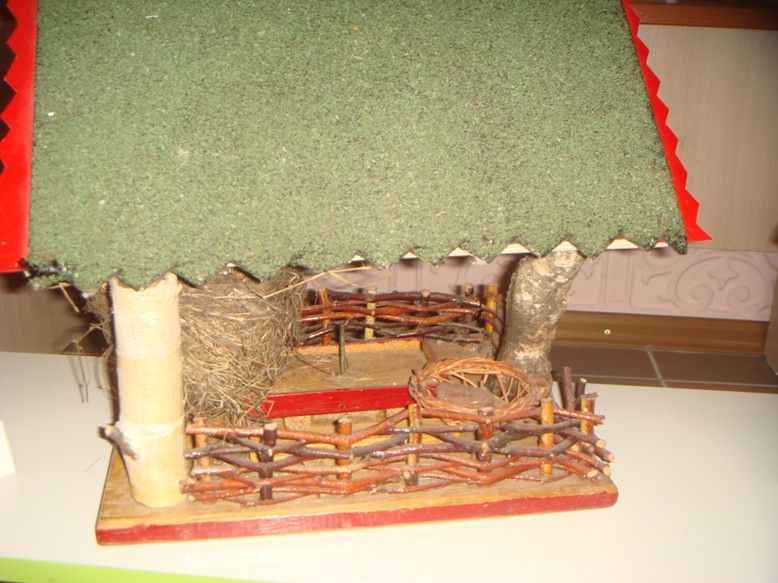
Hut of branches
To make such a feeder, you need to collect more branches of different diameters.
- The bottom of the hut is a blank of square-shaped hardboard. In its center, fix the longest and thickest branch. In the corners, place the branches thinner and shorter. They can be decorated with linen thread.
- The roof is the short and thinnest branches of birch and arborvitae, tied in the center and fixed on the highest stick.
- At the bottom of the hut, glue the bottoms of plastic bottles, you will pour bird food into them. Since everyone's diet is different, so that treats are not confused.
Reliable roof
For such a feeder, you need to use flexible, but durable metal. This piece was left from the installation of the fence. It must be bent into a semicircle and fixed on a quadrant wooden base. You can use the cover from the parcel, painted white.
Fabric leaves and a golden ribbon were used as decor.

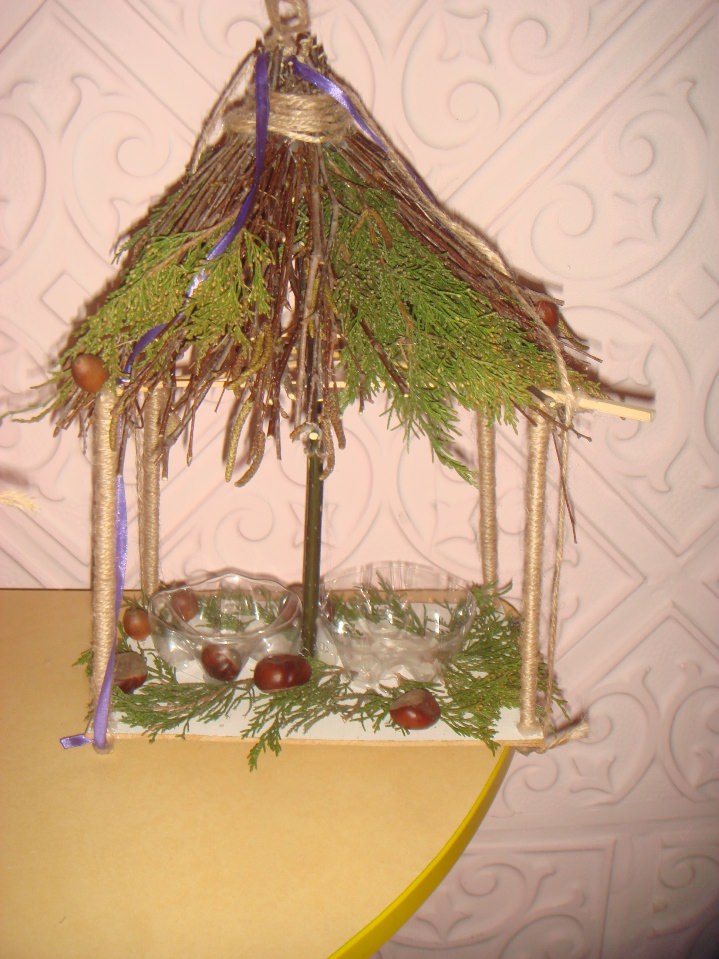
The original idea of a bird feeder: a fabulous house
A funny feeder comes out if you put maximum effort and imagination into its manufacture.
- The bottom of the product is the upper part of the old stool. Three vertical posts - thick sections of tree branches. A roof decorated with thick fabric is attached to them.
- An openwork fence is formed at the bottom of the feeder from thin twigs. There is a high table in the middle for food. A nest is made on the side so that the birds feel at home.
The simplest feeders and drinkers
Plastic products are considered the simplest, since for their production you will not need to spend any money or apply special knowledge in carpentry or engineering. It is enough to find a plastic bottle or bottle, cut a hole in it and hang it on a tree by the bottle handle or a piece of wire. Everything - the product is ready, it remains only to periodically add food inside so that the birds eat every day and plenty.

From cardboard
Such products will now pop up in the memory of every second of our readers, because once upon a time, back in school days, we made similar houses with grandparents or at labor lessons, where we cut and glued cardboard, creating a special box from it. All you need is a couple sheets of sturdy cardboard, scissors, glue, a needle, and thick thread to make the hanger.

From plywood
These are more serious products, for the creation of which you will need both special knowledge and some tools. But such a homemade feeder will be more durable and can last for several years, which means that you do not have to think about a new design every time.
A plywood feeder is made from marked and cut pieces of material, but always using a wooden beam. All parts can be connected with glue, nails, self-tapping screws.

from wood
They are considered capital products that can last even decades (naturally, with stable care for them). These are strong, reliable and durable enough products that will become a real "canteen", which you will be very pleased to watch!

Winter. In Moscow, there is a stable minus outside the window, and sometimes a child cannot be lured out into the street with either a whip or a carrot. However, walking is necessary and you can motivate him by combining business with pleasure. For example, take a walk and feed the birds.
In the warm season, we fed them with pleasure in the forest, on the pond and just sitting on a bench. And now, all the more it is possible and necessary to feed them, especially small birds. And with this noble mission, we will go outside, having previously made a simple cardboard feeder.
There is no doubt about the choice of cardboard as a material. He is afraid of only one thing - water! And now it's dry, frosty, and even if it snows, nothing will happen to the feeder. In support of my words, I will say that three weeks ago my daughter and I hung several such feeders and everything is still in order with them.
We need the following materials and tools:
- Two sheets of cardboard, A4 format;
- Ruler;
- Stationery knife;
- Flat screwdriver;
- Pencil;
- Glue gun;
- Single hole punch.
Cardboard. I used the so-called microcorrugated cardboard, 1.5 mm thick and A4 size. Such cardboard is perfectly cut with a knife, pressed through and finding it at home is not at all difficult! Most of the boxes are made from it. You just need to find a suitable size and use it as a donor. In my case, this cardboard was also white on one side, which certainly adds room for imagination. After all, such a feeder can be painted later? ;)
1. Download and print the pattern for the feeder on A4 format. Lay it on a piece of cardboard and use a flathead screwdriver to push through all the lines. There are two important points here:
- All markings on the cardboard must be made on its back side, where the corrugation is clearly visible.
- To prevent the template from slipping off the cardboard, you can fix it with tape in several places.
2. In places where there will be holes, you need to mark them by piercing the cardboard with a simple pencil. It turns out here is such a blank with pressed lines.
3. Now, looking at the pattern, cut along all solid lines, and leave the dotted lines pressed through. According to them, our workpiece will bend.
4. With the second blank, everything is easier. We simply use the already cut part as a template. We circle with a pencil, push the same lines with a screwdriver and cut it out.
5. So we got two completely identical parts. It remains quite a bit, glue them and make mounting holes.
6. We take a glue gun and glue the walls first on one side, and then on the other. By the way, glue can be used both Moment and PVA and second.
7. Then, the roof and bottom are glued alternately.
8. Now we make mounting holes. We just pierce them with a hole punch, in the places where we marked them with a pencil in step number 2.
9. That's basically it! As you can see, the feeder turned out to be not very large, just for small birds, which have the hardest time in winter. The design is modular and can be hung either way. Thanks to the slopes, the snow will not linger on the roof. And thanks to the sloping bottom, the food will always fall in the middle and it will be convenient for the birds to peck at it.
10. The feeder is attached to a branch with two ropes. Why then other holes at the bottom of the feeder?
11. Well, what if you want to make not one, but several feeders? If there are several children in the family, then everyone can make a feeder, paint it in their own way and hang it in the forest with a beautiful and useful garland! ;) And they are fastened with an ordinary plastic clamp.
With the advent of cold weather, snow and frost, conscious nature lovers hang bird feeders near the tree house (or near the window of the apartment). These simple devices will not only delight children and the elderly, they will help many birds to overwinter. How to make feeders and from what improvised means, we will tell in this article.
Variety of feeders
Human imagination is limitless. And having looked at what and from what people come up with bird feeders, this fact is beyond doubt. After analyzing the basic materials, we can divide the devices for feeding birds into the following groups:
- from glass containers;
- from grids;
- from iron cans;
- from old dishes;
- from plastic containers;
- wooden;
- from fruits;
- all kinds of garlands.
After examining each group in detail, you can definitely find exactly the one, the feeder, which will go in all respects. And most importantly - you want to make it and hang it near your home.
Glass container feeders
For this, jars with a volume of 1l to 2l are suitable. Put a plastic cap on the neck and cut a hole in it. Pour food inside. Hang in a horizontal position. Advantages of this feeder:
- snow does not fall;
- does not blow the wind;
- large birds (ravens, magpies) will not be able to take food from small birds.
- Long service life.

There are more original feeders from cans. They can be seen in the photo.


There are also glass bottle feeders. They need to be fixed upside down, substituting a saucer below, into which the food will be poured.


Alternatively, you can drill or cut a hole in the bottle into which the bird will fly for food. In this case, you must not forget about the footboard for the bird.

Mesh devices
You can also feed the birds in a more primitive way, the main thing is that the birds are full. Grids made of polymeric material, with small holes, need to be fastened so that a bag is obtained, into which food is poured and hung on a string near a window or on a tree. The advantage is the simplicity and speed of production.

For those for whom this method is too simple, there are more original and beautiful net feeders, but their production will take longer:
- You need to take a garden plastic mesh with small holes.
- Twist the cylinder out of it and fix it in this position.
- Take two pallets from flower pots and fasten them to the top and bottom of the cylinder.
- After attaching the lower saucer, pour the food inside.
- In the upper saucer (or along the edges of the net) make fasteners to hang the feeder on a branch.

Iron can feeders
In this case, there are two product options:
- Vertical feeder: small incisions are made in the walls of the jar so that the birds can peck at the food. Be sure to make steps at the bottom base. The top must be closed.

- Horizontal feeder. To the hole into which the birds will fly for food, you need to attach a footboard. Decorating the jar itself is at your own discretion.

The advantage of such feeders: the relative speed of manufacture, long service life, not afraid of shock.
Old crockery as a bird feeder
Old ceramic dishes will fit to create an original feeder, which will not only saturate the birds, but also decorate the gloomy cold landscape. This is the main plus of these feeders. After all, the process of their manufacture will require some skill: to make holes for fasteners without destroying the product.


Plastic feeders
Suitable for feeders:
- eggplants from 3 l to 6 l;
- bottles from 1l to 2l;
- canisters from 1 to 35 l;
- containers with lids;
- not big buckets.
How to adapt them to feeders is already a matter of fantasy. The main models of such canteens for birds are shown in the photo.


The advantages of feeders made of plastic products are:
- ease of manufacture;
- long service life;
- not afraid of shock and temperature changes;
- low cost of raw materials.
The main thing to consider is that thin plastic from bottles and eggplants, when cut, becomes sharp. And it can damage the thin paws of birds. Therefore, that part of the cut where the birds will land must either be melted on fire, or rubber tubes must be put on.
Wooden feeders
- a solid cut of the trunk (chocks);
- from boards;
- from branches or sticks;
- plywood or other wood sheet.


It is recommended to make feeders with a roof so that there is protection from direct snow and rain into the feed. Wood products always attract the eye, as they show the skill and dexterity of the master. Therefore, the advantage of this type of feeders is not only the environmental friendliness of raw materials, but also an attractive appearance.
Plant fruit feeders
Original feeders are made from:
- pumpkins;
- coconut shells;
- orange peel.
Having cut the fruit and stretched out the pulp, you can safely pour food, cling to a rope or wire, and hang it on a branch. Original, beautiful and simple.


