Basics of painting with oil paints. Oil painting
Oil painting. Basics. Bill Martin's lessons for beginners.
There are things you should know before you start painting in oils.
All paints are a mixture of dry pigment and liquid. In oil paints, the coloring pigment is mixed with linseed oil. Flaxseed oil is an oil that dries out through the process of oxidation with air. It absorbs oxygen from the air and crystallizes the paint pigment on a permanent basis. Once the oil dries, it cannot be removed.
Oil paints are thick. They are produced in tubes. The paints are squeezed onto the palette and mixed using a palette knife to obtain new shades. Then they are applied to a vertically positioned canvas with hard elastic brushes.
Oil paints dry very slowly. Typically you need to wait three days before adding the next layer. This long drying time is both an advantage and a disadvantage. The big advantage is that you will have time to comprehend what you have drawn. This is very useful when you make gradient transitions from one color to another. Or, if you are unhappy with how it turns out while the paint is still wet, you can scrape it off with a rag, palette knife or rubber scraper and repaint.
The disadvantage is that if you put two wet paints next to each other different colors, they may mix together inaccurately. The palette, brushes and damp canvas must be handled very carefully so as not to smear yourself, clothes, food and furniture.
You can work with paint for up to 12 hours at a time, then you must leave the work to dry for three days, after which you can continue working. When the paints have dried, you can apply new colors on top. There can be many layers to a work. Each subsequent layer must be the same in thickness or thicker than the previous one, otherwise cracks will occur.
After the work is completely dry (from three to six months), you need to apply protective layer Damara varnish.
DRAWING.
A complex design is quickly lost when applying oil paints, so it is better to label the design simple figures and contour lines. The drawing can be done directly on the canvas, or it can be prepared in advance and transferred to the canvas.
When applying a drawing directly to the canvas, it is better to use diluted paint. Since it's already paint, you won't have to seal it from subsequent layers.
You can also use coal. The charcoal fill will need to be isolated from subsequent layers with fixative. Soft charcoal is easier to fix with fixative than compressed charcoal.
The drawing can also be applied with a pencil to the canvas. Then also secure with fixative. The sharp tip of a pencil can make cracks in the primer layer, so you can additionally apply another transparent layer of primer. If you have applied another coat of primer, no fixer is required.
In the photo: a can of fixer, in the box there is carbon paper.
It is better to prepare a drawing for translation using carbon paper on thin tracing paper, then it will be easier to translate. Attach the drawing to the canvas. Translate it using carbon paper. Trace your drawing with carbon paper underneath. Take advantage of this ballpoint pen contrasting color to see which areas you have already translated and control the thickness of the lines. The applied pattern must also be secured with a fixer or a thin glaze layer of transparent primer.
TRANSITION ONE COLOR TO ANOTHER
Let's consider a graduated transition from one color to another. Oil paints, because they take time to dry, allow you to move them around the canvas while they are still wet. This is why it is much easier to create smooth gradations of color with oils than with other paints. This can be done with any brushes. But flat brushes are best, and round brushes are worst. The same principles apply for small and large stretch marks. 
The paints are mixed on the palette and applied to their intended places on the canvas. The brush is then moved back and forth in a cross pattern between the two gradations of color until a satisfactory result is obtained. Then parallel strokes are carried out to finalize the area. Work with a clean brush from dark to medium, and then again with a clean brush from light to medium. 
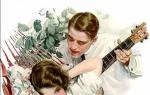
(A) In this example, the brush strokes are ALWAYS perpendicular to the highlight. Moving the brush in a circle, we try to make strokes perpendicular to the highlight, respectively, we get the shape of the strokes of a twisted brush.
(B) Depending on the location of the main colors of the stretch, an idea of the plane in which the surface is located is created. Notice how the shades are arranged to represent a flat surface (left) and a curved surface (right).
WE CREATE FORMS
All shapes are created from five basic shapes. These shapes are: ball, cone, cylinder, cube and torus (donut, bagel). Parts of these forms form any objects that we see. Imagine half a cylinder on a cube - and you get the shape of an American mailbox. Half a ball and a cone will give you the shape of a teardrop, a Christmas tree is a cone, an oak tree is a hemisphere (half a ball), and a cylindrical mug usually has a handle in the shape of half a torus (donut). 
Chiaroscuro creates form. Each of these forms has clearly defined locations of light and shadow. The sphere is characterized by a sickle and ovals. The cones have a triangular illuminated part and the rest is in shadow. Cubes and flat surfaces contain stretch marks (a gradient transition of light into shadow).
The cylinders are made of strips. Thor - made of crescents and stripes.
Concave versions of these forms have the same chiaroscuro, but without reflections.
If you learn to draw these five shapes, you can draw anything.
The ball (sphere) is defined by crescents and ovals. Balls are painted with crescent-shaped and twisted brush strokes. 
Cones are made up of triangles of light and shadow. Cones are painted with triangular brush strokes. 
The cylinders consist of stripes of light and shadow. Cylinders are painted with parallel brush strokes.
Cubes and any flat surfaces follow the same rules. Graduated transition from light to shadow. If the depicted surface is parallel to the canvas, then it is depicted in one even tone. A cube is a combination of intersecting planes. Each side of the cube contains a chiaroscuro stretch. The cube is drawn with parallel brush strokes.
The Thor contains aspects of two other figures. It has stripes of light and shadow, like a cylinder, in the center, and crescents, like a sphere, at the edges. Thor is written using twisted strokes and crescent strokes. 
Here you see that to convey the shape of an object you need to use light and shadow, not contour lines. Light can be confusing, so first try to see the shape of the object, and then how exactly the light falls on that shape.
COLOR MATCHING
The rainbow gives us examples of the pure colors that surround us in the world. The colors of the rainbow in order: red-violet, red, red-orange, orange, yellow-orange, yellow, yellow-green, green, blue-green, blue-violet, violet. When these colors are arranged in a circle, we get a “color wheel.” Color circle - necessary thing when matching colors. 
The circle is positioned so that yellow, the brightest light color, is at the top, and purple, the darkest, is at the bottom. From top to bottom, from the right, there are yellow-orange, orange, red-orange, red and red-violet. These colors are called warm.
From top to bottom, on the left side, there are yellow-green, green, blue-green, blue and blue-violet. These colors are called cool.
Additional colors. 
Any TWO colors located opposite each other in color wheel are called COMPLEMENTARY colors. Red and green are complementary colors to each other because they are located opposite each other on the color wheel. Yellow and purple are also complementary to each other. Yellow-green and red-violet are complementary colors. Complementary colors placed side by side on the canvas enhance each other. Complementary colors neutralize each other when mixed on the palette. On this plate, complementary colors are at opposite ends of the scale opposite each other. If we move toward the middle of this scale, we end up with a neutral gray color, the least saturated of all. 
All colors have shades. The pure spectral colors in this picture are indicated by letters.
So how do we select colors keeping all of the above in mind?
We just need to answer these three questions.
1. What color will make the color we need, where is this color located on the color wheel? (meaning spectral color).
2. How intense is it? (the more additional color we add to the color, the less saturated the color we need becomes).
3. Hue (how dark or light it will be).
Here's how it all works. 
The paints are arranged by color on the palette. 
We select a color like a brown leaf.
The spectral color will be red-violet. White is added to match the shade. Yellow-green, complementary to red-violet, is added to reduce its saturation. 
Select the color of the green leaf.
Spectral green. Cadmium green is our base color. It contains a bit of yellow, so we tone it down with red-violet (quinacridone pink). Yellow-green and red-violet are complementary colors to each other.
We add white to clarify the shade. 
Select the color of the silver electrical tape.
Spectral color blue. We add white to clarify the tonal saturation. Orange, complementary to blue, is added and we get gray. 
Selecting the color of a three-dimensional object. A piece of soap. 
First we select the middle. Spectral color – yellow-orange. We add a very small amount of additional blue-violet to reduce the intensity of the color. And a little bit of white. 
To get light areas of our soap, we add white to the resulting color in the middle. To get the color of the shadow, add more blue-violet to the color of the middle. 
So, the colors of the soap have been selected. Usually, to get the color of a shadow on an object, you need to add an additional color to the main color of the object. For darker shadows, use the base color of the subject, but with less white. In some cases, adding additional color doesn't darken the color enough, so that's when we add a little black.
SHADOWS
Shadows create light. Shadows are divided into three categories. The first is the shadowed part of the object, known simply as the SHADOW. The second is a falling shadow from an object, which is formed when the object obscures the light from the illumination source. The third category is the shadow of neighboring objects. 
The shadow portion of an object is a darker, less saturated version of its base color.
Direct light produces dark shadows. Diffused light produces less intense, blurry shadows.
Reflected light in the shadow (reflex). 
Light falling on an object from its surroundings is called reflected light or reflex. The color of the objects that surround our subject significantly affects the reflected light. See the green reflected light in the left ball? Notice the reflected red in the middle ball. The color of the environment is an integral part of all shadows. 
The light and shadow saturation of surrounding objects also affects the reflected light. The first ball just hangs in the air. The second ball also reflects the white surface. The third ball reflects the black surface. The light and shadow saturation of surrounding objects is also an integral part of shadows.
Falling shadows.
A cast shadow is always characterized by being darkest and most focused at the source of the shadow (the subject). Falling shadows are painted in a darker, less intense color than the color of the surface on which they fall. 
The color of the falling shadow always contains additional color to the color of the lighting and a complementary color to the color of the surface on which the shadow lies.
See a blue tint in the shadow of an object that is illuminated by orange light? And an orange tint in the shadow of an object lit in blue. In the shadow of an object illuminated by red light there is a shade of green. And notice the red-violet hue of the shadow cast by an object illuminated with yellow-green light.
Drop shadows are associated with shape and texture. 
Falling shadows describe the surroundings of an object. On the left, the wall is defined by the falling shadow of the glass. The shadow on the right indicates the presence of a mound. 
The edges of a shadow define the texture of the surface on which the shadow falls.
Grass on the left and dirt with rocks on the right.
Falling shadows in direct and diffuse light. 

Direct light (left) usually comes from a single light source - for example, the sun or a spotlight. It produces high contrast and rich, dark cast shadows.
Diffuse light is usually obtained from several light sources. It produces low contrast and unclear cast shadows. 
Objects with virtually no cast shadow are ALWAYS in diffuse light, where they appear flatter and less textured.
Shadows from neighboring objects. 
These are the dark shadows we see in places where objects touch each other. Dark line around closed door, a dark line under a mug of coffee, a dark line between tightly clenched fingers - this is the shadow from neighboring objects.
It is relatively independent of the direction of illumination. These shadows in the shadows are usually the darkest parts of the drawing. 
A narrow dark stripe under the cylinder on the left tells us that the objects are separated. The cylinder on the right is connected to its base.
CONTRAST
Using light and shadows together.
Contrast is the ratio of the lightest and darkest parts of an object or its surroundings.
Tone scale.

On the left is high contrast, on the right is low contrast.

When objects have high contrast, they appear closer to us. When contrast is lower, objects appear further away from us. Those rocks in the distance seem further away from us, their contrast is lower than the contrast of the rock closest to us. 
The gradual saturation of objects with contrast makes them visually closer to us. 
By the contrast of the falling shadow and its surroundings, you can determine the distance.
Low contrast 
Objects in diffuse light have the lowest contrast. 
Objects without a cast shadow are always in diffuse light. If an object has a tonal gradation from medium to dark, it should have a cast shadow. 
If an object has a tonal transition from medium to light, then it will appear as if in a haze or fog.
CONTRAST IS CREATED BY THE TYPE OF LIGHT. High contrast corresponds to bright lighting. Low contrast corresponds to diffuse lighting, distant distances, and haze.
TEXTURE
Texture helps define what exactly you are seeing.

The texture is best seen when light fades into shadow. On smooth objects, glare is a distorted reflection of the light source itself. The sharper the focus of this reflection, the smoother the surface of the object. A glass bottle has a smoother surface than an aluminum bottle, which in turn is smoother than candle wax. We know how these objects focus the glare on themselves.

On objects without bright highlights, texture is clearly visible and is determined by the transition from light to shadow.

These ten objects are arranged in order of their texture.
Notice where your eye immediately looks to appreciate the texture of an object.

We look at the transition of light to shadow to determine how textured an object is.
Texture in diffused light.

On the left is direct light, on the right is diffused light.
Objects in direct light appear more textured than objects in diffuse light.
The log and towel appear softer and smoother in indirect lighting. Objects appear less textured in diffuse light because the transition from light to shadow takes longer.
GLAZING/LAYER LAYERS
Glazing layers are applied on top of the dried paint.
Transparent layers of oil paint are called glazing layers. Translucent are layers of glaze. To obtain glaze, the paint is diluted in a ratio of 1/3 Damara varnish, 1/3 turpentine and 1/3 linseed oil. Glaze is a thin transparent layer of paint, which is placed on another dried layer to obtain a shade of the third color. For example, if you put diluted quinacridone pink (a clear color) onto blue, you will get purple. If you glaze the exact same color, you will enhance it. Falling shadows on complex textures are often covered with glaze. Glazing darkens the color slightly. (See the “Paints” lesson about transparency and matte).
This is glazing.

For example, the shell of a beetle needs to be greened.

The glazing liquid is mixed on a palette with cyan green (transparent color) until the required degree of transparency is achieved.

Then the mixture is applied with a core brush to the drawing in a horizontal position. Leave to dry overnight. When using glazing, you can change the color of the design without changing the direction of the paint strokes on the base layer.
Glaze is created by using a diluted matte color over the dried color of another paint. The glaze layer does not change color and is a translucent layer.

The paint is also mixed on the palette with the glazing mixture and applied to the horizontal surface with a core brush.

White (matte color) with glazing gives us rays of light. Leave the work to dry overnight.
http://demiart.ru/
Foreign artist and good art school teacher Johannes Vloothuis teaches thousands of students how to paint with oils (among other painting techniques). Johannes gave us 10 best advice for oil painting artists. I think you will agree that every artist should know these basic painting techniques.
1. Use white underpainting or quick-drying white.
One of common problems What bothers oil painters is that when you add a layer of paint on top of another, they tend to blend together. For example, it is difficult to add snow on mountain tops when the first coat of paint has not yet dried.
When an artist gets into a rage and faces such a problem, he gets upset and puts the painting aside, and returns to work after a few days. There are special new whites that can solve this problem, unlike standard titanium whites. They are called quick-drying white or white underpainting.
2. Fine lines with oil.
Most, if not all, oil painters get frustrated when they try to paint fine lines with oil paint, especially over paint that has not yet dried. Even signing a painting is not so easy if the signature is small. Here are some ways to achieve this without waiting for the oil to dry out:
- Use plastic card instead of a spatula
- Use acrylic paint over dry oils
- Another innovative way is to use pastels. It usually doesn't dry, but you can seal it with a coat of varnish.
If you visit an art gallery and look at oil paintings up close, you will see that there are voids in the brush strokes in the painting with the color of burnt sienna - this is underpainting. It provides the following benefits:
- It is more difficult to evaluate and select a color on a white background
- In plein air in sunny weather, a white canvas will be too bright. You can, of course, wear glasses, but there will be obvious problems with choosing the color
- It is almost impossible to paint an entire white canvas in a quick, spontaneous plein air and you will be left with white gaps between the strokes.
- Oil paint is not 100 percent opaque, so there will be gaps in the underpainting between strokes. important role in the perception of the picture. If you are painting a picture with warm colors, for example autumn, then it is better to make the underpainting in a cool color
Underpainting of Johannes Canyon Vista 
Completed landscape of Canyon Vista, Johannes Vloothuis
4. Apply oil in a thick layer
One big advantage of acrylic and oil paints is the ability to apply thick, thick layers that can convey a three-dimensional appearance. Other paints such as watercolors and pastels do not have this quality. My advice is to start with a thick layer of oil paint and work your way down to a thin layer. Add drops of paint only for small parts- tree trunks, stones, flowers, leaves.
In the picture below you can see that the flowers and leaves are applied in a thick layer and therefore create a foreground effect. 
Carmel Mission Johannes Vloothuis
5. Dry brush to create texture
To paint heaps of leaves, a lawn, foam in the crash of waves and waterfalls, use the “Dry Brush” technique. Dry brushing is a term used to describe the technique of applying paint by "stroking" small amounts of paint. The dry brush technique can be used to make wood look scuffed, paint lots of small leaves, paint foam near water, and add weeds to grass.
For a more visual representation, in the video below you will see how to draw a tree using the dry brush technique.
6. Drawing on already dry canvas
Alla Prima or wet on wet is a popular painting technique in oil painting. However, the time and size of the painting may not allow you to complete piece of art in one sitting. Working on dry painting does not give the desired blending effect. This can be a problem when doing reflections on water that require blending.
To work on dry painting, I recommend first adding a thin layer of Liquin oil paint thinner. New paint will dissolve, but will not merge with the previous layer. This way you can soften the edges of the image!
7. Invest in professional quality paints and save on canvas.
Canvas is expensive and mostly an afterthought, however, many professional artists prefer to use this high quality canvas in their paintings.
I will admit that there is some benefit when it comes to dry brushing on canvas in that it frames the painting beautifully, but I don't think the benefit is worth the high cost.
available in our online store.
You can prepare your paintings by simply applying super-heavy Liquitex gesso with a paint roller to the wood panel. This will leave random raised little bumps, simulating linen fabric. Use masonite or birch for the panel. And, instead of spending money on canvas, invest in professional paints from which you will reap the benefits.
8. Use different colors to create more interest in the painting.
Solid monochrome colors are boring, so top artists exaggerate and add multiple variations of similar shades in one area. Try this: Partially mix the colors on your palette until you've evened out the saturation (about 50 percent blended). Apply more effort when squeezing out paint. You should be able to see subtle color variations in each stroke. It takes some practice, but once you get the hang of it, your paintings will look more alive.
You can also use a colorful mixture to paint foliage, grass and rocks. You will learn about this in the short artistic video below, which shows how to draw different kinds green realistic foliage.
Also watch the video to learn how to mix colors and what strokes you can use to paint thick spruce trees.
9. Draw fog for atmospheric depth
I think the fog is completely blown away landscape painting. Scenes where fog is beautifully painted can add deep atmosphere to your painting.
IN art gallery I once saw a beautiful picture of Upper Yellowstone Falls with big amount fog, where falling down he reached the bottom. However, I could see through the fog and it looked very realistic. This was achieved through the use of white zinc, which has a characteristic translucency. You can also use it to add haze to distant mountains and other areas where fog can add atmosphere.

10. Use your fingers
There is an unfounded fear of using oil paint, especially if it comes into contact with skin. Please note that leading manufacturers list toxicity levels on their paint tubes.
I love mixing oil paints and want smooth strokes. With your fingers you can feel and apply the right pressure on the canvas, applying good strokes. You can't do that with a brush.
Well, buy high-quality spatulas and brushes in our online store in the appropriate section and section
In oil painting there are many techniques and techniques for working with paints. The artist himself decides which methods are closer and more interesting to him to use. There are always two basic techniques: single-layer and multi-layer technology.
Single layer oil painting technique.
A preliminary drawing is applied future painting. The picture is painted in a short time. Dye should not dry out, since when applying colorful strokes the artist mixes them into each other, creating new shades right on canvas. This technique is also called ALLA PRIMA (in one step). It allows you to work en plein air or with a small format sketch. Working with a hard knife or a palette knife, the picture turns out textured. By applying paint thickly, you can shape, move and mix the paint layer. Paints differ from each other in their properties. For example, white and cadmium have a dense structure, which allows you to work pasty (pasty) or body-like. One session is not always enough to complete a painting. To prevent the paint from drying too quickly, place the painting in a cool place protected from the sun.
Multilayer oil painting technique.
Long-term work on a painting requires applying two or more layers of paint. The first layer is underpainting. The artist applies a drawing to the canvas and paints a layer on which the main tonal spots are visible. The next layer is registration and detailing. Before proceeding further, the previous layer must dry out. Otherwise the paint will dry out and become dull. This is due to the fact that undried paints absorb oil from freshly applied layers. Before work, it will be enough to oil the picture.
 registration and detailing in oil painting
 Modern artists combine both techniques, alternating layers of paint, achieving depth, saturation and brightness of color. Using texture paste, the artist literally sculpts the texture, thereby bringing objects to the foreground. With a bristle brush and palette knife you can create a rough, bumpy surface. And then add layers of color that suit the author’s artistic intent.
Don’t look for a special recipe for mixing colors, don’t imitate the author you like! The individuality of the artist is manifested in the author's style of writing. Follow your own path, gaining vision and skill in drawing. On our
the past fascinates with its colors, the play of light and shadow, the appropriateness of each accent, the general condition, and flavor. But what we see now in galleries, preserved to this day, differs from what the author’s contemporaries saw. Oil painting tends to change over time, this is influenced by the selection of paints, execution technique, finishing coat of the work and storage conditions. This does not take into account minor mistakes that a talented master could make when experimenting with new methods. For this reason, the impression of the paintings and the description of their appearance may differ over the years.
Technique of the old masters
The oil painting technique gives a huge advantage in work: you can paint a picture for years, gradually modeling the shape and painting the details with thin layers of paint (glaze). Therefore, corpus painting, where they immediately try to give completeness to the picture, is not typical for the classical manner of working with oil. A thoughtful step-by-step approach to applying paint allows you to achieve amazing shades and effects, since each previous layer is visible through the next one when glazing.
The Flemish method, which Leonardo da Vinci loved to use, consisted of the following steps:
- The drawing was painted in one color on a light ground, with sepia for the outline and main shadows.
- Then a thin underpainting was done with volume sculpting.
- The final stage was several glaze layers of reflections and detailing.

But over time, Leonardo’s dark brown writing, despite the thin layer, began to show through the colorful image, which led to the darkening of the picture in the shadows. In the base layer he often used burnt umber, yellow ochre, Prussian blue, cadmium yellow and burnt sienna. His final application of paint was so subtle that it was impossible to detect. Own developed sfumato method (shading) allowed this to be done with ease. Its secret is in heavily diluted paint and working with a dry brush.
 Rembrandt – Night Watch
 Rubens, Velazquez and Titian worked in the Italian method. It is characterized by the following stages of work:
- Applying colored primer to the canvas (with the addition of some pigment);
- Transferring the outline of the drawing onto the ground with chalk or charcoal and fixing it with suitable paint.
- The underpainting, dense in places, especially in the illuminated areas of the image, and completely absent in places, left the color of the ground.
- Final work in 1 or 2 steps with semi-glazes, less often with thin glazes. In Rembrandt, the ball of layers in the painting could reach a centimeter in thickness, but this is rather an exception.
In this technique, particular importance was given to the use of overlapping complementary colors, which made it possible to neutralize the saturated soil in places. For example, red primer could be leveled out with a gray-green underpainting. Work in this technique was carried out faster than in Flemish method, which customers liked best. But the wrong choice of the color of the primer and the colors of the final layer could ruin the painting.

Coloring of the picture
To achieve harmony in a painting, they use the full power of reflexes and complementary colors. There are also such small tricks as using colored primer, as is customary in Italian method, or coating the painting with varnish and pigment.
Colored primers can be adhesive, emulsion and oil. The latter are a pasty layer of oil paint of the required color. If a white base gives a glowing effect, then a dark one gives depth to the colors.
 Rubens – Union of Earth and Water
 Rembrandt painted on a dark gray ground, Bryullov painted on a base with umber pigment, Ivanov tinted his canvases with yellow ocher, Rubens used English red and umber pigments, Borovikovsky preferred gray ground for portraits, and Levitsky preferred gray-green. Darkening of the canvas awaited everyone who used earthen colors in abundance (sienna, umber, dark ocher).
 Boucher – delicate colors of light blue and pink shades
 For those who make copies of paintings by great artists in digital format, this resource will be of interest, where web palettes of artists are presented.
Varnish coating
In addition to earthen paints, which darken over time, resin-based coating varnishes (rosin, copal, amber) also change the lightness of the painting, giving it yellow tints. To artificially make the canvas look antique, ocher pigment or any other similar pigment is specially added to the varnish. But severe darkening is more likely to be caused by excess oil in the work. It can also lead to cracks. Although such the craquelure effect is often associated with working with half-damp paint, which is unacceptable for oil painting: they paint only on a dried or still damp layer, otherwise it is necessary to scrape it off and paint over it again.
 Bryullov – The Last Day of Pompeii
 16. Oil painting. Basic information about technology.
IN art school New Art Intention closer to the end of the basic painting courses and drawing courses, beginning artists begin to use oil painting. Due to complexity new technology many questions arise, and, bearing in mind that the new is the well-forgotten old, we decided to publish an article “Initial information about oil painting techniques”. This article was written by the artist F.I. Rerberg (1865-1938), and published in the magazine " Young artist» No. 9, 1937. It contains somewhat outdated methods and techniques for contemporary artists, but fully effective if you are “in the field”, where before the store with art materials and you can’t get supplies. And it's priceless! Because few artists now fill their own brushes, prepare paints and varnishes, and prime their canvases. But maybe it's worth a try?
The article is completely reprinted, “as is,” with explanations from the 1961 editors (in italics). Our comments will be below.
All the painstaking work of typing and editing this article (and several lessons) was undertaken by Katya Razumnaya, for which we express our deep gratitude to her.
Basic information about oil painting techniques.
Before starting to paint with oil paints, a novice artist needs to know what oil paints are and how to handle them. While working with water paints (watercolors), you have probably noticed that a fine powder settles at the bottom of the glass in which you rinse your brush. It is this powder that imparts color to the paint. The coloring substance is called pigment. If the powder (pigment) is mixed not with glue, which is used to make all water-based paints, but with oil, the result is oil paint. For this purpose, flaxseed oil is most often used, less often nut, poppy and sunflower oil. When exposed to air, these oils do not evaporate like water, but, like glue, turn into a solid mass. There are oils, such as olive oil, that always remain liquid, and paint mixed with them never dries. Other liquid oils evaporate like water. The paint prepared on them quickly becomes a dry powder. Paint powder is not simply mixed with oil, but ground with oil. Small amounts of paint are ground with a chime (the so-called pear-shaped stone body with a flat base). Paint mixed with oil is rubbed with a chime on a stone slab. The movement of the chime is either circular and progressive, or rectilinear in different directions and rubbed until all the paint turns into a homogeneous mass, in which the powder is not felt at all to the touch. The chime and slab must be made of very hard stone (porphyry, granite). The stone slab can be replaced with thick mirror glass. In factories artistic paints paints are rubbed on special machines - paint grinders.
The finished grated paint is stuffed into tin tubes (tubes) closed with screwed heads. The paint is made of such thickness that it can be freely taken with a brush and painted on without diluting anything. The paints are sold in this form. If the paint we bought turns out to be too thick, we will have to add a drop or two of oil. It happens, on the contrary, that the paint squeezed out of the tube flows and blurs and does not hold its shape, which indicates that there is excess oil in it. Before you write with this paint, you need to smear it on the paper for several minutes. Excess oil is absorbed into the paper, the paint thickens and becomes usable.

To work, oil paints are placed on the palette. The palette is made of light wood. It is shaped in such a way that it can be comfortably held with the left hand along with several hands. Nowadays, palettes are usually made from plywood glued together in three layers. These palettes are very durable, but heavy. It is better if the palette is cut from one piece of wood and has a large thickness near the hole for thumb, to the left and top edge it should be strongly planed. This palette is easy to hold on your hand and doesn't cut your thumb.
A palette made from plywood must be pre-soaked in oil and dried well. An unoiled palette draws oil from the paints placed on it, causing the paints to thicken.
The paints are placed on the upper left edge of the palette. The middle remains for making mixtures. It is necessary to establish a certain order in the arrangement of paints on the palette, so that each paint always falls in its designated place. Most often, white paint (whitewash) is placed at the right end of the palette. I. E. Repin placed white in the middle of the upper edge of the palette, to the right of them he placed warm colors - yellow and red, to the left he placed cold colors - green and blue, then black and brown.

Upon completion of work, the palette must be cleaned immediately. Leaving a pile of unused paints on the edge of the palette, the entire remaining surface of the palette should be freed from the paint mass and wiped dry with a piece of cotton wool or a rag, but by no means wash the palette with turpentine or soap and water.
Brushes for oil painting are mostly bristle and, more often, flat.
Oil paints cannot be painted with one brush, like water paints. Brushes cannot be washed while working in oil, so you cannot apply light and dark tones, red and green, etc. to the picture with one brush.
Buy bristle brushes No. 2, 4, 6, 8, 10 and 12 for the first time. Then, undoubtedly, you will want to have more brushes.
To display small details in the picture, you will have to use one or two small brushes made of soft hair. The best of them are core ones. The brush is made from the tip of the kolinus tail. Since kolinsky brushes are expensive and are not always available for sale, you can get by with squirrel or ferret brushes. Buy #5 and #8.
Brushes must be kept very clean. If not washed in time, a dried brush will soon become unusable. After work, dirty brushes can be placed in kerosene*, in which they can stand for one or two days without much harm (*holes are cut in a piece of cardboard or plywood in accordance with the diameters of the brushes. The brushes are inserted into the holes so that they do not fall through, but are suspended).
Before work, brushes removed from kerosene are wiped dry with paper. Wash the brushes with soapy foam and rinse with water until the foam stops completely staining and no traces of paint remain on the brush.
In addition to the listed accessories, without which one cannot paint with oil paints, some other items are less necessary, but useful to the painter: a palette knife (spatula) - a horn or steel knife that is used to clean the palette, mix paints, remove excess paint from a painting, etc.
The artist-painter usually keeps paints and all the necessary accessories in a sketch box, which is convenient to carry with him to sketches. Its purpose is to serve both as a machine for writing sketches and, at the same time, as a repository for raw sketches. There are a lot of sketchbook systems.

What colors should a beginning painter have on his palette? What material can you paint on with oil paints? Do I need to dilute or add anything to the finished oil paints?
In oil painting, first of all, you need white paint - whitewash, which we completely do without when working with watercolors. Until the 19th century, all oil painting was done on white lead. Nowadays, most of our artists paint with zinc white. A beginning painter can, of course, paint with both. But it is better if he remembers that lead white dries faster and, upon drying, forms a very strong layer, but it tends to turn black from bad air (from hydrogen sulfide gas), especially in a dark room. In addition, they are very poisonous. Zinc white does not turn black, but it takes a long time to dry, and the dried layer cracks more easily. Now it is recommended to make a mixture of 2/3 zinc and 1/3 lead white.
Of the red paints, you need kraplak, or garance, a transparent paint of a thick crimson-red color. The bright orange-red dye is called cinnabar. IN Lately We are beginning to replace cinnabar with an equally bright but more durable paint - cadmium red. Our brightest yellow paints cadmium yellow. It comes in a range of shades: orange, dark, medium, light, lemon. Buy two of them: dark and light. In terms of brightness of color, cadmium's rival is chromium yellow, or crown. It is much cheaper than cadmium. Cadmium is a durable paint, but crown soon loses its brightness.
Since time immemorial, the most common yellow and red paints have been the so-called ochres. Ohrami still primitive painted silhouettes of animals on the walls of caves. Ocher is natural yellow clay, only washed and crushed. It is found in many places around the globe and has various shades of yellow, brown, and less often red. High temperatures cause all yellow and brown-yellow ocher to turn red. You've probably seen how yellow raw brick turns red after being fired in a kiln.
All ocher is durable and cheap. Buy light yellow ocher and some red (burnt) ocher. Red ocher or its variety is sometimes called flesh ocher, Venetian, Indian, English paint.
Close to ocher natural Siena soil (from the surrounding area Italian city Siena), bright brown, dark yellow and burnt Siena soil are being replaced by lands similar to them in color, available on the territory of our Union. There are a lot of green paints sold, but most of them are mixtures of blue and yellow paints. Each of you can make this mixture yourself. In a set of paints, you can limit yourself to one green paint. The famous Soviet landscape painter Rylov used only one green paint- emerald green. And look, what an abundance of green shades he extracted from his modest palette!
Of the blue paints, especially at first, you could limit yourself to one ultramarine. Lighter blue paint- cobalt - does not completely replace ultramarine, but is necessary in the absence of the latter. The dark blue Prussian blue (or Prussian blue), common among us, seduces beginners with its great strength and brightness. But it’s better not to get used to this paint. It will be difficult to wean yourself off of it, but it is weak and breaks down when mixed with most other paints.
The black paints we currently sell are: burnt bone and grape black.
Of the brown paints currently produced by our factories, Mars Brown is the best.
What material can you paint on with oil paints?
On a very smooth, slippery surface, oil paint does not adhere, glides, and does not stick to the surface. On a porous surface that absorbs oil, oil paint, as they say, dries up, loses its shine, and becomes dull. So, the paint will fade greatly on ordinary white cardboard or paper. If you glue the paper with a liquid solution of some kind of glue, you can avoid dryness, but sizing makes the paper easily brittle.
In the last century, small works were often painted on oiled paper. Our famous artist A. A. Ivanov sometimes did this. The paint adheres well to this paper and does not dry out. But over the years, dried oil becomes brittle and oil-soaked paper crumbles like a dry tree leaf. But here's a recommended technique: the paper is glued with strong glue onto thick cardboard, and after that it is soaked in oil. The most common and convenient material for oil painting in our time is canvas. Almost all oil paintings that adorn our museums are painted on primed canvas.
More often, linen or hemp canvas is used for painting, as it is more durable, but they paint on both paper and jute canvas. The canvas fabric should be dense and smooth, without knots. You cannot paint in oils on a blank canvas. Oil, absorbed into the canvas, overeats it. After some time, the oiled canvas becomes brittle and collapses. Therefore, the canvas for painting must be covered with primer - primed. This primed canvas is sold ready-made. But, since both the success of the work and its further safety largely depend on the quality of the soil, you need to be able to choose a primed canvas when purchasing it, or better yet, be able to prime the canvas yourself.
The piece of canvas that you are going to prime must be stretched tightly onto the frame, otherwise the canvas will wrinkle. Before applying the primer, the canvas is glued with a liquid glue solution, preferably fish or gelatin. One leaf of gelatin is diluted in a glass of water. When the glue dries, primer is applied to the glued canvas.
Here good recipe adhesive primer:
Gelatin 10 g, zinc white or chalk 100 g (a little more than half a glass), water 400 cm3 (two glasses). To make the soil more elastic, add 4 cm3 of glycerin or honey. This amount of soil is enough for 2 m2 of canvas. The primer is applied with a brush.
Very good soil is obtained using this recipe:
4 chicken eggs stir in 160 cm3 of water and add 120 g of zinc white (or chalk). This amount of soil can be used to cover 1 m2 of glued canvas twice.
To work with paints, small pieces of primed canvas, paper or cardboard can be attached with thumbtacks to the board. A canvas measuring 50 cm or more must be stretched onto a subframe equipped with pegs inserted into its inner corners, with which you can stretch the canvas if it has sagged or formed folds. You need to practice a little in your ability to stretch the canvas onto a stretcher. Having folded the edges of the canvas onto the sides of the frame, fasten with a nail the middle of one side, then the middle of the opposite and the middle of the third and fourth sides. The canvas is then pulled towards the corners, gradually driving nails from the middle of each side to the corners.

When buying or ordering a machine for your painting (easel), pay attention to the fact that the machine is stable and the painting does not sway or tremble from the pressure of the brush. All folding tripods have very little stability, and for working in a room it is better to have a simple vertical easel with pegs.

I have already said that you can paint with oil paints without diluting them with anything, just as they come out of the tubes. But there are times when you have to resort to additional liquids and compounds during work.
You need to have a bottle of purified flaxseed, sunflower or nut oil. But do not forget that any excess oil in paint is very harmful and leads to yellowing and cracking of the paint layer. If for some reason you need to make the paint more liquid, it is better to dilute it with some liquid that will evaporate from it and will not leave any trace in the paint. Such a paint solvent can be refined petroleum (refined kerosene) or white spirit (solvent No. 2). In addition, there are special varnishes that can be used to dilute oil paint. They are called painting varnishes. Do not mix slow-drying painting varnish with others, which is called "retouche varnish" (retouch varnish). The purpose of the latter is to destroy rottenness*.
(*Since the author of the composition of the varnish does not offer retouching, it is possible to remove the fade with bleached or compacted oil, specially prepared for painting. Some artists, to eliminate the fade before the secondary propivation, wipe the faded areas with a weak solution of dammar or mastic varnish. It is used as a solvent for turpentine varnishes purified turpentine; for varnishes prepared with white spirit, white spirit is used.)
There are also compounds that, when added to oil paint, speed up its drying. I warn the inexperienced painter against these compositions (driers), since some of them, while accelerating the drying of paints, at the same time cause them to blacken and crack.
Having received oil paints and a primed canvas in his hands, an inexperienced painter usually begins to paint with these paints at random, regardless of anything, rejoicing in the fact that he can rewrite the same places many times.
As a result of such treatment of the material, the paintings quickly deteriorate, lose their color, turn black, become covered with cracks, and the recorded areas begin to show through the top layers of paint. Do not make excuses by saying that your first endeavors are not of great value and no one will regret if our pictures die:
Remember at first some rules for handling oil paints. If you do not expect to finish your work in one day, as they say, in the wet, do not apply the first layer of paint thickly and avoid introducing slow-drying paints into it (kraplak, gas black).
Usually the paint does not dry on the first day, and the next day you can continue working on it wet. When the paint stops staining, you need to leave the work for several days and continue it only when the bottom layer seems to have hardened. You also need to let each layer dry before applying a new one. With secondary registrations, withered areas usually appear on the paint layer, that is, dull areas. These faded areas can be restored to shine by carefully wiping them with retouch varnish. Be careful because the varnish may dissolve paint that is not dry enough. You can coat the dry area with oil, but the next day you need to use a piece of paper to remove the remaining oil that has not been absorbed into the paint, otherwise a yellow spot will form on the oiled area over time. Oil destroys rottenness better than varnish. You can to some extent avoid the formation of withering marks by wiping with retouch varnish all places that are subject to secondary registration. The old masters rubbed such places with a cut onion or garlic*. When making dry adjustments, be aware that oil paints become more transparent over time, and the parts you painted on top begin to show through under the top coat of paint. Therefore, do not just write down the places that you want to destroy, but scrape them off first. (* This method is especially often used in cases where fresh paint is applied to already very dry paint. Rubbing with onion or garlic helps to better adhere the new layers of paint to the underlying ones).
There are many examples of pieces of painting protruding from under the top layer, which the author considered destroyed. A painting by Velazquez has survived, in which the horse turned out to have eight legs, since the four legs painted on top were joined by four, destroyed by the author, but now clearly visible.
Performance techniques oil painting there are several. In the old days, usually, having carefully drawn the outline, the picture was underpainted, that is, light and shadow spots were installed on the canvas, often in the same tone with some kind of, mostly brown, paint, sometimes not in oil. Such underpaintings remained from Leonardo da Vinci. According to the underpainting, the whole picture was painted in colored paints; The picture ended with glazes. Glaze was especially widely used by the great Venetian masters of the 16th century, who were considered unsurpassed colorists.
Nowadays, artists often paint at once, trying to give each stroke of paint the desired shape, aperture, and color. This is how landscape sketches are mostly written. For example, Repin painted in one session, using raw material, not only sketches, but also completely finished portraits, without preliminary drawing, without any underpainting, without any glazing. Repin completed his large figure paintings for a long time, redoing a lot of them, sometimes even starting the painting again on a new canvas. Serov painted portraits for a very long time and, after drying the work, finished it with glazes.
A young aspiring artist must, from the first steps, accustom himself to serious, thoughtful, systematic work and to a strict attitude towards his material.
U rocks of oil painting for beginners in art school New Art Intention start with practical methods learning to paint with oil paints. But before that, artists paint a whole series of paintings in acrylic, imitating the technique of oil painting, i.e. They write through underpainting and using a brushstroke technique that is closest to oil painting. Initial work They are painted on canvases on cardboard and later, when novice artists get used to the oil technique, they switch to canvases stretched on a stretcher. Although canvases on cardboard are also used in plein air lessons for drawing sketches. In addition to linen, cotton and synthetic canvases are available for sale; the latter have pronounced “rubber” properties, which is somewhat specific.
Let's add on the above article. Now our artists use both plywood and plastic palettes. Plastic palettes do not delaminate and are easier to handle.
There is a huge choice of brushes now, many beginners in painting lessons work with synthetics, some with a column, some use bristles. The properties of each, or "brush stroke", are known to them and are suitable for different tasks when teaching painting. The only thing that can be said is that synthetics are durable, the kolonka wears off very quickly on the canvas.
There is also an abundance of color oil paints on sale now. There is no need to cook them. Paints from different manufacturers interact well with each other and mix with oils and varnishes. To dilute paints in painting lessons, we use “threesome” - a mixture in equal quantities varnish (for example, damar), oil (linseed) and pinene (refined turpentine). It is better not to use sunflower oil, because... it is semi-dry.
Training and further improvement of painting skills in our school New Art Intention have no time boundaries. Therefore, our artists have created many interesting paintings from still life to landscape, from portraits to abstract paintings.