How to draw a pony step by step with a pencil and more, including from the cartoon Friendship is Magic: step-by-step instructions for children with diagrams and videos. How to draw Flattershy from the TV series My Little Pony Photo gallery: children's works
Pony Fluttershy is another heroine of the famous cartoon by American animators “Friendship is a Miracle!” She lives in the town of Ponyville and belongs to the Pegasus group of ponies. Fluttershy is a horse with wings. She can fly and move through the clouds. Control natural phenomena together with other pegasus ponies. Fluttershy is a very shy person. She tries not to stand out anywhere and does not brag about her skills. Loves animals very much. All in all, a pretty nice horse. Let's draw it here step by step with a pencil.
Stage 1. First we draw sketch lines of her future body. It is a round head with a line just above the middle. From the head there is an almost oval figure of her body. From the body we will draw four curved lines of the legs. From the circle we will draw a smooth line of the mane. From the back there is a smooth line of the tail.

Stage 2. Let's start tracing the contours of her muzzle. We draw it smoothly from the neck line, marking a rather wide, sharp ear sticking up. From the front we show the frontal part, then the slightly protruding nose and the chin part of the muzzle.

Stage 3. On the muzzle we make very large expressive eyes. We draw ovals, make clear lines for the eyelids, outline eyelashes on top, sides and bottom. Then in the ovals we draw the eyeballs themselves with large pupils in which glare of light is reflected.

Stage 4. On the head we draw a line of bangs and a bow at the back that intercepts the pony’s mane.


Stage 6. Now we outline the body of the pony. The back, breast and abdomen.

Stage 7. Draw the legs. First those that are closer to us, then those that are further away. We do all this according to the original sketch lines.

Stage 8. Now all that remains is to show her beautiful tail and show the small wings on the barrel.

Stage 9. Let's break the additional lines along the bangs, mane and tail, giving them volume and texture.

Stage 10. Let's paint our Fluttershy in delicate colors. The body is beige, the mane is pink. Green bow. Sea green eyes.

Flattershy is one of the heroines of the famous My Little Pony series, which has won many children's and adults' hearts. Cute little puppies inspire the creators of computer games, comic books, children's toys and carnival costumes. They did not go unnoticed by artists. Let's try to figure out how to draw Fluttershy, a lemon pegasus pony with soft purple curls in her mane. And in order for the drawn horse to be as similar as possible to the cartoon prototype, we will pay attention to its history, character and legend.
Character character
Flattershy's name literally means "Trembling Confusion." The modest pony is quite consistent with the chosen name: Flatty is modest and shy. She loves peace and quiet and never gets involved in conflicts. Grudges, vindictiveness, cunning - this is definitely not about her!
Flattershy's appearance
Before drawing Fluttershy's pony, let's take a step-by-step look at her appearance. Each horse in the series has its own unique skin tone (skin tone). Flat has soft yellow skin. Like her friends, she has large naive eyes and a snub nose. One of the character's features is a long mane of a light lilac hue and the same tail. Flattershy has a cutie mark on her rump - a distinctive sign - three lilac butterflies.
Legend and history
Flath was born and raised in Cloudsdale. As a child, she was teased for her fear of flying. Perhaps this was the reason for her shyness. However, you should not think that the yellow pegasus is so harmless. There were more than once moments in the series when Flat, who endured to the last, went on the attack alone and dealt with her enemies. It was then that followers learned that their favorite was amazingly strong both physically and mentally. Thanks to this inner strength, she conquered her fears and now flies, like her friends. Flattershy does not have a permanent job. Her calling is to care for animals and help the weak. I must say, she’s great at it and Flatty’s talents are always in demand. She is one of the few ponies whose family is unknown. Her family never appears in the series.
Drawing Flattershy
Before we figure out how to draw Flattershy, let's decide on the materials. It is best to depict this vibrant character in color. Markers, felt-tip pens, gouache or regular ones are ideal for coloring. In addition, a soft, simple pencil and a good eraser will definitely come in handy. An image of the heroine will be very useful.
How to draw Flattershy step by step
We will prepare everything you need and carefully place it in the workplace. We will continue to work according to the following scheme.

- First we make the markings. You shouldn't press the pencil too hard - we still have to remove these lines from the finished drawing. Flatty's head is round and his body is oval. Its proportions are very far from those of a real horse; the body and head are almost the same size.
- Most of the face is occupied by the eye. It expresses the entire character of the character, which we examined in detail before drawing Flattershy. Kindness, naivety, modesty - this is what should happen. Closer to the back of the head we draw a soft ear.
- Add a mane, the tip of which is curled. Let's start drawing the legs. It must be said that the heroes of the My Little Pony series do not have sharp horse hooves. Their legs are more like soft paws. Let's draw wings - after all, Fluttershy is not just a cute girl, but a real pegasus.
- Draw the hind legs and tail, also curled at the tip. We draw butterflies on the cereal. Use an eraser to remove auxiliary lines. This should be easy, because before drawing Fluttershy, we decided to make markings without pressing hard on the pencil.
5. The drawing is ready! You can start coloring.
Most children love to draw. And if at an early age they are more fascinated by the process itself, then during school years this activity becomes meaningful, aimed at the result - creating the desired image, for example, a favorite animal or cartoon character. Both are embodied by the pony. This kind and graceful creature, which children can see in the circus or zoo, always evokes affection, especially if they have the opportunity to ride it. The miniature horse can also be seen in the animated series “My Little Ponies,” which takes us to a fictional country inhabited by tiny artiodactyls. How to help your child draw a pony step by step? What other technique can interest a young artist?
Preparing to Draw
Before you start teaching a child how to draw a pony, as well as any other animal, an adult needs to let the young artist examine the appropriate toy. In this case, you should pay attention to large parts of the body and small details of the animal’s structure, discuss how a pony differs from an ordinary horse (shorter legs, due to which it has a small stature). The head of this horse is disproportionately large compared to the rest of the body. The emphasis is also on the lush mane and ponytail, large eyes with long eyelashes.
Before starting to draw, the student must examine the small horse and highlight the key features of its structure.
Alternatively, you can consider photographs or book illustrations.
The simplest version of the image with which to start lessons is the image of a horse from the side, when only one eye and ear are visible.
As for the technical aspects of drawing, you need to consider the following.
- To create the basis of the drawing, you need to choose a pencil that is easy to erase (for this reason, you will also need a good eraser). Before starting the creative process, you should check the quality of the tools - draw lines with a pencil and then erase them: there should be no dirty marks left on the paper. There is no need to try to draw everything at once as smoothly and correctly as possible: it is better to draw the base lines, including auxiliary ones, and then delete some of them. Corrections don't have to be scary - they're a natural part of the job.
- No need to make the image smaller. It is better to learn to draw a horse on A4 or even A3 paper.
- You can also draw with chalk on a blackboard: this makes it easier to delete lines and draw new ones. And it is quite possible to preserve such a work with the help of a photograph. As for the magnetic board, you won’t be able to erase unnecessary elements.
- When creating an image, a student does not need to rush: after all, for a creative nature, the process of drawing brings pleasure and is a form of relaxation. Moreover, if there is a father and mother nearby, who guides the child and shares with him the joy of creativity.
- The task of an adult mentor is to encourage the artist in every possible way. It doesn’t matter if the first works are unsuccessful. First, it is advisable to practice on a rough draft, and then begin the main work.
- The silhouette of a pony is always first drawn with a simple pencil, and when coloring, you can use a variety of materials at the request of the child - colored pencils, wax crayons, bright markers, gel pens, a wide palette of gouache or watercolors.
You can even draw a pony, including step by step, with chalk on a blackboard
How to draw a pony from the TV series My Little Pony - step-by-step instructions
If a child likes the animated series “My Little Ponies: Friendship is Magic,” then he will probably want to portray his favorite horse (girls often collect a toy collection of characters).
The animation takes the viewer to a fictional country inhabited by tiny ponies. The main characters are six little girls, each of which has its own character and is endowed with unique abilities and distinctive external features. Among them there are just ponies, pegasuses with wings and unicorns (two horses of each type).
- Twilight Sparkle is the main character, a unicorn, lilac, has a purple mane with a pink stripe, and a pink star on her back leg.
- Rainbow Dash is a pegasus, the bravest horse, blue in color, with a multi-colored mane and tail.
- Rarity is the main fashionista, a unicorn, snow-white, with a purple mane and a pattern of spots on her back leg.
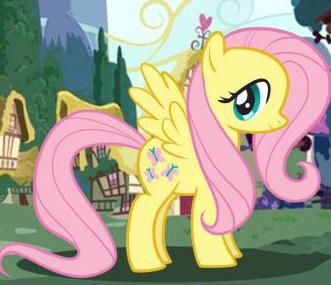
- Fluttershy is a big shy person who loves and knows how to communicate with animals, a pegasus, yellow with a light lilac mane.
- Pinkie Pie is a pegasus, loves holidays and fun, pink, with a red mane and tail.
- Applejack is a very hardworking farm pony who is yellow and wears a hat.
The main characters of the cartoon also include the little dragon Spike, who is in love with Rarity.
Each horse has its own character and unique abilities
General points when drawing cartoon horses
When starting to draw one of the cartoon characters step by step, you should explain to your child important general points.
- The anatomy of any object will consist of simple shapes (circles, triangles) and lines. In this case, the head is the largest circle. If the character is facing forward or backward, the circles overlap, but their size does not change.
Circles are the basis of pony anatomy, the largest circle is the head
- The circles are connected using the neck and tummy. Moreover, the lines should not be straight, but curved. The legs are drawn simply - in the form of triangles with a cut off top. To draw eyes beautifully, you should outline their line and perspective guide on the muzzle.
The connection of curved lines forms the neck and body of the horse
- The wings are very easy to draw, and the horn is depicted in the center of the head on the guide line.
The horn is located in the center of the pony's head on the guide line
- The eyes are located just above the guide line, and the height of the ear is about a third of the head. Particular attention should be paid to the distance between the ear and the eyes - it should not be too large, but not too small.
The eyes are depicted slightly above the horizontal guide, and the ears are depicted at a certain distance from the eyes.
- The neck always remains the same length and thickness in different poses, but you don’t need to draw it if the pony’s head is located almost frontally. In some cases, a long or short neck can emphasize the horse's emotions.
The neck always remains the same length. An exception is when the horse is not standing in full view or you need to emphasize its emotions
- To achieve the desired pose, the circles are arranged and overlapped in a specific order. Due to overlap, you can make the character more expressive and voluminous. If some part of the horse is hidden, then, of course, there is no need to draw it.
Any pose can be depicted by arranging and overlapping the circles as needed.
Step by step drawing of Fluttershy
Let's look at a step-by-step image of one of the heroines of the series - the pony Fluttershy. This modest beauty has a beautiful mane and a fluffy tail of a soft lilac color, miniature wings, and huge eyes.
Shy big-eyed horse is full of charm
- First, draw a horizontal oval (torso) in the center of the sheet. Above it, a little to the left is a circle (head). A wavy line extends from the oval - the future luxurious ponytail.
Using geometric shapes, the main parts of the horse’s body are outlined.
- Next, we outline the outline of the muzzle: the nose is small, slightly raised up. We draw one expressive eye (after all, the pony is standing sideways): don’t forget about the pupil, highlights and long eyelashes. We also depict a slightly pointed ear and a smile. A mandatory attribute of a beauty is long hair, divided into two parts: one in front, and the second partially hidden by the muzzle. The curls curl beautifully and fall almost to the ground.
The emphasis should be on the large expressive eye and chic curls
- Next we depict the front and back legs, flirty wings on the back (only one is possible, the second is not visible from the chosen angle). The legs do not need to be drawn too long, very thin or thick. A harmonious image will be created by observing all proportions. A chic developing tail completes the anatomy.
To achieve maximum resemblance to the original, it is important to maintain all proportions
- We detail the image: we decorate the mane and tail with longitudinal lines, and on Fluttershy’s thigh we draw a characteristic pattern of three graceful butterflies.
Characteristic details give the horse a special charm.
- The drawing is ready. All that remains is to erase the auxiliary lines.
The final image remains to be carefully colored
Photo gallery: step-by-step drawing of the remaining horses from the animated series “My Little Ponies”
Sparkle is a beautiful unicorn with a chic mane, slender and light-footed. A distinctive feature of Pinkie Pie is her magnificent pink fur, a bright pink long mane in curls, a tail and a pattern on the thigh depicting balloons Pony Rainbow Dash - a gorgeous horse with a rainbow tail, mane and an original tattoo depicting a rainbow Slender legs, a thin neck, a perky raised muzzle and a chic curled mane, a magnificent tail - everything about Rarity’s pony is charming. The mane and tail of Apple Jack are grabbed with rubber bands, and the front leg is often raised in a jump
Creating your own style when drawing a cartoon horse
When teaching a student how to draw step by step, you don’t need to simply copy a picture. It is much better if the child, in the process of creativity, develops his own artistic style, brings something of his own to the composition, without reducing the similarity with the original. Let's outline some possible techniques.
- The head can be of a certain shape: more oval or round, pointed or square.
The head can be drawn in a special shape, for example, resembling a circle or square
- You can experiment with the eyes (after all, they are cartoonish): make them surprised, slanted, with large or small pupils, etc.
Drawing eyes opens up great opportunities for experimentation
- Drawing different ears is also interesting: they can be fluffy, more pointed, etc.
You can play with the shape and texture of horse ears
- A pony's mouth, like its eyes, can express strong emotions: it can be large or barely noticeable.
Using the shape of the mouth you can convey the character's emotions
- Drawing the wings of pegasus opens up real scope for creative imagination. Here you can build on the plumage of real birds, making them sweeping or very modest. The wings can be straightened or folded.
There are many ways to draw wings
- The most important attributes of any cartoon horse are the mane and tail. With their help it is very easy to stylize the image in your own way. Hair can flutter in the wind or lie flat. You can depict it as gentle, flowing, or rough and hard - there are a lot of options here. The same applies to the ponytail: you can curl it in a spiral, wrap a ribbon around the tip, “cut it off” evenly, etc.
The tail and mane are the most creative attributes of a cartoon horse
Photo gallery: children's works
Baby pony: Polina Veretennikova, 7 years old My little ponies: Anastasia Igumentseva My little pony: author - 7 years old My pony: Kristina Klimkina, 9 years old Fire pony: author - Kristina Klimkina, 9 years old Pony Sparkle: category - from up to 7 years old Pony Rarity : Nadezhda Zvyagintseva, 15 years old
Step-by-step image of a realistic pony
In addition to a fairy-tale character, a child can ask an adult to teach him how to draw a real pony. Note that artiodactyl animals are quite difficult to depict, but with some effort you can get a wonderful realistic image.
standing horse
- First, select a rectangular area on a sheet of paper to create an image and divide it into 12 squares of equal size. Let's draw two circles and connect them with a rounded line.
Squares define the border of the future drawing
- Using ovals and straight lines, we outline the contours of the animal’s head, neck, back and legs.
We use ovals and straight lines to indicate body parts.
- Add details, outline the contours with a thick line.
To clarify the image, we again use ovals and lines
- Carefully erase the auxiliary lines with an eraser. We depict the eyes, a lush mane, a long tail, hooves, or rather draw the mouth.
The drawing is ready
- We shade the image with a simple pencil: we convey the play of shadows and the texture of the fur.
Using pressure, you can convey light highlights and shaggy fur.
Horses are known for their speed, so we will also consider such a nuance as drawing a running pony. The main thing in creating this image is to correctly convey the position of the legs (all other parts of the body are drawn in approximately the same way).
- First, we draw an auxiliary line - it shows the running rhythm (can be straight or curved).
The line shows the running rhythm
- We outline the torso, hips and the level of the surface where the horse stands.
The line will help in the future to correctly draw the length of the legs.
- We draw the first pair of legs (front and back, which are located facing the viewer, since we have a side view). To create the required length we use arcs.
To determine the required leg length, draw arcs
- We find the middle of the legs, and then the center of the resulting segments. After this, we outline the width of each part with segments, draw ovals around them (after all, the pony’s legs do not look like posts).
The width of the pony's legs is not the same along the entire length
- By connecting the ovals with curved lines, we get a beautiful contour of the legs.
By connecting the edges of the ovals, we can easily get a beautifully curved outline of horse legs
- In a similar way (using segments and ovals) we draw the second pair of legs (those on the other side). They will be bent, therefore the lines should be shorter.
At the last stage of work, carefully erase the auxiliary lines
Draw a pony in cells with pencils or felt-tip pens
Another way to introduce a child to creativity is exciting drawing by cells. To do this, you will need a regular notebook sheet, colored pencils or markers.
- Using this technique, you can create a variety of images of ponies: from cartoonish to completely realistic.
A child can draw a pony by cells
- Accordingly, different levels of drawing difficulty are distinguished. It’s better to start lightly: simply paint over the monochromatic silhouette of the horse or use very few colors.
Portrait of a horse
In addition to aesthetic pleasure, drawing in cells brings great benefits: it develops spatial orientation, attention, stimulates the imagination, and cultivates perseverance and patience. This activity calms the nerves well (adults can also draw) and relieves stress. This technique is a great option to increase self-esteem in children who are not very good at other types of creativity: the results obtained will inspire them to try new things.
Each child can choose a certain tactic for depicting the cells. Some people find it more convenient to draw from top to bottom, others from right to left. You can try working from the center: this works well for rounded images.
It is better for beginning artists to draw in large-checked notebooks, gradually choosing more complex patterns.
Photo gallery: diagrams for drawing ponies by cells
A simple version of the scheme The drawing is dominated by yellow and brown tones The highlight of the portrait is huge eyes surrounded by long eyelashes A beautiful image in profile The drawing is replete with a palette of colors Interesting subject composition A simple version without color tintsAdorable Apple Jack, painted with wax crayons
Fluttershy pony portrait
Portrait of Sparkle: pencils and markers
Sitting horse from the cartoon series
Young animal artists can spend hours sitting at the table with a pencil in their hands, trying to depict their favorite animal, for example, a charming pony. And adults can easily help them create their favorite image - a small realistic horse or a character from a popular animated series. Step-by-step drawing, which represents sequential work schemes, will come to the rescue. At the same time, you need to encourage the child not just to copy the picture, but to bring something of his own into it, to form his own artistic style. Also, a student’s creative leisure time can be diversified with exciting drawing in the cells.