Paper puppets for the puppet theater with your own hands. Do-it-yourself finger theater
Natalya Abdullina
PHOTO REPORT.
Finger theater printed and pasted.
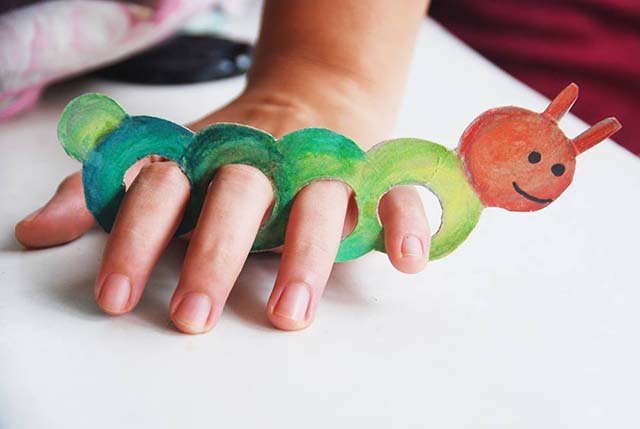
We made these dolls from thick paper. They are very easy to make. Management of such finger puppets is clear, interesting. After all, if you put your fingers through the holes, then the doll will have legs - you get a desktop walking doll.

Bottles of yogurt have accumulated at home, we also decided to use them and made bottle theater.


Theater on magnets. Fairy tale "Turnip"

Fairy tale "Teremok"

Fairy tale "Kolobok"

Flannelgraph figures for showing the fairy tale "Under the Mushroom".

Shadow theater- help children to get to know theater, show your imagination, develop speech. This theater useful for younger children.


We also made original and easy-to-make dolls for home puppet theater from disposable plastic spoons.

And a didactic game using caps. We consolidate knowledge of the fairy tale and at the same time develop fine motor skills of the hands.

Desktop theater promotes the development of coherent speech, imagination. It has a psychotherapeutic effect, helping the child to cope with experiences, fears, to get the missing attention. Forms in children a strong interest in theatrical activities.
Do do-it-yourself puppet theater is not so difficult as it seems at first glance. And very exciting. We plan to continue manufacturing theaters in other ways.
The flat finger theater made of paper "Teremok", from our point of view, is not very suitable for children under 5 years old. But 5-6 year old children will be happy to play with it. The principle of movement of the dolls is very simple - insert the index and middle fingers into the holes-slots. These are the "legs" of the doll. Now she can walk. Of course, children of this age know the fairy tale "Teremok" by heart. But here we are going to “play theater”. And almost all the guys want to be an artist. But, although the fairy tale is familiar, such games will develop the speech of children - after all, for each character you need to speak in a certain voice, try to convey his character. The hare speaks timidly, the fox slyly, the mouse squeaks, and the bear growls menacingly. To convey all these shades with a voice is an interesting and difficult task for younger preschoolers. In addition, children can actively participate in the creation of puppets and scenery for the finger theater from Teremok paper.
Flat finger theater made of paper "Teremok"
In order to make puppets for our finger paper theater, you need to print (or draw) the heroes of the fairy tale teremok on plain paper. The height of the dolls should be approximately 9-10 cm, and the width at the bottom of the figurine should be less than 4.5 cm - so that you can freely cut holes for the fingers.
Templates of puppets for a flat finger theater made of paper "Teremok"


 We paste the template on very thick paper or thin cardboard. We give to lie down under the load (2-3 thick books) for 10-15 minutes. We color the animals with colored pencils of suitable colors.
Cut out the figure, cut holes for the fingers.
If you wish, you can paint the back of the doll. Keep in mind that it will be more difficult for a child to color an already cut figure. The doll is ready.

You can print colored figures right away or use the appliqué technique (as in the photo below).

Scenery for the finger theater from paper "Teremok"
To play a fairy tale with such dolls, we need a decoration - a house-teremok. Making it is quite easy.
Step 1
Take a sheet of brown (not glossy!) cardboard. Draw it as shown in the diagram.

Step 2
Cut out the windows.

Step 3
Cut strips of red paper 1 cm wide for the windows and 2-3 cm for the roof. Decorate the windows and the slope of the roof with stripes. You can make a carved edge on the strips.

Step 4
Cut out circles-logs with a diameter of about 2 cm from yellow paper. Stick them on the teremok.

Step 5
Cut grass out of green paper and glue it on the bottom.

Step 6
Draw the details with a felt-tip pen and cut off the excess cardboard above the roof.
Step 7
From another sheet of cardboard, fold an accordion. The first link of the "accordion" is 2 cm, the second and third - 5 cm. Fold the remaining piece of cardboard in half again (that is, the fourth and fifth link will be about 3-4 cm each)
We glue the narrowest part of the "accordion" to the tower from below.

In order for the tower to be stable, we glue the side parts of the second link of the "accordion" to the tower. A pocket is formed, as it were, in which we will “populate” the animals.
 The photo shows how our teremok will look from behind.

Teremok is ready, you can start the performance.
The Teremok finger theater can be done in other ways, for example. Or . These models do not require any decorations. In addition, you can play with them with very young children 2-3 years old.
Colored paper is a versatile material. She can easily turn into a kitten, dog, hero of your favorite cartoon or fairy tale. A little imagination and effort - and now you already have the scenery ready. What you need for a fun dialogue of little animals.
So, we choose the right colors, prepare glue, paints, felt-tip pens, pencils and go ahead - make wonderful finger puppets.
1. Print and cut out patterns for finger toys.


2. Glue the faces of the little animals.

3. Now glue the torsos. From a strip of white paper, make a finger holder in the shape of a ring and glue it to the inside of the toy's head.

Kids, as a rule, are delighted not only with the process of creating figures, but also with participation in the performance itself. So, if the younger brother or sister wants to try himself in the role of, for example, a bunny, I hope you will not mind.


Well, the dolls are ready! The theater performance begins!


But if you want to make fairy-tale characters (king, princess, knight, dragon or pirate robbers), print out the following templates:


Puppet theater for the little ones:

And here are a few more finger puppet templates for pleasant leisure time with the baby:


Finger toys are easy and fun to make. Note that dolls made from several materials at once - paper, fabric, beads - look very cute and touching. Think about it when creating the next character for the game.
Victoria Zdvizhkova
"The mind of a child is at your fingertips"
V. A. Sukhomlinsky
Finger theater is very fond of the children of our group, especially girls. It's no secret that, in addition to aesthetic pleasure, playing with a finger puppet theater develops a child's imagination, curiosity, sociability, interest in creativity, contributes to the development of speech, memory, attention, thinking, perseverance, broadening one's horizons, helps to cope with shyness and much more. .
In this regard, at one of the parent meetings, we decided to replenish our theater with hand-made characters.
Parents tried and sewed the fairy tale "Teremok"

It turned out it wasn't all that difficult.

Some parents "took the hook" for the first time. And it turned out pretty well, in our opinion.


One family presented a nursery rhyme "Magpie Crow" made of felt.

We made some animals ourselves with children from plasticine.

Thanks to the finger theater, the child has the opportunity to fantasize, invent their own fairy tales and stories. Many thanks to the parents for their active participation in the life of the kindergarten.
Related publications:
All toys were sewn from hard Korean felt. They are bright and attract the attention of children. Finger puppet theater helps the teacher.
You can create a finger theater with your own hands. This takes a little creativity and imagination. Children love to play with their fingers.
The finger theater "Ryaba Hen" is made of felt, taking into account the size of a child's hand. The simple text and plot of the tale allow you to play even with.
We take 200 grams of flour and 150 grams of salt, add 1/3 cup of water, mix. add 1 tablespoon of PVA glue, or wallpaper paste.
Dear Maam people, we all know what a huge role theatrical activity plays in the lives of children - children love to listen to, watch and listen to fairy tales.
Play is the most natural activity for a child. It is she who makes it possible to acquire new knowledge about the world around us, to expand.
The whole school year, the guys and I worked on the project "Pets". The guys learned a lot: how and where they live, what they eat, what kind.
Do-it-yourself finger theater
Master class on making finger puppets from felt
Author: Demidova Ekaterina Nikolaevna, educator, MBDOU "Kindergarten of a combined type No. 62" Silver Hoof ", Kurgan
Theater is thoughts of free flight,
Theater - fantasy blooms generously here ...
Vladimir Miodushevsky
The master class is designed for educators and specialists of preschool institutions, teachers of additional education, parents and creative individuals.
The finger theater is intended for theatrical activities in kindergarten and at home; it can be used in the course of directly educational activities as a surprise moment. It can become a wonderful tradition for your family.
The choice of material - felt is due to the following criteria:
easy to process, the edges do not crumble;
wide range of colors, different thickness and density;
natural, safe for health!!!
Target: making a finger theater for the development of children's creative abilities through theatrical activities.
Tasks:
introduce the technology of making finger puppets from felt;
develop acting and directing abilities of children;
develop fine motor skills;
contribute to the enrichment and activation of vocabulary, develop monologue and dialogic speech;
to form interest in arts and crafts;
develop the skills of organizing practical activities.
Materials and tools:
simple felt, on a self-adhesive basis;
lace;
beads, rhinestones, small buttons, small eyes for dolls;
reinforced threads;
tailor's pins;
needle;
tailor's chalk;
pattern paper;
glue "second";
scissors;
sewing machine.

Chanterelle patterns:

Technology for making a finger puppet "Fox".
Before we get started, let's remember the basic safety rules when working with scissors and needles.
store needles and pins in a designated place (pincushion). Do not take needles, pins in your mouth and do not stick them into your clothes.
do not use rusty needles and pins in your work.
do not leave the blades of the scissors open during operation.
don't cut on the go.
Making a pattern for a finger puppet will not take you much time. First you need to decide on the size. The base of the toy should be about the height of your index finger. Draw the body and other details. Do not forget to make allowances for those parts that are inserted into the base.
We select materials for our fox. The details are transferred to paper and cut out.
Base - 2 parts;
Head - 1 detail;
Muzzle - 1 detail;
Ears - 2 parts;
Tail - 1 detail;
The tip of the tail - 1 detail;
Paws - 2 parts.

We transfer the pattern to felt. Larger details are pinned to the material with pins, small ones are circled with tailor's chalk.

We distribute the details in places.

We adjust the right foot to the base. We do bindings.

We adjust the second paw. We do bindings.

We adjust the muzzle on the head. Align the edges with scissors.

Sew the ears to the head with a triple clip.

We make out the tail - we adjust the tip of the tail to the detail. Align the edges with scissors.

We connect the details of the body along the contour. Don't forget to add a ponytail to the side. We do bindings. Align the edges along the contour.

Attach the head to the body with glue. We work with glue carefully, as traces may appear on the surface of the material. We make eyes and a nose from large black beads. They can be glued or sewn with threads in color.

Technology for making a finger puppet "Mashenka".
A distinctive feature of the performance will be the processing of the head.
We draw a pattern. We select materials.
Base (dress) - 2 parts;
Sleeves - 2 details;
Hands - 2 parts;
Bast shoes - 2 parts;
Head - 1 detail;
Scarf (front part) - 1 detail;
Kerchief (rear view) - 1 detail;
Scythe - 1 detail;
Spout - 1 detail;
Bangs - 1 detail.

Patterns of the doll "Mashenka"

Cut out blanks. Putting the details in place.

We adjust the sleeves on the dress, put pens on the bottom of the sleeves (without adjusting them).

We sew lace on the bottom of the dress. We do bindings.

We set up bast shoes. We do bindings. We sew the dress along the contour. Align the edges along the contour.

We adjust the bangs and nose on the head. To prevent the spout from slipping under the foot of the sewing machine, it must first be glued.

Glue the head to the base. Glue a self-adhesive felt scarf on top. We fix the braid between the two parts of the scarf. Align the edges.

We fix the edges of the scarf with machine stitching. We do bindings.

Glue the eyes - beads. We brown the cheeks with a red pencil.

Mashenka's eyes can be decorated using special accessories for needlework - a peephole.

Here's what we got!

My first works.

Design options for the finger puppet "Frog".

Design options for the finger puppet "Cockerel".

Design options for finger puppets - little men.


