How to open a finished presentation. We make according to the template
POWERPOINTPRO
License type:
Quacked
Languages:
Windows 8, 8 64-bit, 7, 7 64-bit, Vista, Vista 64-bit, XP, XP 64-bit
Downloaded:
How to use PowerPoint
Good day friends! In this description I would like to introduce you to the wonderful program Powerpoint2007.
Here we will talk about how to use Powerpoint 2007 to create the necessary presentations so that they look high-quality and attractive.
From this text you can learn:
1. Why do you need Powerpoint?
2. What is the step-by-step plan for creating presentations with this program?
Microsoft Office PowerPoint 2007 is on your computer device, depending, of course, on the version you have installed Microsoft Office 2007 or 2010. We're talking about PowerPoint2007 here.
Click on the "Start" button, select "All Programs", then Microsoft Office and finally select Microsoft Office Powerpoint2007.

So why do you need Powerpoint2007? It is needed to indicate the key points of your speech or presentation.
Here you won’t have to remember all the necessary information that you present, since the listener will view your slides instantly.
Presentations, of course, are not replaceable in cases where it is too difficult to explain in words, and it is necessary to show everything clearly. This type of presentation includes tables, diagrams or maps, diagrams.
Opening Powerpoint2007, we see:
1. Office key.
This button is located at the top (in the left corner), click on it, a whole row of bookmarks is visible in the window that pops up.

The first tab is called “create”; if we click on it, the next window opens. The “new presentation” button is located here by default. We can also select ready-made templates from the required document. If we click on the “presentations” button, we are offered a number of presentations. Choose one, I chose “Business Presentations”.

Click on the theme, a window with templates opens, where you can select any template you like. Click on the template. Your selected template will appear on the right, the size of this template is indicated here: 298KB,

We click the “download” button and see that our template has been downloaded to us, on our computer device.

2. Open - the ability to open your ready-made lists of presentations.


save the presentation in PowerPoint 2007.
A PowerPoint show that opens when you start the slide show or PowerPoint 2003 show. There is also an option to create your own slides in a format, for example, PDF or save in some other formats.
If you press the button save to other formats,

then a dialog box opens, where in the “File type” drop-down line, you can save the file both in PowerPoint and in web page format, as a drawing. It is very comfortable.
5. Prepare - here you can encrypt your presentation using a password so that no one but you can open it.

6.Send - here you can send your presentation via email, as an attachment designed for PDF or XPS format, and send it by fax.

7.Publish - prepare the work and save it to any disk, save materials in a slide library, open the material in Microsoft Office Word, save presentations somewhere on a document management server, create a new website for the presentation.

Let's now look at the PowerPoint options

Here we click settings, a quick access window will open.

What to do here? Here you can move the quick action command to the right window, which is needed for work, by right-clicking on the command, we see how it moves to the right side.

This command appears at the very top. So I moved the command - “draw table”.
This is where you can move the commands you need to do your work. Here we have analyzed the commands found in the office button of this PowerPoint program.
The next thing we will look at is the tool belt. When you open PowerPoint, it always defaults to the Home tab, divided into tool columns.
Here, for example, is the "Clipboard" column. There are commands here: cut or copy and create a format according to the example.

Another column "Slides". Here you can also create some new slides and change the layout, restore, or delete slides.

The third column is "Font".

The same operations that are available in Word are provided here: make text bold, write in italics, underline, and you can also increase or decrease the font or shadow of the text.

Fourth column "Paragraph". Here you can set a command that will make the text bulleted or align the text (for example, centered), as well as left or right, raise or lower the level of the list, distribute the text over two or more columns, convert the text into a picture.

Fifth column "Drawing"

Here you can insert some shapes, for example, circles, rectangles, arrows.

Putting objects on the slide in order, styling the finished presentation. Outlines, fills and shaped effects are done to make your presentation work more memorable. The next sign is express styles. Here, a considerable selection of styles is selected, with the help of specialists, which you will use for your presentations.

The sixth column is “Editing”. The “find” command means that if you need to replace some words in the text with others, then press the “find” button.

Then click “replace”, a line appears in which you enter the word that you want to change.

And the last operation is “Text selection”.
In the tool ribbon, look at the “Insert” tab. It will also be divided into columns.
1. Illustrations
2. Table
5. Multimedia clips.
In the “table” section, you can select a table that you like. By clicking on the table, the so-called table designer appears. We can choose table styles or create them ourselves.
The next tab in the toolbar is the Illustration Section insert. Here you can insert pictures, download or insert a clip from your computer device, and create photo albums based on the pictures. Insert shapes, insert a SmartArt graphic, insert a chart, to present or compare data.

Let's move on to the "Connections" column below. Here you can create a link to web pages. If the link is made active, then (when we click it) we will be able to go to a web page or to a slide. This is the most convenient way of presentation.

In the “Text” column you can insert objects or insert an inscription, select a font, select the date or time of current slides, add a slide number, insert characters that are not on the keyboard.

And the last column is “Media Clip”. Here you can insert animated clips, as well as add music from CDs or record from a microphone.

"Design" feed. Here we see the design for your slide themes. You can select it by following the link, or click “find on the Internet.” There are ready-made interesting samples that can be used for your presentation method. You can also customize the color, effect, fonts.

The Animation ribbon offers you already made animation effects; you just have to select or customize them to suit the structure of your slides. Here you can also customize the animation of lines, pictures, letters.
Slide Show Ribbon. The feed is also divided into a number of columns:
1.Start a slide show, where you configure your start of all slides from the very beginning (that is, from the current slide) or a random slide show.

2.Settings. Here you can set up a slide show - show them in full screen mode. And the “hide slide” option hides the current presentation slide. Also, recording from a microphone is configured. “Time Adjustment” adjusts each slide in time. There is also a setting for automatic slide switching.

3. Licensing. Adjust PowerPoint spelling to ensure your presentation is free of spelling errors. You can also view reference materials here. There is also a presentation protection key.
4.View. Here, by default, slide viewing is selected in “normal” mode. Here you can click on the “slide sorter” button to change the location of the slides. You can put a grid, install a ruler.

This concludes this topic “How to use PowerPoint” for today. You have figured out all the tabs of our PowerPoint step by step, and I will write to you how to do the job in my other topic. Please leave your comment if this article is useful. Bye.
A presentation is a great way to make your report more understandable and interesting to the public. Nowadays, presentations are created mainly in PowerPoint, which is included in the Microsoft office suite. In this article you can find small step-by-step instructions for creating presentations in Microsoft PowerPoint. The article will be relevant for PowerPoint 2007, 2010, 2013 and 2016.
Step 1. Launch PowerPoint.
To start creating a presentation, simply launch PowerPoint. This can be done using a shortcut on your desktop.
If you don't have a PowerPoint shortcut on your desktop, you can launch the program by searching in the Start menu. To do this, open the Start menu and search for “PowerPoint.”
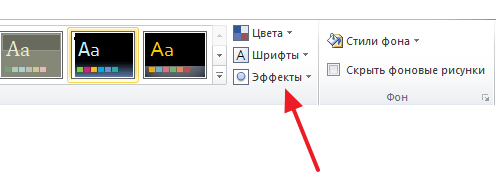
Step No. 2. Choose the design of the future presentation.
Once PowerPoint is launched, you can immediately begin creating your presentation. The best place to start is with the design, to do this go to the “Design” tab. On this tab you will see a large list of ready-made presentation designs. Select one of the available options.

To the right of the list of ready-made designs, there are buttons for “Colors”, “Fonts”, “Effects” and “Background Styles”. Using these buttons you can adjust the selected design to your requirements. You can change the color and font of the text, the background color of the presentation, and add additional effects.
If ready-made designs are not enough for you, then you can search the Internet for other templates for PowerPoint presentations.
Step No. 3. Creating slides.
After choosing a design, you can start creating slides for your future presentation. This is done using the “Create Slide” button, which is located on the “Home” tab. Click the down arrow below the New Slide button to open a menu with available slides.

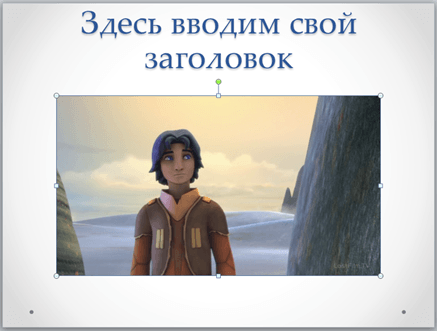
In the menu that opens, you will see several types of slides. These are the Title Slide, Title and Object Slide, Section Title Slide, Two Objects Slide, etc. Select the type of slide that suits you and click on it with the mouse. For example, we will create a Title and Object slide. This will create a new slide with a title at the top of the slide and an empty space at the bottom.
Step No. 4. Filling out the created slides.
Once you've created your slide, you can fill it with information. To begin with, you can change the title of the slide; to do this, double-click on the inscription “Slide title” and enter another text.
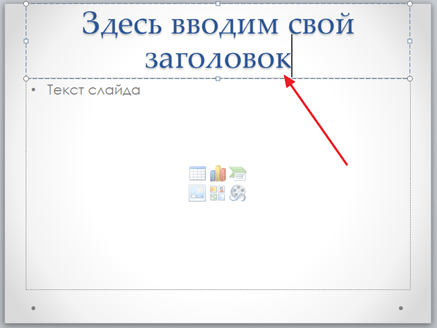
Once the title has been entered, you can fill in the blank field below the title. If there should be text under the title, then simply click on the empty field and enter the desired text.

If there should be some other information under the title, for example, a video or picture, then for this you need to use the buttons that are located in the middle of this field. There are six buttons available to insert tables, charts, SmartArt graphics, photos, pictures from the PowerPoint library, and videos.

When creating presentations in PowerPoint, photographs are most often inserted, so we will consider this option. In order to insert a photo from a file, you need to click on the button with the image of the photo. After this, a window for selecting a photo will appear. Select the desired photo and click on the “Insert” button.
The photo you selected will then appear under the slide title.
This way you have created a PowerPoint presentation from one slide. To add another slide, return to the “Home” tab, click on the “Create Slide” button again and add another slide to the presentation. After this, you can fill out another slide with information. Repeat this procedure until the presentation is ready.
Step #5: Preview your presentation.
In order to evaluate the created presentation, go to the “Slide Show” tab and click on the “From the Beginning” button there. After this, the presentation will open in full screen, and you can see how it will look in its finished form.

You can also click on the “From Current Slide” button. In this case, playback of the presentation will not start from the beginning, but from the frame where you stopped when working with the presentation.
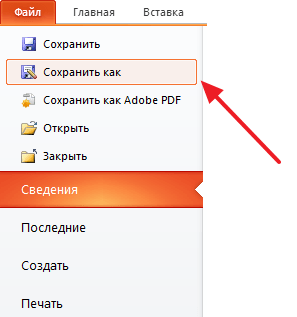
Step No. 6. Saving the presentation.
After the presentation is created, it needs to be saved. To do this, open the “File” menu and select the “Save As” option.
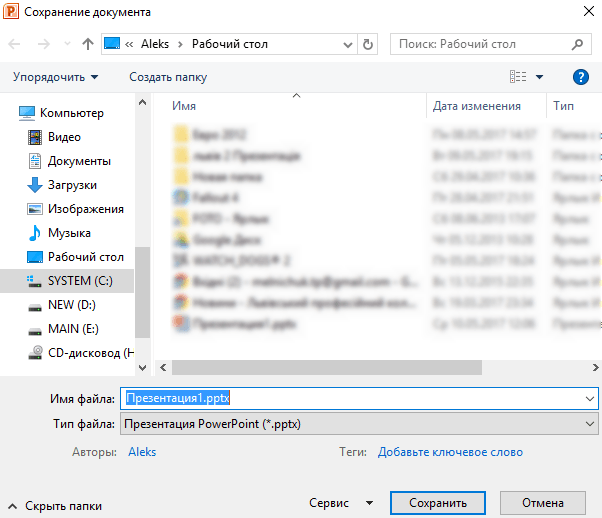
As a result, a window will open to save the file. In this window you need to select a folder and click on the “Save” button. This will give you a PowerPoint presentation file in PPTX format, which you can then open and continue creating your presentation.
If your presentation is already ready for display, then you need to additionally save it in a different format. To do this, you need to use the “File – Save As” menu in the same way, but before saving, change the format to “PowerPoint Demonstration”.

After saving this way, you will receive a file in PPSX format. The advantage of this format is that the presentation begins to play immediately after opening it, and the PowerPoint interface does not even appear. However, files in PPSX format cannot be edited, so the presentation must be saved in both PPTX and PPSX formats.
Today we will deal with the PowerPoint program. How to use it and why is it needed at all? We'll look at a step-by-step plan for creating a quality presentation and answer many other questions.
Let's start with the fact that this software product allows us to create bright presentations. We'll be looking at the 2007 version of PowerPoint. Both an elderly person and a schoolchild can figure out how to use this tool.
But you need to know that many even experienced users do not know all the capabilities of PowerPoint; our task is to familiarize you with the program from all its sides.
Acquaintance
The program for creating a computer presentation is called PowerPoint. How to use it and what capabilities does it contain? Let's start with the fact that all presentations are saved in files with the PPT extension. And the project itself is a set of ordered slides.

To create a high-quality presentation, it is not at all necessary to study since the program already provides a certain set of templates on many topics. What is a template? These are already designed slides, where we need to add text, graphics, and possibly music. If you are satisfied with the template, but you prefer a different color, then this is not a problem, you can change the color scheme to your liking.
What will make a presentation more attractive? High-quality images matched to the theme, music and animation effects. We have already said that the work is very easy and fun with the PowerPoint product. Anyone can figure out how to use it. You just have to experiment a little.
Possibilities
Let's move on to the question of how to use Microsoft PowerPoint, or rather, we will determine the capabilities of the software product. Originally it was a program that allowed you to view slides; the modern version can not only create slides in the classical sense, but also organize electronic presentations without losing multimedia capabilities.
The areas in which presentations are used are quite wide; the main thing to remember is the thesis and clarity. She must meet these two qualities. What does this mean? The presentation should not look like a continuous text; outline the main thing and supplement your words with multimedia, then interest in your presentation will not cool down.

What else you should pay attention to is the design, so as not to make the presentation boring and monotonous. Attract attention with vibrant images, animations and sound effects. One of the components of a high-quality presentation is graphs and tables. These components will help you place a large amount of information on one slide.
Many presentations have one drawback - they are static. Many PowerPoint features remain behind the scenes. The presentation will attract attention if you add animated slide transitions, insert interesting videos, and so on. We suggest that you try to create a presentation together, using as many of the program’s features as possible.
Creating a presentation
So how do you use PowerPoint? First you need to prepare the necessary material for the presentation. Please note that we leave most of the information to oral speech; you should not try to fit everything on the slides.
We open the program and select the design we need from those available in the collection; you can also create your own layouts, but this is a more labor-intensive task. We configure the background and some other parameters. How to do it? Right-click on an empty slide and select the item we need in the context menu.
Now about the inserts. Text can be copied from Word or directly from online sources. Don’t forget to format it, bring all the text of the presentation to a single form. You can insert pictures and videos in the same way as text, or use the “Insert” menu item. Pay attention to the menu at the top of the screen, everything is very clear there. You can experiment with different transitions and effects of presentation objects.
Let's get started with PowerPoint 2007- one of the best programs for creating and conducting presentations.
Presentation , by definition, is a set of color slide pictures, often with text and audio accompaniment, that reveal a specific topic. Preparing presentations is a very responsible process. Presentations are now increasingly used for seminars and webinars, for various conferences and reports, for introducing new products and services, for business and training.
Presentations can be made using various programs such as Harvard Graphics or Lotus Freelance, but the most popular currently is Microsoft's PowerPoint program.
PowerPoint provides the user with such powerful tools for working with pictures and text, such animation and design capabilities that you can do almost anything in it.
A PowerPoint 2007 presentation is a file with the extension .pptx. This file is essentially a set of slides with special effects that accompany the display of various pictures and text on the screen. You can also store a summary and presentation plan in this file, which will only be seen by the person giving the presentation.
You can find PowerPoint 2007 in the same way as through the menu Start. Naturally, you must have Microsoft Office 2007 pre-installed.
So, go to the menu Start - All Programs , find the folder Microsoft Office, and select the item Microsoft Office PowerPoint 2007 .
You can make a shortcut to this program on your desktop. To create a shortcut, left-click on this item and drag it to the desktop. Before releasing the mouse button, press the button Alt. While holding down the button, release the mouse button. The shortcut will be created.
 The interface of PowerPoint 2007 is similar to that of other programs in the Microsoft Office suite. For example, as in other programs, there is a round button in the upper left corner Office. To make a new presentation, click this button and then select Create. Then click on the option New presentation
, and press the button Create
.
The interface of PowerPoint 2007 is similar to that of other programs in the Microsoft Office suite. For example, as in other programs, there is a round button in the upper left corner Office. To make a new presentation, click this button and then select Create. Then click on the option New presentation
, and press the button Create
.
You can also choose a template for your future presentation - after selecting Create in the left column you can find the item Slides with design (background) . Select the option that suits you best and click Download. A new presentation will be created with the background from the template you selected.
By default, new slides will be created with the layout Title slide - this is a slide with prepared places for the table of contents and text. If you prefer to place text and pictures yourself where you want, you can choose a layout Blank slide .
You can change the slide layout through the command ribbon at the top. You need to go to the tab home, in a group of teams Slides select a team Layout, and select a layout Blank slide.
You can do the same through the context menu. Right-click on the slide and select Layout - Blank Slide .
Then you can add a picture and text using the tab Insert. When you click on this tab, you will see a list of all the elements that you can add to the slide: drawing, clip, text, WordArt and others.
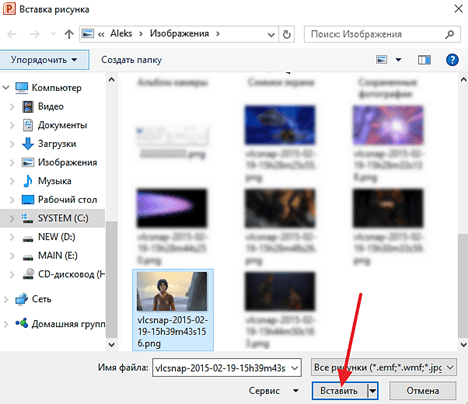
 To add a picture, click Insert - Drawing
, select the file on your computer, and click the Insert button.
To add a picture, click Insert - Drawing
, select the file on your computer, and click the Insert button.
If you are searching for your presentation, for example, using Google or Yandex search, it is not at all necessary to download all these pictures to your computer. You can, of course, right-click on the picture and select Save image as , and download it for yourself, and then put it in a presentation. But you can do it even simpler: right-click on a picture on the Internet, select Copy picture , then right-click on the presentation slide and select Insert. The picture will appear on the slide.
You can insert a clip - this is the name for pictures from the Microsoft Office library. Click Insert - Clip, then in the right column that appears, write in the field Search your keyword related to the presentation topic and click the button Begin. After that, click on the picture you like, and it will appear on the slide.
You can paste Inscription or object WordArt. Although the buttons are different, they are essentially the same thing. Text can be formatted so that it becomes WordArt, and conversely, if all formatting is removed from WordArt, it becomes plain text.
Video on how to get started with PowerPoint 2007
You can get more detailed information in the “All courses” and “Utilities” sections, which can be accessed through the top menu of the site. In these sections, articles are grouped by topic into blocks containing the most detailed (as far as possible) information on various topics.
You can also subscribe to the blog and learn about all new articles.
It does not take a lot of time. Just click on the link below:
Create a simple presentation in PowerPoint
Tsybanova Galina Anatolevna,teacher at Tver Trade and Economic College, Tver.
Description: The master class is designed for schoolchildren, students, parents,
additional education teachers, educators and teachers.
Difficulty level: Simple. Execution time, 20 - 30 min.
Purpose: Creating a presentation in Microsoft PowerPoint.
Target: Create a simple presentation project for Victory Day
Tasks:
- introduce the technology of working in PowerPoint;
- develop creative abilities;
- cultivate accuracy in work.
Work algorithm:
1. Prepare text and images on the chosen topic.
2. Open Microsoft PowerPoint.
3. Select a slide layout.
4. Select the background (theme) of the presentation.
5. Place information in the appropriate blocks.
6. Edit the presentation.
7. Save the new file to a folder on your hard drive.
Preface:
A presentation is a brief and visual presentation of information that helps the speaker reveal the essence of his work in more detail. Now it is used in many areas of our lives. Therefore, before you start, decide on a plan for your speech. Determine the main goal of your presentation, think about what you will say at the beginning, at the end - and, accordingly, what slides, with what information and in what sequence you will need.
You can create high-quality presentations using PowerPoint. It comes with the standard Microsoft Office package. With it, you can create, view, and show slide shows with text, shapes, images, graphs, animations, charts, videos, and much more.
I will introduce you to the basics of creating a presentation.
When working on a computer, follow the safety requirements:

Progress:
1. Find information in advance on the topic of the future presentation and upload it to a text file.
Save it in a separate folder on your computer.
2. Prepare the necessary images and save them in the same folder.
The images can be your photographs or pictures copied from the Internet.
You can use a scanner and digitize any photograph or drawing.
3. Open the program Microsoft Office PowerPoint
You can do this:
from the main menu Start - All Programs - Microsoft Office PowerPoint
by program shortcut on the desktop;
by the presentation file icon in the folder.

If no one has opened this program on your computer yet, then you should look for it in the folder
Microsoft Office (Start - All Programs - Microsoft Office - Microsoft Office PowerPoint)

Immediately after launch, the first tab called home, here we see an empty slide,
which you can already work with.

“By default”, a slide opens with two text blocks (title and subtitle),
which can be used as a title page.
To change the slide layout, use the command Layout on the tab home and select the appropriate one.

2. To prevent the presentation from being faded, you need to choose an appropriate background.
To do this, go to the tab Design and select the appropriate one. The presentation background can be made
and independently, but this is a topic for another master class.

Enter the title of the presentation in the top block, and subtitle information (for example, information about the author) in the bottom block.

The font size is already set, you can change it a little without forgetting
that the information on the slide should be easy to read.
This can be done in the window Font or using tab commands home

4. To create a second slide, select the command Create slide on the tab home.
If you have already decided what information will be presented on it,
select the appropriate template (header and object, two objects, etc.)

I'll create a slide with two objects and a title.
I will enter some of the information into the title block.
To do this, I will open a text file prepared in advance and copy a fragment of text to the clipboard

and insert this fragment into the top block. You can also enter text from the keyboard.

5. I will insert a picture into the left block by clicking on the corresponding icon.
In the window that opens Inserting a picture I select the desired file.
The image size can be changed by selecting the image and dragging the corner.

6. I will also place text in the right block. Now the second slide is ready.

7. I will create the next slide from Blank slide.

To insert a text block, run the command
Insert – Caption(the mouse pointer will change its appearance)

Place the pointer at the desired location on the slide, press the left mouse button and, while holding it, stretch the rectangle to the desired width. Inside the new text block, enter the required information.
8. To insert a picture, use the command Insert – Drawing.

Select the file in the window of the same name that opens (see photo in paragraph 5)
and move it to the desired location on the slide (resize the image if necessary).

To crop a picture, use the command Size and position(context menu).
I cropped the image a little at the top and bottom. The third slide is ready.

9. Create the remaining slides in the same way.
On the last slide it is customary to indicate sources of information.
If creating a presentation takes a while, do gymnastics.
The exercises are “compact”, you won’t disturb anyone
1. Raise your hands clasped together and stretch, trying to reach the ceiling;
2. Raise your shoulders (pull your head in), move your shoulders back, trying to align your shoulder blades
and release your shoulders (“through your back”), performing a kind of circular movement with your shoulders (4 times);
3. Sit up straight, look into the distance;
turn your head to the right (while looking into the distance);
tilt your head, trying to touch your chin to your shoulder (do not raise your shoulder!!!),
look at your shoulder;
raise your head, look into the distance;
slowly turn your head to the starting position, look straight (into the distance)
Repeat the exercise with a twist to the other shoulder.
4. Roll from toe to heel (although this can be done while working)
10. Be sure to save the presentation you created.
This is such a simple presentation.
There is no animation, transition between slides is carried out “by click”,
the visual and text series on the slide changes automatically, along with the previous one.
I will try to talk about setting up animation in the next master class.
I apologize in advance to IT technology specialists, maybe I used the wrong terms...
...I'm self-taught, so please don't throw away mice and keyboards...
It’s better to write in the comments what’s wrong.
Thank you for your attention.