How to draw winter as a person. Non-traditional drawing technique on the topic: Winter in kindergarten
Winter is a fabulous time of year, associated with snow-white snow, small but very beautiful snowflakes falling from the sky, cold weather, as well as bright animated cartoon characters and also children's heroes. preschool age. The entire list of beauties and wonders of winter can be listed endlessly. True, it is simply not possible to depict all aspects on a white sheet of paper! Therefore, in today’s article we decided to show our readers a version of the work that can reflect all the beauty of December, January, February, and related holidays. Winter landscapes pencil drawing - good idea for creating thematic drawing. Due to the variety of proposals and master classes that are presented in today’s article, artistic oses are suitable for beginners, children, adults who prefer art sketches according to the principle “step by step for beginners at home.” The options in the photo selection below can even help students in grades 7, 2, 5 and 6 get an excellent grade at school.
Untouched nature, covered as if with a snow carpet with a diamond shine, small but noble bullfinches sitting on the branches of trees, small houses with the lights on and fences between areas in the form of a wooden fence - no worse than a crowded city with high-rise buildings, illuminated streets , dressed up parkas and cheerful children sledding.
Master class step by step with photos:
1) On album sheet sketch a house and a fluffy fir tree. This must be done on a horizontal plane, starting from the middle.
2) After the first part of the winter landscape is drawn in pencil, draw two more houses and one Christmas tree. On the left side there is a house with a spruce tree in the background, on the right there is just a house whose foundation is hidden under a mound of snow.
3) In the background, draw a couple more trees and fir trees under the snow cover.
4) The last part the outline will become a fence.
5) The final stage is coloring. For it you will need colored pencils, felt-tip pens or paints - at the choice of the author of the work.


Master class: winter landscape in the suburbs, pencil drawing
This version of the winter landscape involves the outskirts of the city, the beginning of a forest belt, sledding hills and a distant suburb inhabited by people. In addition to the main aspects, the picture shows: a full moon falling on the ground, a finished snowman and the height of the heating season.
Step-by-step drawing for beginners:
1) Repeat several stripes that will become the basis of the design.
2) Draw a forest, a snowman and houses.
3) Draw the remaining parts winter picture, erasing unnecessary details.
4) Color the landscape drawn in pencil using watercolors.


Winter night pencil drawing, photo
A landscape that combines white, blue, indigo, brown, yellow and green is transformed into a very interesting picture. The most important thing is not to be afraid to combine several shades at the same time.
The following stationery supplies can be used as drawing tools: pencil, eraser, gouache.
The master class in the photo below will help you understand the technique of sketching and step by step image every detail of the drawing. The most important thing is not to change the idea by painting extra parts of the winter landscape.


Winter landscape with a river and a bridge
A pencil drawing can be presented depicting not only snow and trees, but also structures built by people. It's about about a bridge that helps you cross the river without swimming across it to get from one bank to the other, as well as a cozy house with all the amenities.
Drawing should begin with objects located in the foreground, gradually moving to the buildings and nature standing behind.


The beauty of the winter forest
The winter forest is no less beautiful than in spring, summer and autumn. It looks especially interesting and mysterious at night, when moonlight falls on the snow, adding to the already luxurious landscape special charm and shine. A marvelous ensemble combined with a palette of bright and rich colors is something that will surely attract the attention of not only a child, but also an adult.
For coloring you can use gouache and watercolor paints, capable of conveying all the naturalness of a winter night landscape.


Christmas house with wreath and garlands photo

Already drew +5 I want to draw +5 Thank you + 31
Winter is a very cold time of the year. This is not to say that it is not as beautiful as spring, summer or autumn. Winter has its own characteristics and beauty. Snow-white snowdrifts, crispy snow underfoot and small snowflakes that fall straight from the sky. Well, isn't it lovely? Today we will find ourselves in a village in winter time of the year. Frozen river, roads covered with snow, small houses standing in the distance, and behind them silhouettes winter forest. This lesson will answer the question of how to draw a winter landscape.
Tools and materials:
- White sheet of paper;
- Eraser;
- Simple pencil;
- Black pen;
- Colored pencils (orange, brown, blue, dark blue, dark brown, green, dark yellow, gray).
Drawing a winter village landscape
- Step 1
In the middle of the sheet we draw two houses. It is worth considering that they will be in the background, so we make them small. The house on the right will be larger than on the left and has a window. They will stand in the snow, so we draw the ground line a little wavy.
- Step 2
Silhouettes of bushes and trees are visible on the sides of the houses. To the right of the house there will be two trees on a tall and thin trunk. We make the horizon line wider.

- Step 3
Add silhouettes of trees in the background. We make them different, but at the edge the height of the trees should decrease. Let's draw the foreground a little, making a small indentation.

- Step 4
In the depression in the middle we draw a small fence, covered with snow. Add snowdrifts on the sides. The river will be placed in the center, so the snowdrifts should decrease in this area. And in the very center of the river (and the leaf) there will be a large stone.

- Step 5
In the foreground, trees will be visible on the sides of the snowdrifts. They will be completely bald, with only the trunk and branches visible.

- Step 6
Draw the outlines with a black pen. Using a black pen, we do not highlight only the background of the picture, in which the forest is located (behind the houses).

- Step 7
We make the front part of the houses orange. Draw the side part and under the roof with a brown pencil.

- Step 8
Under the house we will draw snow in blue and light blue, adding a frosty tint to the drawing. The middle of the picture will be blue and the edge will be blue.

- Step 9
Trees, stumps and a fence should be painted in brown and dark brown. By right side let's add an orange tint to the trees.

- Step 10
We make the river blue in the middle, and blue closer to the ground. Draw the snow in the foreground in gray to give it volume.

- Step 11
We will draw the forest against the background of the picture in three colors – gray, dark yellow and green. We apply the color without specifying the contours. Since the trees are in the background, they will be slightly blurred.

- Step 12
We finalize the drawing by adding blue color to the sky. Now we know how to draw a winter rural landscape.

How to draw a simple winter landscape with a pencil step by step


Drawing a winter landscape with a Christmas tree and a snowman
- Step 1
First, using light pencil lines, indicate the approximate location of all objects on a piece of paper;

- Step 2
Start drawing the winter landscape in more detail. To do this, first outline the branches of the birch tree, and then draw the outlines of the forest in the distance. Draw a house, depicting its roof, chimney and windows. Draw a path going into the distance;

- Step 3
Draw a small Christmas tree next to the birch tree. And on the other side of the road, draw a snowman;

- Step 4
Of course, once you understand how to draw a winter landscape with a pencil, you shouldn’t stop there. You need to color the drawing. Therefore, outline the landscape with a liner;

- Step 5
Using an eraser, erase the original sketch;

- Step 6
Color the Christmas tree with a green pencil. Shade the birch trunk gray. Paint over the stripes on the birch tree, as well as its branches, with a black pencil;

- Step 7
Color the forest in the background green, and the house with brown and burgundy pencils color range. Paint over the windows yellow. Shade the smoke with a gray shade;

- Step 8
Color the snowman using pencils of various colors;

- Step 9
Use blue-blue pencils to shade the snow. Shade with yellow the places where the light falls from the windows;

- Step 10
Use gray pencils to color the sky.

- Step 11
The drawing is completely ready! Now you know how to draw a winter landscape! If desired, it can be painted with paints. For example, gouache or watercolor is perfect for this purpose! You can also draw a similar picture with a simple pencil by applying shading. True, in this case it will not look so bright, festive and impressive.

Drawing a winter landscape with a lake

How to draw a winter forest landscape
Every season the forest is transformed. In the spring it begins to come to life, covering the trees with young foliage and melting snow. In summer, the forest is fragrant not only with flowers, but with ripe berries. Autumn colors the trees of the forest in various warm colors, and the sun palely warms with its last rays. Winter exposes the branches of trees and covers them with a white blanket of snow, freezing the rivers. It's hard not to convey this beauty in illustrations. Therefore, today we will choose the last season of the year and learn how to draw a winter forest landscape using colored pencils.
Tools and materials:
- Simple pencil;
- White sheet of paper;
- Eraser;
- Black helium pen;
- Black marker;
- Colored pencils (blue, orange, blue, gray, green, light green, brown, dark brown).
- Step 1
Divide the sheet into four parts. First, draw a horizontal line in the middle of the sheet. In the middle horizontal line draw a vertical line.

- Step 2
Let's draw the background part of the picture. On a horizontal line we draw two mountains (the left one will be larger than the right one.) And in front of them we will make silhouettes of trees.

- Step 3
We retreat a small section down from the horizontal line (there will be a river here). Using a curved line we will draw the ground, or rather, a cliff.

- Step 4
We retreat further down and draw pine trees. Their feature is a long trunk and thin branches. At the base of the trunk we will add small snowdrifts. The trees on the left have some foliage.

- Step 5
Let's draw a deer in the foreground. The animal should not be too detailed, because the main task drawing to show a winter landscape. Let's add more snowdrifts in the foreground.

- Step 6
Let's outline the contours of the drawing in the foreground with a black pen. There will be snow on the tree branches.

- Step 7
We begin to paint with color from the background part (top). Let's determine that there will be a sunset, so between the mountains we apply orange, then add blue and blue. We make the transitions between colors smooth, applying from bottom to top. The mountains will be gray, but adjust the contrast using pressure. We make the trees in front of the mountains uniformly green.

- Step 8
For the river we use the usual blue and Blue colour. Closer to the mountains we add green and gray shade into the water to make it look more picturesque.

- Step 9
The trunk should be drawn using orange, brown and dark brown. The trees on the left have some leaves, which we'll make green.

- Step 10
Adding shadows from trees using gray pencil. Let's add a little coldness to the drawing by drawing the foreground in blue.

- Step 11
The deer's body is covered with hair Brown. And between the snowdrifts we’ll add blue color. So we learned how to draw a winter forest landscape.

How to draw a winter mountain landscape step by step
You can often see incredibly beautiful mountain landscapes on postcards or find similar ones on the Internet. The stone giants covered with snow are mesmerizing. At their feet stand blue spruce trees, frozen from the cold. And there was not a soul around, only a blue snow flicker. Is it possible to resist skipping to the lesson and learning how to draw a winter mountain landscape with a pencil step by step? The lesson is perfect for novice artists who will be able to depict this beauty ice mountains the first time if they carefully follow the steps.
Tools and materials:
- White sheet of paper;
- Simple pencil;
- Eraser;
- Black marker;
- Blue pencil;
- Blue pencil.

Winter is for real magical time of the year. White snow crackling underfoot, patterns on the windows, warm hats with pom-poms, snowball fights, New Year's holidays - this is still far from full list all the wonders of winter. And if you want to keep a little of this magic for yourself, then learning how to draw a winter landscape is what you need.
 Landscape with mountains and river |
 Dusk in the forest |
 Simple drawing |
Drawing a rural winter landscape

Although winter can fill even the atmosphere of a fairy tale big cities, rural views acquire a special charm and comfort at this time of year. We will demonstrate all the beauty of snow-covered village houses when we learn how to draw a winter landscape step by step.
First, with a pencil, we outline the outlines of one Christmas tree and one house. The Christmas tree will be wide and spreading.

And then - two more houses and another Christmas tree. The houses will have triangular roofs, characteristic of many villages.

Let's add more Christmas trees and a picket fence. This fence, of course, is quite conventional - in the villages people know each other and do not build high fences.

Now, based on the sketch, we will draw with paints. The Christmas trees will be a lush green hue, the houses will have the warm shade of unpainted wood, and the snow will have a slightly blue tint. To make the picture look alive, we will place three birds on the fence.
That's it, the drawing is finished.
Hills and snowfall - drawing a winter landscape

Let's continue the theme of rural beauties. This time we will depict the very outskirts of the village - the forest will be visible in the background. And the snowfall will be in full swing. Don't worry, it's not difficult at all - this example is a great way to practice and draw a winter landscape for beginners.
First, let's outline the largest forms - in our case, these are hills.

Then we will draw three spruce trees in the foreground, and in the background we will make a house, a snowman and the sharp tops of smaller fir trees. Don't forget about the path leading to the house.

Let's draw all the contours well. We’ll also “give” the snowman a top hat and depict snowflakes falling from the sky.

Let's color the drawing. Our landscape will be at night, so we’ll make the sky dark, grayish (it will be overcast). And, of course, you can’t do without a chic full moon. The house will be made in warm colors: the walls will be yellow, the roof will be red, the doors will be brown.
Let's wrap this up - we did a great job.
Magical winter night

Despite the fact that untouched snow, smoke from the chimneys of rural houses and the pointed tops of Christmas trees look fabulous even during the day, the true magic lies in winter nights. This is exactly what we will show when we figure out how to draw a winter landscape in gouache.
We will not immediately take up gouache - first we need to complete a pencil sketch. Let's start with the general outline of a hilly area, a house and three trees near it.

Then we’ll draw another smaller house, a path leading to it and add more trees, coniferous and deciduous. In the very foreground there will be a birch tree with thin branches hanging down.

After that we will start working with paints. First of all, use dark tones to depict the sky and forest in the background. You can also grab three spruce trees near big house. Don’t forget to make a month in the sky - it will still be very thin and young.

Now the foreground. Let's make the snow a little bluish, the Christmas trees green, and the walls of the houses light brown.

Remained small parts- light in the windows, smoke billowing from chimneys, snow on the feet of fir trees, trunk and branches of a birch tree. And many stars in the night sky.
Now we can safely say that the drawing is finished.
Winter landscape with mountains and river
Winter in the mountains is amazing. The forest has become harsh and dark, clean rivers, the thickness of the snow - all this looks so pristine, clean, untouched that you can admire this beauty for hours. But you also need to add a touch of coziness - a small, but solid and neat village house is perfect for this purpose. So we will learn how to draw a beautiful winter landscape.
First, let's take a look at the first plan - there will be two trees with thin branches there.


On the right side of the picture we will depict a house of a peculiar shape and the tops of Christmas trees in the background.

Now you can take up pencils or paints. Let's make mountains in the background - they will be completely covered with snow. The house will be made of wood, and the bridge will be made of brick. You also need to draw transverse stripes on the nearby trees - these are birch trees. Pay special attention to the windows - they should glow, because this is a sure sign that someone lives there.
That's it, we've finished the picture.
Twilight in the winter forest
Besides the night most interesting time Days in the winter forest are twilight. The stunning shade of the sky and the falling nature merge into a marvelous ensemble. Using the example of such a miracle, we will learn how to paint a winter landscape.
First, let's work on the sky and the overall tone of the snow. For this we will use watercolor or gouache to create beautiful stains. You need to wet the paper, and then apply paint with big amount water and tilt the sheet. The paint will flow down, forming these beautiful patterns:

Then we will draw a tree in the foreground. try to make the branches thin enough. Moreover, the brush must be guided from the base of the branch to its tip.

Using the same principle, we will draw three small bushes.

Then - two Christmas trees. They should be painted with thick, rich strokes of a dark green hue.

Let's cover the trees and bushes with snow. We’ll also decorate the front bush with juicy red berries.
Now the picture is complete.
A colorful house, a bunny and snowflakes - a fun winter
Winter is a time for fairy tales, which is why it is often depicted in cartoons. In this section we will also work in a cartoon style - at the same time we will learn how to draw a winter landscape with a pencil.
First, let's outline the house and the bunny looking through the window. All outlines will be very smooth, rounded, without sharp edges.

Then we’ll draw the Christmas trees (they will be just as smooth and round) and the snow falling from the sky.

Now let’s paint everything in the brightest colors. But the snow, of course, needs to be made blue. And the Christmas trees are green.
That's it, the fun house is ready.
Already drew +5 I want to draw +5 Thank you + 31
Winter is a very cold time of the year. This is not to say that it is not as beautiful as spring, summer or autumn. Winter has its own characteristics and beauty. Snow-white snowdrifts, crispy snow underfoot and small snowflakes that fall straight from the sky. Well, isn't it lovely? Today we will find ourselves in a village in the winter season. A frozen river, roads covered with snow, small houses standing in the distance, and behind them the silhouettes of a winter forest. This lesson will answer the question of how to draw a winter landscape.
Tools and materials:
- White sheet of paper;
- Eraser;
- Simple pencil;
- Black pen;
- Colored pencils (orange, brown, blue, dark blue, dark brown, green, dark yellow, gray).
Drawing a winter village landscape
- Step 1
In the middle of the sheet we draw two houses. It is worth considering that they will be in the background, so we make them small. The house on the right will be larger than on the left and has a window. They will stand in the snow, so we draw the ground line a little wavy.
- Step 2
Silhouettes of bushes and trees are visible on the sides of the houses. To the right of the house there will be two trees on a tall and thin trunk. We make the horizon line wider.
- Step 3
Add silhouettes of trees in the background. We make them different, but at the edge the height of the trees should decrease. Let's draw the foreground a little, making a small indentation.
- Step 4
In the depression in the middle we draw a small fence, covered with snow. Add snowdrifts on the sides. The river will be placed in the center, so the snowdrifts should decrease in this area. And in the very center of the river (and the leaf) there will be a large stone.
- Step 5
In the foreground, trees will be visible on the sides of the snowdrifts. They will be completely bald, with only the trunk and branches visible.
- Step 6
Draw the outlines with a black pen. Using a black pen, we do not highlight only the background of the picture, in which the forest is located (behind the houses).
- Step 7
We make the front part of the houses orange. Draw the side part and under the roof with a brown pencil.
- Step 8
Under the house we will draw snow in blue and light blue, adding a frosty tint to the drawing. The middle of the picture will be blue and the edge will be blue.
- Step 9
Trees, stumps and a fence should be painted in brown and dark brown. On the right side of the trees we will add an orange tint.
- Step 10
We make the river blue in the middle, and blue closer to the ground. Draw the snow in the foreground in gray to give it volume.
- Step 11
We will draw the forest against the background of the picture in three colors – gray, dark yellow and green. We apply the color without specifying the contours. Since the trees are in the background, they will be slightly blurred.
- Step 12
We finalize the drawing by adding blue color to the sky. Now we know how to draw a winter rural landscape.
How to draw a simple winter landscape with a pencil step by step
Drawing a winter landscape with a Christmas tree and a snowman
- Step 1
First, using light pencil lines, indicate the approximate location of all objects on a piece of paper;
- Step 2
Start drawing the winter landscape in more detail. To do this, first outline the branches of the birch tree, and then draw the outlines of the forest in the distance. Draw a house, depicting its roof, chimney and windows. Draw a path going into the distance;
- Step 3
Draw a small Christmas tree next to the birch tree. And on the other side of the road, draw a snowman;
- Step 4
Of course, once you understand how to draw a winter landscape with a pencil, you shouldn’t stop there. You need to color the drawing. Therefore, outline the landscape with a liner;
- Step 5
Using an eraser, erase the original sketch;
- Step 6
Color the Christmas tree with a green pencil. Shade the birch trunk with gray color. Paint over the stripes on the birch tree, as well as its branches, with a black pencil;
- Step 7
Color the forest in the background green, and the house with brown and burgundy pencils. Paint the windows yellow. Shade the smoke with a gray shade;
- Step 8
Color the snowman using pencils of various colors;
- Step 9
Use blue-blue pencils to shade the snow. Shade with yellow the places where the light falls from the windows;
- Step 10
Use gray pencils to color the sky.
- Step 11
The drawing is completely ready! Now you know how to draw a winter landscape! If desired, it can be painted with paints. For example, gouache or watercolor is perfect for this purpose! You can also draw a similar drawing with a simple pencil using shading. True, in this case it will not look so bright, festive and impressive.
Drawing a winter landscape with a lake
How to draw a winter forest landscape
Every season the forest is transformed. In the spring it begins to come to life, covering the trees with young foliage and melting snow. In summer, the forest is fragrant not only with flowers, but with ripe berries. Autumn colors the trees of the forest in various warm colors, and the sun palely warms with its last rays. Winter exposes the branches of trees and covers them with a white blanket of snow, freezing the rivers. It's hard not to convey this beauty in illustrations. Therefore, today we will choose the last season of the year and learn how to draw a winter forest landscape using colored pencils.
Tools and materials:
- Simple pencil;
- White sheet of paper;
- Eraser;
- Black helium pen;
- Black marker;
- Colored pencils (blue, orange, blue, gray, green, light green, brown, dark brown).
- Step 1
Divide the sheet into four parts. First, draw a horizontal line in the middle of the sheet. Draw a vertical segment in the middle of the horizontal line.
- Step 2
Let's draw the background part of the picture. On a horizontal line we draw two mountains (the left one will be larger than the right one.) And in front of them we will make silhouettes of trees.
- Step 3
We retreat a small section down from the horizontal line (there will be a river here). Using a curved line we will draw the ground, or rather, a cliff.
- Step 4
We retreat further down and draw pine trees. Their feature is a long trunk and thin branches. At the base of the trunk we will add small snowdrifts. The trees on the left have some foliage.
- Step 5
Let's draw a deer in the foreground. The animal should not be too detailed, because the main task of the drawing is to show the winter landscape. Let's add more snowdrifts in the foreground.
- Step 6
Let's outline the contours of the drawing in the foreground with a black pen. There will be snow on the tree branches.
- Step 7
We begin to paint with color from the background part (top). Let's determine that there will be a sunset, so between the mountains we apply orange, then add blue and blue. We make the transitions between colors smooth, applying from bottom to top. The mountains will be gray, but adjust the contrast using pressure. We make the trees in front of the mountains uniformly green.
- Step 8
For the river we use the usual blue and blue colors. Closer to the mountains we add green and gray tints to the water to make it look more picturesque.
- Step 9
The trunk should be drawn using orange, brown and dark brown. The trees on the left have some leaves, which we'll make green.
- Step 10
Add a shadow from the trees using a gray pencil. Let's add a little coldness to the drawing by drawing the foreground in blue.
- Step 11
The deer's body is covered with brown fur. And between the snowdrifts we will add blue color. So we learned how to draw a winter forest landscape.
How to draw a winter mountain landscape step by step
You can often see incredibly beautiful mountain landscapes on postcards or find similar ones on the Internet. The stone giants covered with snow are mesmerizing. At their feet stand blue spruce trees, frozen from the cold. And there was not a soul around, only a blue snow flicker. Is it possible to resist skipping to the lesson and learning how to draw a winter mountain landscape with a pencil step by step? The lesson is perfect for novice artists who will be able to depict this beauty of the icy mountains the first time if they carefully follow the steps.
Tools and materials:
- White sheet of paper;
- Simple pencil;
- Eraser;
- Black marker;
- Blue pencil;
- Blue pencil.
The article will tell you how to easily and simply draw a winter landscape yourself.
Drawings featuring winter landscapes have a special attractive magic: you want to look at them and hang them on the wall in the recreation area (living room, bedroom, office). Images of snow-covered trees and house roofs inspire human soul a feeling of comfort and tenderness, fairy tales and magic that is present during the New Year.
Drawing winter landscapes is not difficult. Main - choose the right paper and paints. Approximately 50% of the success of the entire work depends on the chosen paper. When painting with paints, you will need thick cardboard from the “craft” category. You can also use colored matte cardboard, for example, blue or black, on which White paint, pastels and pencils look especially contrasting.
When thinking about what you can draw in a winter landscape, the first thing that comes to mind is a house. The house has been present in the human mind since childhood, since the child first sees a fairy tale about Morozko or forest animals. It doesn’t matter what kind of house you imagine, the main thing is to draw it correctly.
We invite you to depict a cozy forest house:
- Choose a perspective, i.e. approximate location of the house on a piece of paper.
- It is best if the house is in the center of your image, or close to the center. This way it will attract attention and be the main storyline.
- To draw an even and proportional house with a roof, you can use a ruler, but then be sure to trace the house template by hand so that the drawing does not look angular.
- After you have drawn the main lines: walls, roof, windows, threshold, etc., proceed to detailing.
- Don't rush to draw snow. Only when the house is completely drawn, using white paint or chalk, literally “cover” the house with a “snow cap”. If you only draw with a simple pencil, you will need an eraser.
Step by step drawing:
House in the forest: drawing in stages 
 House, winter landscape: step one “main lines”
 Once the main lines are drawn, sketch out the snow on all surfaces
  Start detailing the drawing, depict nature: trees, fir trees, paths and other little things
  Erase extra lines with an eraser
  Start coloring the picture with paints
How to draw a child in winter with pencil and paints?
You can decorate a drawing with the image of winter with children having fun. Such a drawing will definitely evoke pleasant emotions and associations with childhood. This idea is also good for drawing New Year cards and pictures for competitions and exhibitions.
How to draw:
- Plan the storyline in advance: how your characters will be depicted, where and what they will do: dance, play snowballs, build a snowman, sledding, spinning around a Christmas tree, and so on.
- Schematically depict the figures of children. You must choose a pose for everyone: someone raised their hands up, someone is sitting on a sled, someone has their ears covered or is tickling a friend.
- After you have depicted the figures of the children, you can begin to detail them and create a winter landscape.
How to portray children:

 Children are sledding
 Snowball games, snowman
 Winter fun: kids
  Making a snowman, playing snowballs
 Finished drawings:
Drawing with paints: winter fun Sledding: painting with paints
 Winter drawing with children having fun
 How to draw animals in winter with pencil and paints?
Winter is a “fairytale time,” which means that even animals at this time of year enjoy the lush snow, wait for the New Year and have fun. You can draw a landscape depicting any “forest inhabitants”: a wolf, a fox, a squirrel, a bear, a hedgehog, a hare and others.
What animals can you draw:
 Step by step drawing wolf
 Step by step drawing of a hedgehog
 Step by step drawing of a squirrel
 Step by step drawing of a woodpecker
 Step by step drawing of a moose
 Step by step drawing of a hare
 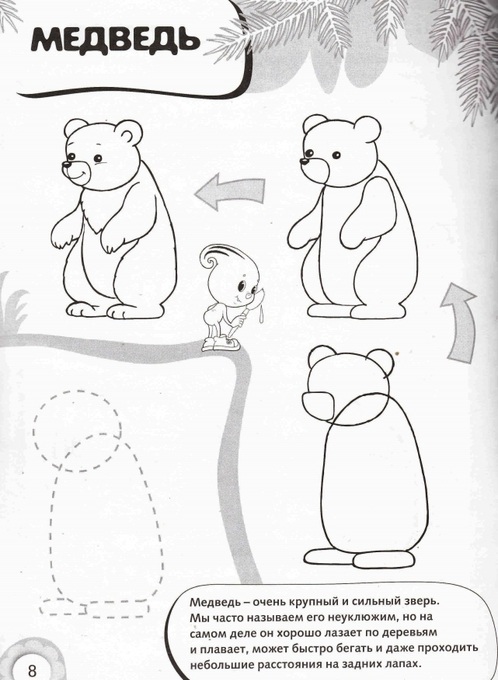 Step by step drawing of a bear
 How to draw a winter landscape with children and animals with pencil and paints?
To make the drawing rich, interesting and positive, draw several storylines straightaway. For example, in a forest or in a clearing, children have fun with winter fun together.
Drawing Ideas:

 Forest animals, children: “winter” drawing
 Animals: winter fun
  Animals meet New Year

 Children and animals in winter
 New Year winter drawing Children and animals: winter
 Winter fun animals Feeding animals in winter
 Drawings about winter with children and animals for beginners and children for sketching: photos
If you are not good at drawing on your own, sketching will always help you. You can draw the template through glass or by placing a sheet of white paper on your computer monitor (it is advisable to do this in the dark). Adjust the size and location of the picture yourself.