Wood carving for beginners: secrets of craftsmanship from experienced craftsmen. Relief carving: from basic skills to confident technique
All beginning carvers ask: “What tools do I need first?” First we will need a small number of tools. Instead of buying a full set of cutting supplies, purchase tools as you need them. Usually, when you buy a set, you don't save a penny, but there are always things left that you hardly need. Buy the best quality tools you can afford; good, sharp, high-carbon steel tools will last you a long time and save you money.
Knives
You will need a good knife - one that is comfortable to work with. There are three types of knives - with a folding blade (pocket knife), with a fixed blade and knives with a replaceable blade. I prefer to use fixed blade knives because they are the safest. Knives also vary in blade shape and steel type.
I recommend a high-carbon steel blade with a hardness of 55 to 60 RC—it will stay sharp longer than a stainless or low-carbon steel blade. For finishing and creating shapes, I use a blade 4 mm thick and 3.8 to 5.1 cm long. A knife with a narrower and shorter blade is better for detail work. Some carvers prefer knives with replaceable blades because instead of sharpening the knife, you simply need to change the blade. Another advantage is this. that the handle of such a knife can be used with small chisels.
Chisels
Chisels come in different widths and curvatures. Curvature is indicated by a number. The steeper the curvature, the larger the number. So, a chisel with number 3 is almost flat, and number 11 has a U-shape. Of course, a number 10 or 11 chisel cuts deeper and removes more wood than a number 3. On the other hand, a number 3 chisel is useful for finishing. The number 12 V-shaped chisel has a wide range from 24 to 90 degrees, but the most common chisels are those with an angle of 60 to 70 degrees.
When choosing a chisel, pay attention to the handle so that the tool does not roll onto the floor when you place it on the table. Otherwise, you will constantly have to repair the blade.

When choosing a chisel, also keep in mind the size and type of carving you want to make. For manual work, palm-sized chisels are more suitable, and for small parts you will need even smaller tools. Sculpted and relief carvings require the use of standard chisels with heavy handles.
Saws
Carvers use a variety of saw types depending on the task, but the most commonly used is a bow saw (“snake”).

It includes a replaceable high carbon steel blade mounted on a steel frame with handle. A bow saw can be used to create narrow, curved lines, although a fair amount of patience is required to prevent the blade from breaking or warping. The saw is also used to remove excess wood.
Special tools
The scraper is used for stripping bark and for quick, rough removal of excess wood, such as when working on furniture. The spoon knife has a double-edged round blade, ideal for making spoons, cups or masks.
Abrasives
Files and rasps remove excess wood quickly and smoothly. They differ in the nature of the surface, which can be rough, medium or relatively smooth. Always use flat, semicircular or round shaped tools with a handle. Riffler-type files and rasps have teeth on both ends and come in a variety of shapes. They are used to penetrate hard-to-reach places and remove small chips. Tools with a rough surface are used for cleaning small areas.
The flexible sanding belt is useful when working on curved surfaces. Sanding cylinders as part of a hand drill or press are indispensable for final finishing. Polishing tools differ in surface texture and the nature of the material, meeting a wide variety of needs. Use sandpaper only after finishing the job, otherwise abrasive particles will get stuck in the wood and your tools will quickly become dull.
Electrical tools
When you start making workpieces yourself, you will need a band saw. A huge selection of blades will allow you to make the most difficult cuts with ease, far surpassing anything that can be done with a bow saw. An openwork saw will help to process the inner surface, but not every tree can handle it. Belt and disc sanders are good for both finishing and removing bark. Many carvers use rotary tools with a wide range of heads to machine parts such as feathers. There are hand-held grinders and small high-speed cutters. There are also at least four types of electric chisels with a reciprocating motion, allowing arthritic people and people with tennis elbow to enjoy carving.
Strengthening devices
If you are holding a workpiece in a vise, select a tool that will not leave marks on the workpiece (or insert some material between the workpiece and the vise). I often use a 6mm capercaillie and a wing nut to secure the workpiece to the workbench. If you are a beginner, you can wear a steel wire glove to protect your hand.

I have an old friend, also a carver, who wears a heavy leather apron when working toward the chest. When finishing or dyeing a product, you can use an awl or a paint stick.
SUPPORT
In order for the workpiece to hold better when you cut wood with a snake saw, I advise you to use a support - an ordinary board that supports the wood during sawing. Simply attach it to a workbench or table and hold the saw vertically in the V-section while cutting the workpiece.
BENCH VICE
If you are planning to do relief carving, I suggest you also make a simple bench vise. One clamp holds the vise at the bottom in a stationary position, while the angle formed by the other two at the top prevents your workpiece or workpiece from slipping out of your hands while you work. Place a bench vise on your work surface.
Additional accessories
Electric burning tools can be used to color the product, add texture, and also to sign the work. You will need a dust mask and a vacuum cleaner. Artist's tools and various brushes are also needed if you want to coat the product with paint or varnish. To transfer the pattern to the workpiece, I advise you to use tracing paper or copying. When performing fine machining of parts, a good light source and a magnifying device are necessary.
Instrument care
You should periodically inspect your tools and wipe them with an oily cloth to prevent them from rusting. Store tools in individual compartments or wrapped in cloth to protect them and reduce sharpening time.

TOOL SHARPENING
Make sure your tools are always sharp and stop working from time to time to sharpen them. All the carvers I know have developed their own dressing system; everyone found their own procedure that was convenient for them personally. Some use whetstones with oil, others with water, and others use electrical devices.
The first step is to sharpen the blade using a fine-grained abrasive such as diamond chips or sandpaper. First, one side is processed until burrs appear on the metal, then the other. At the next stage of editing, the surface irregularities that arose initially are eliminated. Finally, you should polish the blade with a special compound to a mirror shine, reducing friction between the blade and the wood.
How can you tell if a blade is sharp enough? Take a piece of scrap wood and run a knife across the grain. If a smooth mark remains, then the blade is sharp. If the fibers stick out in different directions and the mark is rough, then you need to sharpen the blade more.
TOOLS NEEDED
Cutting tools
Knife (preferably fixed blade)
Four straight chisels (palm-sized enough)
No. 3 sloping chisel 1/2 wide (1.3 cm)
No. 7 semicircular chisel 1/2 wide (1.3 cm) No. 11 steep chisel 1/4 wide (6 mm)
No. 12 corner chisel 1/4 wide (6 mm)
Drawing supplies and tools for applying patterns
Copier (MFP)
Bow saw (“snake”)
Support (see above)
Drawing supplies
Pencil
Copy paper
Wood carving is an exciting activity that does not require special skills and a lot of experience. Anyone can master the basics of artistic or applied carving.
You need to start learning by preparing the necessary tools. For a beginning carver, a knife with a beveled blade, a wooden blank, office tools (ruler, pencil) and paper for sketches will be enough. Sketch - a drawing for carving a future product.
The basic techniques of work are simple and clear: cutting and piercing. For beginners, it is better to start with geometric carving, which is considered the easiest to perform. The basis of geometric carving is rhombuses, squares, pyramids.
To begin with, it is better to choose simple products; carved cutting boards are perfect.
Which tree to choose
The wood must be free of knots, homogeneous, and must not break or chip. The best wood for carving is hardwood, such as linden, alder, and ash. After drying, wood products of these species become durable and do not warp. Pine also works well. Pine is a light but durable species and has soft wood. Pine is suitable for sawing almost any product, especially good for large carvings (platbands). Working with pine can be unnecessarily difficult for beginners due to its hardness.
It is better to pre-impregnate soft wood with an anti-rot agent, and they should also be painted with oil paints.
If you prepare the materials yourself, then make sure that the wood is dried in the shade or under a canopy. Experts consider autumn and winter to be the best time for harvesting material, due to the fact that sap flow slows down at this time.
Imitation thread
This is a special technique to create the effect of a carved surface without carving. Imitation carving is well suited for furniture such as wardrobes, chests of drawers, and shelves. Doesn't require much time, effort or materials.
A stencil of the desired design must be attached with tape to the surface of the furniture and applied with plaster. After the plaster has dried, it must be cleaned with sandpaper, and then using paint, give it the color of wood, slightly lighter than the color of the furniture.
The unevenness of the surface better imitates hand carving, so it is not advisable to sand the surface until it is perfectly smooth.
Wood Carving Basics
In order to prevent burrs and chips from forming on the material, the cut must be made along an inclined line, relative to the wood layer, and in the direction of the running fibers.
Carving technique
First, we apply the pattern to the workpiece using a template. Then the ornament is cut out along the outline of the design. Now you can move on to carving using various chisels and knives. The last stage is finishing work; the product must be cleaned with sandpaper and, if desired, covered with varnish, stain, or paint.
You can teach yourself using video tutorials online.
There are many educational video tutorials online for beginner wood carvers. You can also sign up for wood carving classes in your city. Experienced craftsmen will introduce you to various carving techniques and help you choose the material and necessary tools.
Wood carving is an interesting and useful pastime, with the help of which you can create exclusive gifts for loved ones with your own hands or decorate your home as you wish.
In past centuries, almost every resident of our country mastered handcraft techniques. Hand work was divided into female and male types. Today, gender boundaries are somewhat blurred, and everyone can choose any business to their liking. Few people choose obsolete types of manual labor as their main occupation, but most people want to have an exciting hobby. One of the arts that you can choose as a hobby is real wood carving, which is suitable for beginners. Carved elements on boxes, photo and painting frames, as well as furniture and interior items look very beautiful.
The beginning of the journey from a beginner to an experienced carving master:- First you need to prepare a theoretical basis. Look Pictures with the works of craftsmen, videos on the topic, read articles and scroll through books . If you are sure that you want to try yourself in this creative work, then you should get tools, blanks and other things necessary for a master.
- First of all, you need to prepare your tools. It is important to monitor their quality: a poorly sharpened knife can discourage you from continuing to learn a new craft for a long time. In addition, if the tool breaks during cutting, you will not be able to finish the job at all, which will lead to great disappointment. Tools for the carver can be ordered on well-known Chinese websites, bought in construction or specialized stores, and also made to order from a good, trusted craftsman.
Learning wood carving for beginners with basic techniques
The first and main assistant for the master will be a jamb knife. It is a cutter with a short blade beveled at an angle. It is convenient for them to cut out geometric patterns and some other elements.
In addition, a set of chisels will come in handy. They differ from each other in shape and size. There are flat chisels; semicircular chisels of various diameters for cutting grooves and notches; square and triangular - for various carving techniques. Initially, in order not to spend money on expensive tools, some craftsmen sharpen flat-head screwdrivers themselves for these purposes. There are also various tools for professional craftsmen, which will be useful to the artisan after he has mastered carving techniques with basic tools. In addition, carvers sometimes use electric tools: a router, a jigsaw, and even a chainsaw.
Choosing the type of wood for different types of carvings
To master wood carving with basic techniques for beginners, you need to understand that different types of wood have different qualities from each other. They all have their advantages and disadvantages. Soft woods - linden and juniper. They are easy to cut, but all the flaws and unnecessary cuts are visible. Many masters do not advise starting to learn using them. Spruce and pine are denser and more durable materials, but this makes the cutting process a little more complicated. It is quite easy to cut birch, but it is not very strong, and over time the product can become deformed and darken. Thus, the choice of wood remains with the master.

A simple way to avoid paying too much attention to this aspect: take an existing cutting board at home or a blank box from a craft store. You can also try it on a piece of wood from the garage. When you understand that carving is for you, you can purchase special materials.
When choosing wood, you need to pay attention not only to the type of wood, but also to the uniformity of the block, the absence of knots and cracks. When preparing, you should not sand the block so that particles do not remain on the wood, causing the knife to become dull.
When learning any business, it is important to remember the principle of gradualism. You should not start carving wood with sculptural carvings: in this case, there is a high probability that nothing will come of it until he knows how to hold a knife in his hands or has no idea about the volume of the product.

Oddly enough, you don’t have to be an artist to master this craft. To perform beautiful work, it is enough to hold a knife in your hand correctly and master the basics of this art. To make a pattern on a box, board or somewhere else, you can use ready-made sketches, stencils and templates, which can be found in abundance on the Internet or in books, and you can also repeat drawings in books or patterns on fabrics, for example, on wood.
Let's look at a master class on geometric wood carving for beginners
The simplest type of cutting is flat carving. It is divided into several types, the simplest and most accessible even to children is geometric carving. The name itself suggests that ornaments consisting of simple geometric shapes are cut out with a knife. However, with careful work and interesting combinations, this type of carving can also look very impressive and beautiful.
To work you will need:
- knife-jamb
- a block of selected species
- pencil with ruler
First, you need to draw two parallel lines on the workpiece at a distance of 1 cm and make marks also 1 cm apart in a checkerboard pattern.

Connect the dots to form triangles. Make a mark in the middle of each triangle on the bottom row.
Connect the centers of the triangles with the vertices of the triangles. Now insert the knife into the middle of the triangle to a depth of 4-5 cm, and bring the obtuse angle of the knife to the top. Do this for all three corners.

Then cut out the sides of the triangles as shown in the photo.
Do the same with the top row of the ornament.
Having a little experience in wood carving from the master class above, you can safely start cutting out slightly more complex elements. The following stencil or any other will be useful for this.

Video lessons on the topic of the article
Very often people ask me to teach wood carving. Usually this question is asked by people who are very far from carving and have little idea of how extensive this layer of knowledge and skills is. Therefore, I try to specify the request by asking questions: “What style of carving are you interested in?”, “What kind of product do you want to carve?” etc. For some reason, in the modern environment there is an idea that there are always miracle courses, after completing which in 1-2 months you can become a real carver. At the same time, people forget that truly beautiful carvings are the result of a lot of hard work. I'm not even talking about the internal component; without pleasure from the process, there is no beauty. So what’s stopping you from starting to cut yourself, why is everyone waiting for the “magic pill”?
With the help of this article I will share materials for self-learning wood carving. So, the first thing we need is materials and tools. Here's an article to help - If you're not satisfied with what's sold in your region, go to online stores (Tatyanka, Stameskino) or look for someone who can make a custom-made instrument.
The tool and material have appeared, but we don’t know which way to approach? Methodological materials will help you. At one time, Mikhail Ilyaev’s book, The Basics of a Skilled Carver, helped me understand a lot. In addition, I am posting links to video tutorials on geometric carving from Ekaterina Popkova.
Lesson 1 Basic element of geometric carving - skewer
Lesson 2 Triangle
Lesson 3 Socket
Lesson 4 Rosette with petals
Lesson 5 Rotating rosette
Afterword
I hope this article was useful to you, and very soon you will become a real master of carving. Write in the comments if it is not clear what else is required for training.
Interested in wood carving for beginners, as a rule, people who do not have an artistic education. For them this art is a hobby. Due to the fact that the knowledge of most of these carvers is scattered, we will try to organize it. There is nothing complicated about wood carving itself. In Russia, this type of creativity has always been the main one. Even in stone processing, at first they used techniques that they had long been accustomed to.
Applying a pattern to a wooden piece
Today this type of art is of genuine interest, despite the fact that many skills are already being lost.
Generally speaking, wood carving can be classified as a plastic art. Traditionally, a distinction is made between relief and. A novice carver should first master the techniques of creating relief.
This technique has several thread options:

The list doesn't end there. There is still a lot left outside the scope. From the names you can understand how this or that performance technique differs. Classification is often complicated by the fact that our country is large. In different regions, the names of the same equipment may differ. However, the essence does not change, so we will outline the general working methods.
All beginning carvers are introduced to geometric carving. She is simple but beautiful. This type of carving is divided into three types:
- contour;
- triangular-notched;
- nail or staple.
For execution you will need:
- linden board;
- blunt knife;
- Ruler and pencil.
Drawings in the form of a geometric pattern are applied to the board. The carver can come up with his own or copy the one he likes. You don’t need to immediately take on complex elements if you don’t have the skills and your hand isn’t strong enough.
 Several ornaments for wood carving
 The board should be smooth. This surface is achieved through planing. Under no circumstances should you sand the surface with sandpaper. If abrasive particles remain in the fibers, they will prevent the threads from becoming clean and neat. In addition, the cutting edge of the knife will become dull faster.
Beginner carvers are recommended to choose hardwood to make geometric patterns.
They allow you to draw straight lines with a knife. Creating straight lines on softwood boards is much more difficult. So, the tip of the knife cuts vertically into the surface. Depth - 1.5-2 mm. Then the entire line is cut, pull the knife towards you. In this case, the blade tilts at an angle of 40°. Movements should be smooth. Note that you need to start and finish carving the line with the tip of the knife. 
Having made one line or cut, we make the next one. Only now the blade should be tilted in the opposite direction. The chips will separate, and a geometrically shaped depression will appear on the board. If the edges are clear and the surface is shiny, then everything was done correctly. Gradually we cut out the entire element, and then the entire ornament.
It must be remembered that the knife goes easier along the fibers. When cutting through cross fibers, you have to apply more effort. Your hand may slip, and here you need to know the rules:
- work safety;
- organization of work space;
- tool preparation.
Carver's workplace
Work with sharp tools should be carried out at a workbench that meets all the requirements for stability and strength. If it is not possible to make such a workbench, you can limit yourself to a tabletop. It can be of any size, but the height should not be higher than the level of the carver’s belt.
The countertop should always be smooth and clean. Often, while working, the knife slips and hits the table. Jagged edges form and need to be removed. Professionals always monitor the condition of the workbench surface. They do not recommend hammering nails, chopping with an ax, or throwing a sharp tool onto a workbench, as all this can damage the countertop. The board on which the ornament is cut is carefully secured with clamps. Working on your knees or on an unstable table or stool should be avoided.
 An example of a carver's workplace
 The workbench for wood carving should be well lit. You can install it near a window. However, there is little daylight.
If there is only one light source, dull dark shadows appear, which interfere with making the carving clean. Therefore, 2-3 more lamps are installed above the table.
They should illuminate the work from different sides, especially if it is dark outside the window. The lamps must be installed above the carver's eyes. While working, your eyes feel strained. Even experienced craftsmen notice this. A novice carver gets tired faster, and high-quality lighting makes the working conditions comfortable and safe.
Tool requirements
Modern ones open up wide opportunities for artists. They are used successfully in wood processing. But we will consider a tool for manual work.
 A selection of chisels for wood carving
 After all, gaining the skill to work with such a tool is more important and more difficult.
The master always has in his arsenal:
- saw;
- hand drill or brace;
- plane;
- semicircular and flat chisels;
- knives of different sizes;
- small axe.
Many manufacturers have already taken care of cutters and are creating a variety of sets. It is impossible to unequivocally assess their quality and benefits. There is some debate about this. Let us only note that not a single professional master has such a set. All tools are purchased separately and finished by hand.
Any saw with large teeth is suitable for working with wood. This could be a hacksaw, bow saw or jigsaw. It’s good if there are saws of different sizes and types. A beginner should monitor the condition of the canvas. It should always be well tensioned and sharpened. In addition, do not forget about wiring.
 Different Types of Wood Carving Saws
 A plane is an indispensable tool when working with wood. For a beginning craftsman, one medium-sized plane is sufficient. This tool is sometimes called a plow, reflecting its function. Experts classify a planer as one of the types of planer. In the future, you can purchase a jointer and scrapers, which can be used to perfectly level the surface of the wood.
The main tool for carving is a chisel. This is true. The carver should have a set of chisels of different thicknesses and shapes. Experience shows that at first it is enough to have 3 flat chisels:
- wide;
- average;
- narrow.
The same can be said about semicircular chisels. 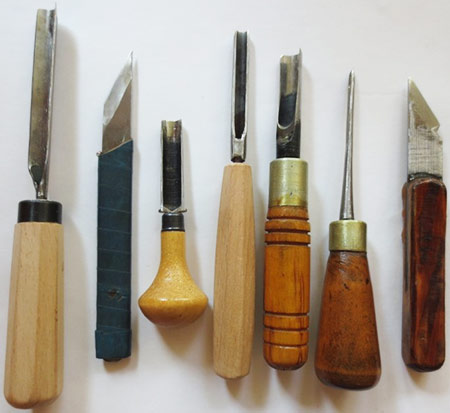 The most important point is the correct sharpening and condition of the cutting edge. Chisels need to be sharpened frequently. Sometimes it is recommended to do this before starting work, but most often the chisels are prepared in advance. Do not use blunt instruments. Is it dangerous. An unsharpened chisel is more likely to break off, resulting in serious injury.
In this case, the carving will be ugly, and the work will be long and difficult. To sharpen chisels, you can use a sharpening machine, sandpaper and a piece of genuine leather with polishing paste to finish the blade.