We draw a colorful illustration in Photoshop. Illustration Guide: How to Make Your Brand Style Recognizable
Are you ready to take risks in web design? Most likely, not each of you will give an affirmative answer. However, there is a risk that over time has become a kind of standard, a trend in modern web design. We call this “something” a risk only because it is important not only to imagine the theme and mix variations of elements, but also to imagine how appropriate it is in your website design project. It's about combining photographs and illustrations into one design.
Photography is now used to make the appearance of a project more realistic and to draw the visitor’s attention to what we're talking about about quite important and the right things in the life of every person. An illustration or drawing is more often suitable for narrowly focused projects and is subconsciously associated with action, “cartooniness” or even frivolity.
But web design is the art of innovation and professionalism in working with graphic editors. Therefore, combining two types of images is quite possible. Today we will look at not only the options for how webmasters use this type of image, but also the intricacies of creating them in Photoshop.
Custom Accents
Incorporating illustrations into web design is almost easy as long as they represent user interface elements. But they also don’t have to be hand-drawn or just specific buttons/arrows. This can be high-quality plot vector graphics. In the examples below, you can see how illustrations have brought the design to life (www.wittycookie.com), with the hero character representing the company's capabilities.
Logo image illustration
If you love illustration as such and plan to focus on it in your web design project, then using an illustrated logo image would be a good option. The first project madebyfew.com represents this perfectly. Moreover, drawings were used everywhere as separate design elements in the form of circles, serpentine ribbons, smiles, and miniatures for materials. Since the site is dedicated to the conference and displays its participants, such a picture can be used instead of a mass photo of the participants.

Another example from onehappycampernj.org is somewhat more modest, using a texture with plant elements as an illustration. The peculiarity is that the image was created for only one section per home page. This allows you to focus attention on the information, enliven the site and emphasize the peculiarity of the information. In one of our previous materials we already talked about huge collections of textures. Then you only need to change the color in Photoshop, the transparency.

Belgian construction company konosair.be also decided to create an illustration above the photo. At the same time, hand-drawn pictures are no longer used in website design. However, even at home page This combination looks very interesting.

Typography illustration
There is a way to add captions over a photo. But imagine hand-drawn typography and even animated typography (archrival.com). This “trick” can be used on top of an existing video or image.

Steptoandson.co.uk/about/ looks more modest, where typography and font pairs were used not as an illustration, but as a text layer. However, the right style creates the impression that the photograph was painted and written by hand, calligraphy or stencil.

Tell a story
The project mamyfactory.com/fr/ is interesting because drawings are used literally everywhere, but combined with photographs. Creating such a design is more difficult. Firstly, you will need real photo hands engaged in knitting, and secondly, you will have to carefully select the threads and knitting in Photoshop with a magnetic lasso, and then convert it all into a drawn form. This may require plugins, drawing skills, or simple knowledge of how to convert a photo into a drawing.


The web design of the discoveryphototours.com/photo-tours/ project can also be called a beautiful combination of illustration and photography. Here, photographs are designed in page breaks, prints, titles are created in the form of brush strokes and illustrated typography.

Gili-lankanfushi.com looks similar, in the design of which illustrated icons and inscriptions are placed on top of photographs of the Maldives, leaves, in the sidebar and footer further enhance the effect of drawing.

Rules for using illustrations
Using illustrations and photographs in one project is an opportunity to develop imagination, add intrigue to the project, and add a little sophistication to the design. But it is necessary to follow some rules. Yes, yes, alas, but even for a combination of photos and pictures they are also available.
- The style of illustrations should correspond to the overall design. This means that icons and pictograms, as well as text, should also be consistent with the general style.
- It is better to use illustrations for icons and buttons, additional small pictures, but for visual emphasis and interaction with users - only photographs.
- Start by creating a template with illustrations and then add accents by adding photos and videos.
- Not just pictures, but animated elements look great next to photographs. For example, tmfp.co.uk; they are barely noticeable near the photos and do not distract the user from studying the information at all.
- In the form of drawings, it is appropriate to create a label or company logo and place them next to or on top of photographs.
- Illustrations help the visitor navigate the site, tell him a story and guide the user through the pages of the project.
Creation of illustrations inPhotoshop
Despite the fact that the “risk” that we talked about at the beginning turned out to be not so terrible, the question arises of what is the easiest way to create an illustration. On the one hand, you can use clipart, of which there are many freely licensed ones on the Internet. But on the other hand, you can create a drawing yourself.
The important thing is that the quality of the final material can be improved for a long time, lightened, darkened, played with contrast and color. And yes, there are a lot of illustration styles, hand drawing.
But we will give a small example of how you can create an illustration in general and how to use it further. Remember that then it can be converted into a vector or made into a vector, you can use an eraser to remove unnecessary details and leave only the outlines. For example, you need a drawing of a handbag or a shoe, but there is no suitable clipart or drawing style. Transfer to Photoshop and then remove all unnecessary things, make them more saturated contour lines and..voila, the drawing is ready.


For example, let's take a kitten.

Open Photoshop, copy the photo to a new layer, create a copy of the layer. So that there is a background and two layers with a photo.

Select the last layer (top) and blur it using Gaussian. The parameter is selected “by eye”, because all photographs are different in detail and color. But after a couple of attempts at different levels blur, you will see exactly what you need.

After that apply properties of this layer - Split. You will already receive a blank for the pencil drawing.

Now it's a matter of small things. Copy the contents to a new layer (Ctrl+Shift+Alt+E) and Desaturate (Image-Adjustments-Desaturate).

Now create a copy of this layer and select the option Linear dimmer.

That's all. Now especially black areas can be Lightened from the toolbar. You can create even more layers, achieving clarity. You can touch up gray areas with a brush to avoid stains. But it all depends on the specific material and your imagination.
What to do now with a seemingly incomprehensible illustration? It can be inserted into the template. We chose one with kittens, where there is a section with sections and inserted our kitten into one of them. Additionally, we added more layers and made it clearer. If you use other drawings of kittens nearby different poses, give a slightly different style, make the kittens more contoured, then you will get the personification of the theme of our material. The source was taken from here: templatemonster.com/ru/demo/47111.html.

As for the text under the paw, it can be moved apart in this place, and the background of the kitten can be decorated with a page break. Additionally, adjust the edge, correct the spots around with an eraser, apply sharpening, or even send it to Illustrator for tracing and converting to vector. It is more convenient to translate architecture and faces into drawings.

Completion
Using illustrations in combination with photographs within the design of one website is quite possible. It even looks amazing, but it is difficult to create if exactly the drawings that are required are not available and you have to create it yourself in graphic editors. This is more difficult to do if you are not particularly good at drawing by nature and in life. However, it is possible to create an illustration, you just need to have an idea of what style you want. If the analogue is mamyfactory.com/fr/, then you can draw the store building yourself, but transfer the dog from a photograph, select the contours, and remove everything that appears inside (dots, artifacts, pixels) with an eraser.
Web design is a creative profession that requires not only time, but also imagination, a love of art and a search for inspiration. And knowledge too.
Hello! My name is Hatice Bayramoglu, I am a 3D artist and illustrator from Turkey. In this lesson I will show you how to draw and color a hero - an illustration for a children's book. As the lesson progresses, I will explain my choice of certain tools and my thoughts on illustration. My tutorial shows how I create an illustration from initial sketch to full drawing. I believe that after reading this lesson you will find something useful for yourself. To create the work I will use Photoshop and a Wacom tablet.
This drawing will be created entirely in Photoshop CS2.
Step 1: Sketch
Start by creating a new document in Photoshop. Its dimensions should be about 800x778 pixels. I started by creating quick sketch, which reflects my main idea. Here is the main sketch environment around the main character.

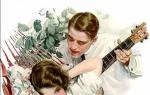
So, as you can see, this sketch shows the main character - a little girl standing next to an apple tree with an apple in her hands. She smiles because she is happy, and perhaps a little sad.
Step 2: Setting Up Brushes in Photoshop
Here is the one and only brush that I use to paint my heroine. For painting I will use standard brushes.

Before you start painting, you need to set up your brush. Start by choosing a tool Brush(Brush), then use the standard brush shown below.

(click on image to enlarge)
Step 3: Color Palette
You must decide on the colors you will use before you start painting. Here are my colors used in my work:

Step 4: Layers (Layers)
Create New Layer(New Layer) and name it Sketch. You can create this sketch in Photoshop or on paper. Once you have created the sketch layer, change it Blend Mode(Blending Mode) on Multiplication(Multiply) and always keep it on top of all layers so you can see what you are painting over.
Now look at my layers palette. Here are separate layers for each sketch object. Painting each detail on a new layer makes it easy to make adjustments as you paint. It's much easier to correct mistakes if the main elements of your illustration are located on separate layers. This step is really very important!

Step 5: Working on the Background Color
Here let me show you how I color the background. Choosing a tool Fill(Paint Bucket) (G). Once you fill the background it should look like this. Make sure the layers are arranged as shown in the image below.


Step 6: Coloring the Basic Shapes
Before we start coloring, let me show you the order of the layers again. I changed it because the sketch layer should be on top of all layers, and also set to Multiplication(Multiply). At this point we can start coloring the sketch and can identify the main shapes. Using the tool Brush(Brush) (B), start painting the main character and the tree on separate layers. Make sure that Rigidity(Hardness) of the brush is set to 100%. A brush with soft edges may result in a somewhat blurry result.

And in this step I would like to change the size of my file because I want to add more subtle details. So I open Image(Image) - Image Size(Image Size) and increase the file size to 1500x1495.

Step 7: Adding Details
Now I can start adding details. In this step I started by painting the face. main character. Make sure you are working on the proper layer before painting.

And here I created a copy of the tree layer and added some details to it. I also hid the first layer with the tree.

Here's a screenshot to show you the details. I started adding even more details to my drawing, such as grass and small flowers. At this point I created a layer called Flowers.

I add even more color and fine detailed lines on the wood.

Now look at the details I just created. I continue to add details and, if necessary, create new layers.

Step 8: Special attention to the main character
Now that I'm happy with the detailing of the decorations and wood, I'll add detail to the girl's outfit. At this stage I noticed that my character looked very plain and not very attractive, so I thought I should take the time to make some changes. I tried to give a slightly different look to the heroine and continued to add more details. Again, pay attention to the order of the layers. As you can see, in this step I have a few more new layers. All layers have their own names.

Now I'm starting to add little details to the heroine, adding more yellows and greens. By the way, don't forget that you don't have to detail everything in this step. At this stage I work on the main details and light until I get a nice contrast. Sometimes I change some colors. I'm almost finished painting her clothes and body. I also moved the sketch layer a little to one side so that you can see what the heroine looks like without the sketch base.

Step 9: Adding Highlights and Contrast
I used the tool Clarifier(Dodge) (O) to brighten areas. This is what the work looks like after all the adjustments made by the tools Clarifier(Dodge) (O) and Dimmer(Burn). I continue to add more detail to the tree using brushes of different sizes and colors. Once enough detail had been added, I began to smooth it out using a soft edged brush. I also use tools Clarifier(Dodge) (O) and Dimmer(Burn) to give shade to branches.


I also add a few strokes with the tool Finger(Smudge). I use this because I want to add soft blurry areas to the clouds and background. At this stage I noticed that my clouds were not very detailed. So I created a new layer to paint the details to the cloud using two tools: Finger(Smudge) and Brush(Brush).

Step 10: Adding More Details
At this stage, I noticed that I needed to add more flowers to my drawing. So I create a new layer and, as you can see, I draw some cute and simple flowers. I continue to add more details. Adding some touches with a tool Clarifier(Dodge) (O), I'm doing this because I want to add some lightly lit areas of grass.

Now that the grass and background are complete, I can start adding more detail to the girl's hair and face. Selecting the brush mode Lightening Basics(Color Dodge) and add a few strokes to her face.

Now notice the details I added using just the brush in the mode Lightening Basics(Color Dodge).

Step 11: Color Correction
The drawing is almost finished except for color correction. To start Drain(Merge) all layers. Now in Image(Image) - Corrections(Adjustments) - Brightness/Contrast(Brightness/Contrast) let's change the color a little. I want to give the illustration a more sunny effect.

Set the parameters that I set. This is what the illustration looks like - more sunny and joyful.

Finished illustration
Here is the finished illustration, I hope you found this tutorial interesting. Thanks for reading.
Illustrations in a book are an important emotional factor influencing the reader. fiction, which has an aesthetic and semantic impact. Illustrations contribute to a better perception of texts of any level of complexity, helping to make a choice in favor of a specific publication!
In this article we will introduce you to the main points of illustration and tell you about ways to do it. All you have to do is choose the appropriate way to decorate your book with illustrations.
The size, format and location of each illustration in the book has its own purpose. You need to become familiar with how illustrations are typically laid out and drawing techniques so that you can communicate with illustrators on the same language.
The following types of illustrations are distinguished:
- Frontispiece. Such an illustration for a book is printed on a separate thick sheet of paper and glued to the left side of the first book block, spread title page before the first page of text material. Typically, this sheet displays main idea, the action of the story. In some cases, a portrait of the writer or the main character of the plot of the work is placed here.
- Screensaver. It is used to decorate the beginning of a chapter or section, and reproduces a thematic breakdown of the content of the entire rubric part of the publication, this is a kind of graphic introduction. The screensaver prepares the reader for the development of the plot and the emotional perception of the work. Besides thematic pictures, at the beginning of sections they often use an ornamental, symbolic, subject-decorative thematic composition called a ruler.
- Strip. A drawing that takes up the entire page of a book.
- Half-strip. A picture that is located anywhere on the page: top, bottom, right or left.
- At the centerfold. The image that occupies the spread of the publication.
- Defense. Thematic image framed with text.
- Drawings in the margins. Small images distributed along the edge of the text strip.
- Background. Often used in color gift editions. The text is placed on top of the image.
- Ending or vignette. A picture or graphic element is placed at the end of the text. It is performed in the same plot-thematic execution with the screensaver.
The following are the basic drawing techniques:
- pencil or charcoal;
- watercolor or oil;
- line drawing in the style of books from the glorious times of the USSR;
- computer graphics, including 3D;
- photo collage - an illustration made up of several photographs;
- photorealistic drawing.
Check out the illustrations made in different techniques, and choose the appropriate option for yourself.
Coal  Watercolor
  Pencil
  Photorealistic painting
  Line art
  Photo collage
Attractive publication cover, aesthetic and memorable appearance, thematically correctly selected illustrations are a guarantee of the future success of the book. And here it is important for the author to decide which illustration method to choose.
Method 1: Order illustrations from an illustrator
Hiring a professional illustrator or graphic designer is one of the best options providing your written creation with high-quality images in full accordance with the presentation. All illustrations for the book are made using the same drawing technique, maintaining a single style agreed with the author.
Hiring an illustrator to work is not the cheapest method, but it is the most advantageous in terms of quality and accurate representation of the author’s intention.
Method 2: Select ready-made illustrations for an existing plot
This method is well suited for poems or stories where all the illustrations are not connected by a common theme.
On the Internet you can find many ready-made images on the theme of the work. But you must use them to design your book only with the permission of the artist or photographer, since in this case there are copyrights to the image. Failure to comply with this requirement can lead to unpredictable consequences: litigation, monetary fines.
Therefore, it is better to turn to the services of photo banking sites, where all photographs, reproductions, drawings are provided for a small fee, and sometimes for free. A wide selection and high-quality images allow you to design literary work without violating the copyrights of others. Our publishing house uses the services of the photo bank www.lori.ru, where you can quickly find a suitable image using keywords.
Method 3: Find an artist among your relatives or friends
If you ask, you will be surprised how many people you know can draw. Even if not very professional, but very sweet and sincere. These people will welcome the opportunity to illustrate your book for free, or for a small fee or return favor. Let them draw on paper. And then the publishing house will professionally scan the illustrations and insert them into the book layout.
Services of illustrators of the publishing house TRIUMPH
Our specialists create illustrations in any technique. By ordering the publication of a work from our publishing house, the author gets the opportunity to work directly with the illustrator, which allows him not only to discuss the technique of performing the work, the number of drawings, but also to agree on the cost. Payment is also made directly to the artist.
Surely many artists have repeatedly wondered how to create digital illustrations, and not just of a satisfactory level, but high-quality works that will take the breath away of any sophisticated viewer. This, like any craft, requires constant attention and time.
First, you need to understand the creation process itself. digital painting, which can develop in several directions. The article will tell you about these options, among which you can choose the one that suits you.
Creating an illustration from a photograph
The main advantage of this method is that it is suitable for everyone, without exception, giving an opportunity to those who cannot boast of the ability to draw well. The principle of such sketching is as follows: the original photograph serves as the basis for the drawing until the artist feels comfortable continuing to work without it.
If, for example, you work in Adobe Photoshop, then by reducing the transparency of the photo and creating a new layer, you can safely create an illustration, stroke by stroke, repeating all the lines and folds of objects. This can be done either with a mouse or using a special tablet with a stylus - an accessory in the form of a small thin pen for controlling a device with a touch interface.


Below is a video showing this method creating illustrations like this:
Creating an illustration from a scanned drawing
This method is already for people who actively practice creating high-quality illustrations, that is, who know how to draw.
So, the finished (or partially finished) work is scanned and opened in the appropriate program on the computer for further application of strokes on top of the drawing.
The following videos will demonstrate this method in practice:
https://youtu.be/UVGxAJL7dSQ
Create an illustration directly on your computer
As the name suggests, this is the most difficult level, which is actively used by professionals in this field.
Relevant videos are attached:
Over the past few weeks I've been trying out using grayscale filters, curious about the results and what they can do. Also, much to my surprise, I discovered the Width Tool in Illustrator CS5. Having these two tools, I decided to put them to good use and create an illustration in the style of Roy Lichtenstein.
There are quite a lot of tutorials that tell you how to create such an image, but I decided to go through this one myself. I was not interested in other lessons, because... my occupation was only entertainment. Therefore, if I suddenly copied someone's technique, then I really didn't know. In addition, it would be quite nice to post a lesson on creating illustrations in a similar style on this site.
Roy Fox Lichtenstein (October 27, 1923 - September 29, 1997) - American artist, representative of pop art. The artist's success was brought to him by his works on the themes of comics and magazine graphics. Wikipedia
Step 1
Let's start with working in Illustrator.Open the photo in Illustrator that you will be working with. I found this one on Shutterstock, but you can choose any other.

Step 2
Select the Pencil Tool (N) and start drawing over the photo, using it as a background. I started with the eyes. For the pupils I used Ellipse (L).
Step 3
Continue drawing with the Pencil Tool (N) and Pen Tool (P) to achieve greater precision, but don't get carried away as... perfection is not required here.
Step 4
Using the Pencil Tool (N) draw the outline of the girl's hair:
Step 5
Then, use the same tools to add some details for the hair:
Step 6
As a result, we got vector elements for creating a girl. You can add more elements optional, it depends on the photo used.
Step 7
Remove the background photo to work only with vector elements:
Step 8
One of my favorite tools in Illustrator is the Width Tool (Shift+W). It allows us to change the stroke width of part of our stroke. Look, it's just fantastic!
Step 9
Using the same tool, change the width of some strokes like this:
Step 10
It's time to add some color. I used beige for the skin, yellow for the hair, white for the eyes and black for the details. Let the blouse be green:
Step 11
Now let's go to Photoshop. Open the paper texture in Photoshop. I found the texture in the same place as the girl, on Shutterstock.
Step 12
On top of the paper texture, create a layer and overlay a photo of the girl with the Multiply blending options. IN in this case We will need it to import vectors from Illustrator and create halftones.
Step 13
Trim any excess parts of the photo that extend beyond the edges of the paper texture. The best way to do this, use a layer mask:
Step 14
Create a new layer below the girl's photo layer, but inside the same folder with our mask. Change the new layer's blending mode to Multiply and fill it with blue:
Step 15
Copy the vector image in Illustrator and paste it into Photoshop. When inserting, I used the “Smart Objects” option, because... this allows you to edit the vector at any time directly in Photoshop.As you probably noticed, I set the new layer's opacity to 70%, so you can set the desired layer location:

Step 16
Once you find the desired location, make the layer opaque (100%):
Step 17
Change the order of the layers so that the photo of the girl is on top of the vector layer. After that, desaturate the photo (Image > Adjustments > Desaturate). You can do it black and white photo, about the same as mine.Then go to editing levels (Image > Adjustments > Levels).
Change the black channel to 60 and the white channel to 195.
Set our layer's blending mode to Multiply:

Step 18
Select Filter > Pixelate > Color Halftone. In the window that opens, specify a maximum radius of 15 and a value of 199 for all channels.Note: Depending on the size of the illustration, adjust the maximum radius proportionally.

Step 19
As a result, we get this image. The illustration is almost ready, all that remains is to give it an old, shabby look. We also need to clean the teeth and eyes from undertones:
Step 20
Place the paper texture on top of all layers of our illustration and set the blending mode to Linear Burn:
Conclusion
The illustration is ready. Here the teeth and eyes have already been cleaned of halftones.In the same way, you can use halftones to create illustrations in the style of Roy Lichtenstein, like in our experiment.
Thank you for your attention.
This topic is a translation