How to color a knight with colored pencils. Step by step lesson: how to draw a knight
Already drawn +3 I want to draw +3 Thank you + 45
Step 1.
Draw a vertical line - the axis of the crusader's sword. We use two ovals to depict the helmet and the upper part of the body.Step 2.
We draw the center line of the helmet. We use an arc to depict the upper part of the knight’s legs. On the centerline of the sword we draw a horizontal line on which its hilt will be built. On the vertical we make serifs at the bottom and top, and on the horizontal on the right.
Step 3.
Using a horizontal line we divide the helmet into two parts. We draw the hands of a knight, right hand is drawn with one oval, while the left one is constructed using an arc representing the shoulder and two ovals. Draw the knight’s waist and outline it with an arc bottom part torso. We depict the knees of the crusader with two ovals. Draw the shin part with an arc right leg, depict the soles of the feet. We make a horizontal notch on the knight's sword.
Step 4.
We finish drawing the helmet, depicting two verticals coming out of its upper part, and using an arc to emphasize its lower part. We build a sword, depict its handle and blade, which gradually converges to the bottom. We finish drawing the knight’s legs: we draw the thigh parts with several arcs, then we draw the shin parts with ovals and arcs, and finally we finish drawing the feet. Using several vertical and horizontal lines we show the folds of clothing covering the legs.
Step 5.
We finish drawing the crusader’s helmet and draw wings on both sides of it. In the helmet itself we make a cross-shaped cutout. Detailed drawing of the armor on the hands, showing their relief with several arcs, and drawing iron gloves on the hands. Minor improvements appearance sword, the shape of its hilt and blade. On the waist, draw a belt that creates folds in the clothing. We depict the armor on the legs, we also use several lines to show their shape on the thigh parts, we finalize the knee protection, and we draw protruding sharp blades on the sides. Behind the knight's back we depict a sheath for a sword. Finally, we show the folds on the clothes.
Step 6.
A more detailed drawing of all elements from head to toe, including a helmet, armor on the arms and legs, clothing on the knight’s body, a sword, its hilt and blade, and a sheath for the sword. We identify the dark, shaded parts and shade them, depicting folds on the clothes. Leaving white areas on the armor can create a feeling of shine. The scabbard of the sword can be decorated with ornaments in the form of a skull. Here everything depends on you and your imagination.All kinds of coloring books are very popular in modern children's everyday life. Knight coloring pages are especially popular among boys. Such books are also interesting to girls because of their visibility and relevance among their peers. Children, playing one game, quickly get used to it and therefore every time they need to look for something new and interesting. Knights coloring pages can be printed quickly and easily on our website, and parents do not need to spend cash to purchase new heroes.
 |
|
 |
|
 |
 |
 |
You can also find coloring pages for boys of knights, who are clad in elite medieval armor, with decent weapons in the form of bladed weapons, swords, spears and maces. The Age of Chivalry in coloring pages is presented on the website in full scale. Information about it first appeared in the 8th century in France. Later, the image of the knight was formed and presented to the public, being influenced by the church, the Crusades and the poetic lines of that grandiose era in the 18th-19th centuries.
The theme of chivalry is in demand today and proves its relevance and development. IN late XIX century, this period in history ended due to the emergence of firearms and heavy armor. However boys different ages and peoples will always continue to search for the preconditions of knightly times and their consequences. Medieval knights are now in demand, so there are now many coloring books with stories, exploits, campaigns and competitions dedicated to them.
To keep your child busy with some exciting activity, knight coloring book for kids is especially suitable for children of different ages. Imagining a real warrior with your own eyes, you can color the pictures one after another with pleasure. By printing pictures on the website album sheets, the child clearly sees the knight and imagines him, so it is easy for him to concentrate and work on his creativity, while parents can do theirs important matters. By practicing as needed, children can easily master the technique. You can print out knight coloring pages for boys from a number of warriors presented on the company’s website.
Various pictures are also presented here for the attention of children. famous heroes, musketeers, knights and other topics covered fairy tale characters. You can print out the knights coloring pages for free without much difficulty or effort. This is especially true for teenage and younger boys school age. These children are eager to buy something more interesting and quickly paint it. Therefore, for the attention of little fans on the site there is great pictures High Quality and textures. Knights in pictures and coloring pages represent historical episodes and feats that people performed during the Middle Ages. This is why their inner world is rich and interesting.
If you liked our site or found the information on this page useful, share it with friends and acquaintances - click one of the buttons social networks at the bottom of the page or at the top, because among the heaps of unnecessary garbage on the Internet it is quite difficult to find truly interesting materials.
Knights are one of the main characters of various tales, ballads, and legends. These are brave characters who always actively fight in the fight against evil, overcome various trials and difficulties, and are very affectionate towards their ladies - lovers. Often knights sorted things out not only on the battlefield, but also at knightly tournaments. They went through several tests, at the end of which the winner was determined and he was awarded a cup. Knights usually dressed in iron armor, which covered them from head to toe and protected them from enemy attacks. The knights' true friends were their war horses. In this lesson you will learn how to correctly draw a knight in armor with a pencil step by step for your drawing.
Stage 1. First we draw the auxiliary lines of the knight’s figure. A small oval of the head, a rectangular body extends from it, the lines of the arms are crossed in front, the circle is the closed future palms. The lines of the legs extend from the body.
 |
Stage 2. Draw a head wearing a helmet. We outline the contours of the helmet, highlighting its side parts, the cutout for the eyes, the strip to protect the nose, and the frontal part. At the top of the helmet we draw ornate feathers that decorate the knight’s head.

Stage 3. We clarify the shape of the left hand, bent and dressed in armor. We draw the lines of the armor, the bend in the elbow part. The armor plates seem to overlap each other.

Stage 4. Now we show the shoulder and elbow parts of the armor on the knight’s arm. These are massive lines, indicating to us the thickness and weight of this armor.


Stage 6. Now let's draw the gloves on the knight's hands. We draw the lines of the fingers, slightly bent and superimposed on each other.

Stage 7. The turn has come to depict the sword in the hands of our hero. It is drawn in a straight line from the junction of the arms down to the very feet. Let's show the sword's hilt and crossbar.

Stage 8. Note that the knight's waist is tied with a wide belt with a large buckle. We draw the features of the fabric folded at the waist and pulled through the buckle.

Stage 10. Draw the knight’s wide pants, smooth lines which connect to the lines of the top of his shoes.

Stage 11. Now all that remains is to draw his boots from the clothes. These are big Wellingtons, covered protective layer leather or thin iron, which also protect the knight’s legs from being hit by enemy weapons during battle.

Stage 12. Let's apply shading to various parts of our drawing.
Stage 13. Let's paint our knight in dark colors. It's black, gray, brown colors with small splashes of red (belt, feathers). This is the kind of gloomy knight we have. All clad in iron and ready for battle!
Similar drawing tutorials:
Hi all! My name is Yuichi Shimazaki, I am a digital artist from Japan. First of all, I want to say that it is a great honor for me to present this knight drawing lesson for your viewing. Thanks to CGArena.com!! I have been drawing since 2008 Adobe Photoshop, and I really like this program. In my work I use Photoshop CS3 and a Wacom Intuos4 tablet, and I also learn from my experiments and mistakes. My goal is to become an active 2D artist and conceptual artist, famous not only in Japan, but throughout the world.
BRUSH TOOL
I always use different brushes. This time I decided to work mainly with special brushes (1, 2, 3) and an Airbrush.
CONCEPT
I was inspired to create this drawing fantastic works J.R.R. Tolkien. When I create my illustrations, I use books, films and comics as sources of ideas. Here I wanted to depict a scene where knights are riding horses across the battlefield.
SKETCH
Now I start working on a rough sketch based on the concept in Photoshop using the custom brush 1. I'm not working with color yet.
COLOR SCHEME
Before I start coloring, I always think everything through carefully. Here I'm using reddish brown as the base color for the background, and some red and dark brown for the characters.
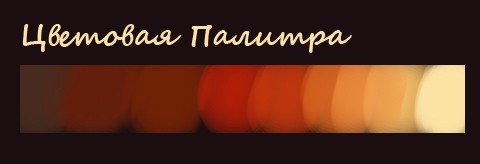
Warm colors can create different moods: battlefield, danger, passion, rage, etc. I wanted to display all these moods at the same time.
LIGHT AND SHADOW
Light is one of the most important tools in creating a dramatic scene. Therefore, here I applied a light spot on the helmet of the main character, which is the focal point of the whole picture. I also added natural light bouncing off the ground to add a little more contrast. Then, to make the main character stand out a bit, I decided to add a shadow between him and his horse.
COLORING
I use two coloring methods:
Method 1: Create a monochrome sketch and then colorize it using different layer blending modes, such as Soft Light and Multiply.
Method 2: Creating a monochrome sketch and then using it to refine the drawing.

Click on the picture to view the image in full size and 100% quality.
STEP 1: BACKGROUND
The background should convey the mood of a burning battlefield. Next, using a large speckled Airbrush and a special brush 3, I paint flames, smoke and ash.
STEP 2: ARMOR
To add rough texture to the knight's armor (like rust, dust, etc.), I used special brushes 2 and 3.

Click on the picture to view the image in full size and 100% quality.
Next, I wanted to add a chainmail texture to the main character's armor, so I used a custom brush I created. This is the most important and difficult detail! This brush helps me paint chain mail!

In the end, I wanted to use a symbol that could tell the audience about the main character's knighthood. So I decorated his helmet.

STEP 3: HORSES
I wanted to depict the muscles of the horses using simple brush strokes. So I used a special 2 brush that will leave a nice texture on the surface of their skin. The horses in the background were painted with a low saturation brush.

STEP 4: DUST
At this stage we will add the atmospheric effect of Dust.
Dust is a very useful effect that gives the painting momentum and dynamics! So, I added some dust using a special brush 3 and an Airbrush.

Here you need to be very careful, add dust either in the foreground or in the background. I add this effect in the foreground of the main character using a layer in Linear Dodge mode and a special brush 3. In the background I use a normal layer mode and a low saturation level.
STEP 5: FINAL TOUCHES
First of all, add highlights; For this I used a layer in Linear Dodge mode and Airbrush.
The next step is to use Adjustment Layers, with which I adjust the Light, Shadows, Hue, Saturation, Brightness and Contrast of the image. So, for greater effect, I also use Curves and a Layer Mask.