Drawing a person's face. Proportions of the human head for artists Graphic drawing of the human head
Study drawing of a plaster head of Gattamelata
Let's look at the stages of drawing a plaster head.
As a natural model, let’s take a plaster cast of the head of the monument to Erasmo de Narni, nicknamed Gattamelata.
This head is extremely useful for educational drawing, thanks to the pronounced architectonics of the form. Speaking more in simple language, the plans (planes) on this head are clearly expressed and detailed.
IN in a certain sense, the opposite of this head can be considered antique female heads, where all plans are smoothed out and studied with difficulty.
Nowadays the situation is aggravated by the fact that plaster heads sold in popular stores look as if they were sanded, not to mention distorted castings. For example, the head of Gattamelata, which can be found in showrooms, no longer resembles the prototype.
We are in in this case We take a casting from Soviet times.
We place the light from above so that the volume works, but so that the shadows from the brow ridges and nose are not too large, if possible.
We begin to draw with light lines, without pressing on the pencil. It should be borne in mind that the drawings presented here, especially the first stages, in reality are much lighter in tone.
First, we mark the composition on the sheet. The composition must immediately be in proportions and in character, otherwise in the process of changes and clarifications of proportions, tilt, etc. it can change a lot...
In any case, if you immediately determine what is important for you in the composition of the sheet, where the “center” is, then even with small changes it will never lose.

The composition of such educational drawings is usually extremely simple, the question arises, why bother bothering yourself with this at all?
And then, that all the principles we are considering work in drawing and creativity in general, and not just in this particular case. Developing the right attitudes and habits is beneficial for the future. It’s unlikely that you are preparing yourself to be a plaster head painter...
We start with light lines, do not put pressure on the pencil for two reasons: 1) a drawing that is light in tone is easily erased i.e. it is easy to edit 2) when pressing on the pencil, the hand tenses and the consciousness micro-strains, goes into the hand, which means at this very second it does not observe nature.
We place the main details and fractures of the shape, but do not forget that now we are NOT DRAWING DETAILS, but DRAWING THE WHOLE WITH DETAILS.
In practice, this means that we constantly look at the whole nature and the drawing as a whole, trying to take a more accurate picture. general proportions the head in general, the rotation, tilt and nature of the shape.

But we cannot take all these basic things abstractly, therefore, we immediately grasp all the most characteristic moments, but without hanging on them, but as if rushing past.
It is better to immediately outline elements that are closer to us with a little more contrast than parts that are further away. Due to this, volume and space begin to appear at the beginning of the drawing.
At the same time, until you find out that all the details and dimensions are taken correctly, the overall tonality of the drawing should remain light so that it is easy for you to edit.
After you have outlined the main characteristic relationships by eye, it will not be superfluous to try on, starting with the largest sizes.
Also, pointing the pencil vertically and horizontally at the nature and drawing, check whether the slope is correct.
Why is it better to first outline everything by eye and only then start measuring? Because each time you give your eye a little chance, you feed it, as it were. Gradually he begins to justify your trust.
Gradually you should understand the architectonics of the head shape. You can add light shadow to immediately create volume.

This should be done in accordance with the plans (planes) and fractures (rotations) of the head shape that you see. To do this, it is useful to come closer and look carefully from different angles.

In order to have a good understanding of the location of plans and shape fractures, you need to be very interested in this issue and notice them on all the plaster and living heads that you see in front of you.
Training “cutting” heads should be drawn many times in different turns and angles. At the same time, many long-term sketches of 20-30 minutes of small size (8-12 cm) from different points provide much more benefits than just two full-size three-quarter drawings on the left and right, as is the case in some educational institutions.
In addition, from the point from which you draw, not the entire shape of the head can be perceived adequately.
Therefore, you should not be shy to approach and inspect (sometimes feel) the form from all sides.

As you manage to correctly find both the general proportions of the head and its details, you can slowly add more tonality - we make more active what is closer. Due to this, volume and space appear. By space we mean that the more active (done in the picture with more contrast) parts appear to be located closer than the parts decided more softly. Accordingly, it is worth making more contrasting those parts that are actually closer to us, in this case, this is the nose, the near cheekbone, the brow ridge, the near edge of the mouth, etc.
This whole transfer of space as a whole gives a feeling of overall volume, general form head - more or less reminiscent of an egg.

At the same time, we use the transition of the drawing from linear to tonal in order to compare everything even more accurately.
The more realistic the tonality is, the easier it will be to compare, because in life we see everything in spots, not in pencil lines.
Therefore, you need to continue comparing until the end of the drawing.
As you can see, details are added gradually.
At the same time, the more confident we are that the main thing is taken correctly, the more confidently we arrange the details. The more specific each place becomes, the easier it is for us to compare the whole again. The easier it is for us to compare the whole, the easier it is for us to adjust the arrangement small parts. The more specifically we worked on the details in the foreground, the more volume and greater relationships are felt, and so on ad infinitum.

Thus, our consciousness constantly looks at the overall impression of the head as a whole.
At the same time, the more tonal the drawing becomes (the more we gain the real tonality of dark and light places),

it is all the more important for us to remember to often look with an unfocused gaze. What is it about?
IN ordinary life, if we look at an object, we see it clearly, specifically, all the details in turn.

For this reason, our gaze often rushes from detail to detail, examines them, but at this very time does not see the whole - it is impossible to see absolutely clearly many places at once. But this is not particularly necessary. But to see as a whole (in a literal, not figurative sense) is necessary.
If you just look at the entire object you are drawing at the same time, it will be a little unclear. This is the look we need - the one that needs to be added in addition to the usual “jumping” look. You can also glance around without focusing - all this usually happens when a person is thinking, “looking absent-mindedly.”
Eat famous saying Chistyakova: “When you draw an ear, look at the heel!” You can interpret it in different ways, but the fact is that the details are better placed in their places when you look at the entire object with a slightly defocused look.
When working in tone, we need to see the overall tonal picture and clearly visible details usually greatly interfere with this.


Moreover, the more unfocused we look, the more details disappear, the better we see the overall picture, the basic relationships.


This vision of the basic tonal relationships allows us to correctly set the tone of the drawing.

It is important not to forget to constantly compare linear relationships - the proportions of the head as a whole, the location of small and large parts, etc.
The ability to look out of focus does not mean that you do not need to move away from the drawing and compare from a distance. On the contrary, doing this from a distance is even more convenient and efficient.

Hello, dear friends!
Today we will draw a person's face. Many people mistakenly believe that only select talents can draw. This is not true: anyone who has the desire and patience can learn to draw correctly. Knowing the basic proportions and rules of construction will help you correctly depict a person’s face. Read the following material and try to draw a face step by step.
Axes and proportions
When drawing a person's face, it is imperative to study and constantly draw centerlines easily.
With experience, you can get by with one or two guides, or without them at all. You don’t need to think that axes are boring and uninteresting, they will help you quickly and correctly build a face with the correct proportions, with the same eyes, symmetrical parts.
In the future, visually imagining these axes, you will be able to work with human facial expressions and emotions. After all, to show sadness, you need to lower your eyebrows and corners of your mouth, close your eyes, and for this you need to imagine at what level all these parts of the face are in a state of calm.
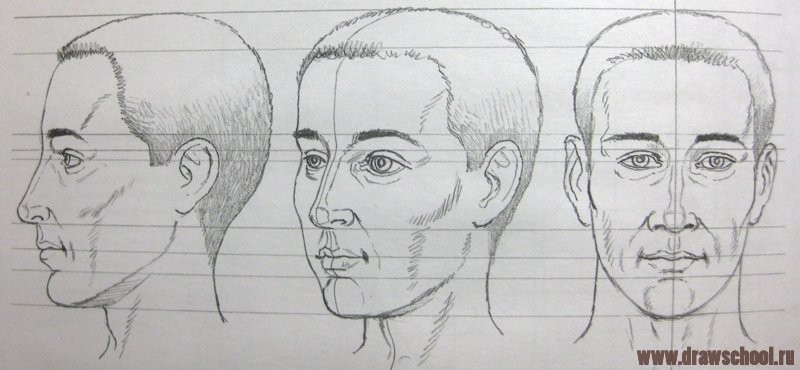
Eye line
The first and main axes that you definitely need to remember are:
The eye line of all adults is in the middle of the head.
Axis of symmetry and eyes
Divide the oval of the head into two equal parts horizontally - this is where the eyes will be located. We also outline a vertical line of symmetry.
Human balance in motion
At first it’s difficult to do this by eye, so check yourself by measuring identical lengths with a pencil or ruler.
Eyebrow line nose hair
Next you need divide the oval of the head with horizontal lines into three and a half parts. The upper axis is hair growth, in the middle is the level of the eyebrows, below is the axis of the base of the nose. The distance from the hair to the eyebrows is equal to the height of the forehead. Essentially, the face (if you don't take into account the hair) consists of three equal parts that are equal to the height of the forehead.

Line of mouth and lips
Next we will designate the lips. To do this, the lower part of the face (from the nose to the tip of the chin) needs to be divided in half - this way we will find the line of the edge of the lower lip. To determine the level of the mouth cut, you will have to divide the segment from the lower lip to the nose into four more equal parts. The first quarter will be the line of the mouth.

Mouth and lips
The mouth section of most people is at the same level, but the sizes of the upper and lower lips are completely different.
How to draw beautiful eyes
Where to place the ears
No matter how strange it may be, very often, with a more or less successful face structure, the ears are not attached at all in the place where they should be located. Therefore, we will pay special attention to the ears.

Placing the ears correctly
At the top, the ears are attached to the axis of the eyes, and at the bottom at the level of the base of the nose. They can be large or small, stand out strongly or lie close to the head, but for all people they are attached to the line of the nose and eyes.
How to place your eyes correctly
How to find out the width of the eyes and the distance between them? To do this, the eye line needs to be divided into 8 equal parts.

Outlining the eyes
- Another eye (2/8) should be placed between the eyes.
- Each eye is 2/8 wide.
- From the outer corners of the eyes to the contour of the head, leave 1/8 (the width of half the eye).
These are rough guidelines. U different people These proportions are slightly different. It is not necessary to divide the axis into 8 parts every time, just check yourself.
Drawing a person's nose
Also read the article on how to draw eyes realistically and correctly.
Make sure that your eyes are not too close to each other, or, conversely, too far away. These settings will help control the size of the eyes so that they are not excessively large or small. The inner corners of the eyes should always be in line with the eyes.
At first glance, all these lines are cumbersome and difficult, but first you can practice drawing a face, taking into account only the horizontal axes. As you work, you will have questions and you yourself will come to the conclusion that you also need vertical guides. With the acquisition of a little experience and skill, you can easily draw faces without preliminary markings and axes.
Eyes, nose wings, mouth
The inner corners of the eyes are at the level of the wings of the nose. The corners of the mouth are level with the center of the eye, or the pupil if the person is looking straight. 
On this photo of lungs lines and shows that:
- the corners of the eyes are level with the wings of the nose
- and the center of the eyes lies in line with the corners of the mouth
Learning to draw a human hand
Face drawing scheme
Actually, if you outline all the guides, then you should end up with a diagram like this. You can print it out as a sample, since it is difficult to remember everything at once and practice drawing a person’s face with the correct proportions.

Schematic representation of a person's face
Later, you will be able to give faces features of specific people and draw portraits of everyone you are interested in.
With this we will finish with axes, proportions and guides and start drawing.
Drawing step by step
Today we will not paint a portrait of someone specific person, and we will learn to create quick sketches with the correct proportions and placement of all the main parts.
Drawing a face is a skill that improves with experience. If you have never drawn portraits of people, it is important to first simply learn at the level of mechanics and repetition how and at what level to place the eyes, nose, mouth, eyebrows, ears, and the relationship between them. To do this, look at the diagram in the previous section and easily apply the guides.
How to draw a hare
Repetition is the mother of learning :)
We designate the form
The first stage is the simplest, we need to designate the shape of the face; it is easiest to fit it into an oval, ovoid or other round shape. The vertical axis will help create a symmetrical pattern, the horizontal axis will help show the eyes correctly.

Outlining the main elements of the face
All previously outlined lines will help us build our face. These axes need to be applied very lightly, barely noticeable, so that later you can easily and unnoticeably erase them. 
It doesn’t really matter where exactly you start drawing facial features, the main thing is that you don’t get stuck and concentrate on one thing: nose, eyes, lips, eyebrows.
At first quickly and easily define all parts of the face without going into detail without trying to be too precise. We apply all the lines very lightly, so that it is easy to correct.
If something turns out crooked or inaccurate, you can fix it at the next stage.
We specify the shapes and sizes
At this stage, we adjust the size and shape of the eyes, ears, eyebrows, nose, lips, and clarify the shape of the face. We correct everything that went wrong at the previous stage. 
This is quite a difficult lesson, so it may take you quite a lot of effort to repeat it. If you didn’t succeed in drawing the head the first time, don’t despair and try again. Try your best to complete this lesson. If it still doesn’t work out, you can try to complete the lesson “”. But I believe that you will succeed.
What you will need
In order to draw the head we may need:
- Paper. It's better to take medium grain special paper: It will be much more pleasant for novice artists to draw on this one.
- Sharpened pencils. I advise you to take several degrees of hardness, each should be used for different purposes.
- Eraser.
- Stick for rubbing hatching. You can use plain paper rolled into a cone. It will be easy for her to rub the shading, turning it into a monotonous color.
- A little patience.
- Good mood.
Step by step lesson
Different parts of the human body and organs should be drawn with a certain degree of realism. This is required academic drawing. Also, he strongly recommends drawing the head from life or, in extreme cases, from a photograph. This is the only way to achieve high realism and elaboration.
By the way, in addition to this lesson, I advise you to pay attention to the lesson “”. It will help improve your skill or just give you a little fun.
All complex drawings must be created through forward thinking and vision. The subject must be more than just a form on a sheet of paper. You must draw it three-dimensionally, that is, creating it from simple geometric bodies as if they were on top of each other: here is a ball on a cube, and here are two balls next to each other. All living and non-living things on earth consist of these primitive forms.
Tip: create a sketch with as thin strokes as possible. The thicker the sketch strokes are, the more difficult it will be to erase them later.
The first step, or rather the zero step, is always to mark a sheet of paper. This will let you know where exactly the drawing will be located. If you place the drawing on half of the sheet, you can use the other half for another drawing. Here is an example of marking a sheet in the center:
In various specialized institutions ( art schools, for example) it is recommended to study complete structure the head - from the muscles to the hair - so that you can draw it correctly. But there is one little secret here: even if by some miracle you manage to learn on your own absolutely all the terms even indirectly related to the structure of the head, you still will not be able to draw the head as it should be. And all because such establishments have at their disposal a large number of supervisors (teachers, in the sense) who correct and guide students during work.
Our task (before learning to draw portraits) is to independently (without teachers at hand) learn to coordinate our actions, understand the very essence of the drawing process, be able to see our mistakes and correct them correctly. That is why we will go a little beyond the standard familiar system and begin to formulate points of a kind of instruction that will help us solve our problem:
First, we need to understand the process of creating a head on paper
And finally, learn how to draw a head correctly without unnecessary stress, understand the essence of this process and be able to eliminate your mistakes
Well, dear amateur draftsmen, are you ready? Are you ready for work? Then go ahead and sing (it’s advisable to hum it mentally, there’s no point in alarming the neighbors!)
To get started, we, as always, need to find everything we might need. In this case, it is an easel, charcoal, A2 paper, nature, a chair (or a paper clip - it depends on your nature of envy...). For real, we catch a restless and trusted friend, or we convince the grandmother with her knitting to move to your stool, or we ask the grandfather to tell us about something interesting (we work hard in the process, of course). If you have diligent brothers and sisters, you can find them too. But, you shouldn’t start drawing a head by drawing the head of your favorite parrot... In extreme cases (well, very extreme - if there is absolutely no way out and there is not a single living soul nearby), you can use a ready-made reproduction or a photo (which we mount on the easel in the upper left corner). Everything is? Is there any nature? Let's continue, or rather, start drawing.
Drawing a head with a pencil
First of all, we make constructive sketches with charcoal - and even if it doesn’t turn out very neatly, don’t worry, these are just sketches:
We are looking for the basic ratios of the proportions of height and width - for this we compose the shoulders, neck and head on paper. Here we have our eye working hard.
Now we need to find the volumes of what we have assembled separately (head, neck, shoulder girdle)
Remember how at the very beginning, when you were still a novice draftsman, you worked in sweat to draw three-dimensional cubes, cylinders, etc. ? So, look at your nature and understand that this is not a head, but just one of the varieties of form. Right now we must realize and perceive that the head is an inanimate object, then it will be easier to draw.
The next step will be to observe your nature and sketch this very volume of the head. You shouldn’t immediately draw tiny wrinkles, bristles and eyelashes - it’s better to pay attention to the fact that we are drawing a three-dimensional image, not a flat one. And from this it follows that we need to feel the volume of the head, feel all the protruding parts of the face and head in general.

Draw, stop wasting time reading my scribbles - pencils in your teeth and go ahead, you must understand the very essence of the process. And as you understand, I will still be here.

In order to draw a head with a pencil, we need to hold on to something. These can be points that, if you look, are immediately visible - they mean the most protruding places in the head area. Next, you need to select the main planes - they are formed using various kinks in the shape.
The most prominent points and, accordingly, planes make up the structure of the volume of the head - these are design points. What stands out most clearly to our gaze are the cheekbones, the nose (or the nasal prism - after all, the nose is shaped like a prism), the forehead, the chin, and the balls in the eye sockets. To find the height of the head, we simply need to find the highest point on the skull and the lowest, most protruding point on the chin.
Now it is important to distribute the main light and shade. To do this, you need to squint your eyes and look at the nature, then you will be able to distribute the basic light and shade along the planes of the head. By the way, if you are good at distributing shadows along the edges of the simplest geometric shapes, then I’ll tell you a secret that it’s quite possible to fit the head into a cube, so... And act according to the same system of distribution of light and shadow.
The main thing you need to understand at this stage of work is that the head is the same shape, in which there are such characteristics as depth and width plus planes and edges (like a cube). That is, all the same patterns apply to it as before (I hope you remember, there was talk about active and inactive, distant and close).
Head shape
Let's move on to the next point. One of the previous paragraphs talked about the mysterious design points that determine the shape of the head. It is these points that give us the proportional relationships of the planes on the volume of the head. If you have realized the importance of these points, then with due reverence and trepidation we begin to examine, analyze and distribute them.

- The first thing that immediately strikes us is, of course, the orbital sockets and eye sockets.
- The second thing we immediately pay attention to is the zygomatic point on the left and right.
- Now it’s the turn of the frontal tubercles.
- Chin (or rather, the point of the chin)
- Mandibular angle
- Now one of the most important is the highest point on the skull of our nature.
- Finally, the temporal points
The parietal tubercles are the most convex, according to textbooks, along the width of the bone, which are located on the back of the head.
Well, that's all for starters with the dots - you need to draw them and remember them well, otherwise you will have to repeat this material again. Now look again at the picture above, see? In addition to dots, there are also colored lines. Are you wondering what they mean and what to call them? Patience, my dears, now we will analyze them too.
These lines are called axes, which, quite logically, schematically divide the human head into different specific areas. In the next picture, which is more “humanized” and not skeletal, we can consider both our points and axes.

The first line is red - it divides the head into two equal halves, in other words, this is the axis of symmetry.
The line of the superciliary arches, which divides the head into the upper cranial and lower facial regions, is highlighted in blue.
The green line is the one that divides the head into the facial and occipital areas and it passes exactly through the highest point of the skull and through the ears
The yellow line is usually used to determine the rotation of the head (you understand, this is very important for the drawing), that is, this is the axis of three-quarter rotation.
Neck cylinder on which the head is mounted
And one more axis, she turquoise color, which passes through the lower points of the ears and the lower line of the nose. It shows the lower part of the nasal prism.
BUT! All this is given to you, beginning draftsmen, solely for information purposes and so that you better understand the structure of the head. And we will learn to draw using an easier version of what was described above - these are blanks. So, let’s draw rectangular blanks in three positions at once: front view, side view and three-quarter rotation.

These rectangular blanks have everything we need: axes, points, proportional relationships different areas heads and, in fact, the most important thing - structure. That is, as an example of proportional relationships, the height from the level of the eyebrows to the level of the lower line of the nose is equal to the height of the ear, or the mouth and the lower corner of the jaw are located on the same line. But here, too, the laws of perspective can be applied: that part of the face that is closer to us retains its original size and shape, and that part that is further away (in a turn, for example) will be slightly (slightly dear artists, a little, and not as always...) distort in size, become smaller.
Consolidating the result of drawing the head
Now the finale: we consolidate what we just read. To do this, we will need to work together with the blank. Now our main assistant in drawing is a blank, it’s like a template, a kind of prototype of a real head. It's much easier to learn.
You are already drawing a person’s head, that is, the composition has been outlined, the place for the head, and the main volumes too.
The second step will be to find the proportional relationships of the head, its shape and character. This will be the sketch of the base of the head, our simple blank.

Now the vertical axis - they are really itching to divide the head into equal areas (well, not necessarily equal - it depends on all sorts of turns and angles). This axis is determined by the location of the nose and gives us two important points: the highest and the lowest.
Since we are also determining the rotation of the head, we need to find the line of three-quarter rotation - it would be very useful for us. To do this, visually find the location of the zygomatic bone and draw a line through the zygomatic point. We'll deal with it later, so for now it's enough to just outline it lightly.
Now it’s time for the brow line. Here we just need to use our eye and determine how much space is occupied by the forehead and, and how much is the face up to the chin. Woo-a-la! Ready.
Now you need to select the line of the lower pyramid of the nose. To do this, it is better to use this pattern: the line of the brow ridges and the line of the lower prism of the nose divide the head into equal parts. But at the same time, you also need to take into account the features of the head being drawn.
The next stage is to find the line dividing the head into the occipital and front parts. We already remember that it passes through the ear opening and the highest point. Now take a closer look: at the intersection of the three-quarter turn line and the previous line there is the temporal point that we outlined earlier. If you can’t yet see the shape of your head, then correct all the lines using your eye.
Well, we already have enough points and lines to start marking the nose, the place for which has already been cleared and found.

The same thing is with the ear - and there is a place for it (it would be strange if this place did not exist, you will agree). Its height is equal to the distance between the line of the superciliary arches and the line of the lower prism of the nose, and it itself passes through the line dividing the head into the facial and occipital part. Better look at the drawing, I think it’s clearer than all these twisted phrases.
There is very little left...
The next stage is the search for the cheekbones, but since they are sandwiched, one might say, in the lines, it will not be difficult to find them. And the corner of the lower jaw - it is located at the intersection (again at the intersection) of the line of the mouth and the line dividing the head into the back and front (you understand what I mean). Well, now even he can find his mouth
It remains to find a little, and among this “little” there is a place for the eyes, the superciliary tubercles (well, the places that especially protrude on the eyebrows - I’ll decipher). And now it’s time to look for frontal bumps (that is, protruding points on the forehead). Finding them is no less simple; you just need to draw lines from the brow ridge to the most convex points of the forehead. TA-dah! You already have frontal bumps. But in order to understand them better, you need to tie these points to highest point and to the temporal ones.
And finally, if the angle allows us to see the parietal tubercle - the most convex part on the back of the head.
Now spin the blanks, use the lines and points that you remember. For example, something like this:

Review that again. what we have already gone through here, and rotate the blanks taking into account all the design details. To begin with, it would be good if you get blanks in three familiar positions: profile, front, and three-quarter.

Have you played enough? Are you ready for some scary serious work? Catch your nature and return it to its place. Now we will gradually transfer what we learned on blanks to our long-suffering nature. Look at it with new eyes. Examine the head from all angles and try to evaluate it as an inanimate object, to understand its “structure”... Abstract from the person of the head’s bearer.
The next task is to simply transfer all the previously studied constructive axes and points to an already living, quite curious one, asking questions like “And how? Looks like it worked out?" Of course, not literally - visually (I'm afraid your nature will not be funny at all if you draw on her head and face with multi-colored pencils).


Now that you're on a diligent search, I'll tell you something about proportions. The ideal proportions are considered to be the so-called “Greek” proportions, because it is the inhabitants Ancient Greece allocated perfect proportions bodies. But the ideal proportions are somewhat different from those that each person has - it is these discrepancies that allow people to maintain their individuality. But you can check the correctness of the proportions by connecting all the most important parts of the face or constructive points located one opposite the other - their connection will pass through the ear hole.
Practice
Now the practical part - we transfer our knowledge to life drawing:

So, we are working on the composition, finding a place for the head, neck, and shoulders. We work according to the principle: the indent from the edge of the paper (tablet) in front of the front part (front!) is greater than above the back of the head, and at the top the indent is less than at the bottom.
Now we find a place separately for each subject of the composition: neck, shoulder girdle and, accordingly, the head.
Remember our blank? Now we draw a blank, but taking into account all the proportional features of our nature. Do not forget that our neck is not just a strange rectangle, it is a cylinder - that is, it is voluminous, as are the shoulders.
The blank is already in place, now we work with it using the following sub-points:
- a) Find the lowest and highest points using the axis dividing the head into two equal parts.
- b) Three-quarter turn line - remember this one? Since it passes through the zygomatic point (of course, you haven’t forgotten this yet!), We will first have to find this very point and outline it.
- c) Further along the plan is the line of the brow arches. It can be drawn along the level of the eyebrows (a little further) and plus one more detail, which we will arbitrarily call the break point of the brow ridges. This point is located exactly where the eyebrows change their direction.
- d) Now it’s time for the bottom line of the nose prism. We carry it out as in the case of the brow ridges, at the level of the nose, only further. Unfocus your gaze on your nature, do not look specifically at it. And try not to change the angle of your observation.
- e) The temporal point, which is quite clearly visible in our nature. There are as many as three points located on the same line (temporal, high and ear opening) and it fits the shape of the head
- f) Ears and nose. The height of the ear has already been found using lines, but we take the shape from our nature. The nose is a little more difficult. You need to outline the total volume of the nose schematically with a pyramid and then deal with the features there. But! Not a single form in our nature lives on its own; it passes, crawls and flows into something else. Smoothness, comrades, and plasticity, remember this - the nose, for example, connects to the brow ridges.
- g) We complete the search for the zygomatic points (yes, it lasted all this time!).
- h) Determine the place for the mouth and find the angle of the lower jaw based on the shape
- i) Finally, we find a line for the eyes, which goes somewhere along the corners of the eyes. In order for them to be drawn correctly, there must be enough space between the eyes for one more (it is not necessary to draw a third eye, but it is better not to draw it at all)
- j) And now we come to the frontal tubercles. They are found using lines that you draw from the brow ridges to the most convex areas of a person's forehead - these lines are located symmetrically to the central axis. And from them we draw lines to the temple points and to the highest point. Hurray for us!
I think the question: “How to draw a head” was at least a little cleared up for you, thank you for being with us!
The composition of the sheet space has been resolved. Proportional relationships between the height and width of the selected mass of the human head were found.
Draw the midline of the person's head according to the position of nature you have chosen. This line will be vertical or almost vertical, depending on the tilt of the head. It must be carried out while it is filled, feeling the surface of the ellipse underneath it. The midline passes through the bridge of the nose, the base of the nose, the middle of the mouth and the chin. It is crossed at right angles by other auxiliary lines that pass through the orbital sockets, forming the axial eye, through the cheekbones, frontal bone, and chin.
The axial eye divides the height of the head into almost equal parts (facial part and cranium). The center line of the cheekbones divides the height from the chin to the upper center line of the forehead into equal parts. It is necessary to mark auxiliary lines taking into account the proportional relationship of the parts of the face to the whole, as well as the nature of the person.
All horizontal auxiliary lines must be drawn taking into account the chosen position and perspective. If the horizontal auxiliary lines are continued, they will converge at one point on the horizon line. It is at the level of your eyes, and the position of the nature in relation to you has been chosen. Now determine the position of the nature relative to the horizon line: above the line, at the level of the line, below the line.
Draw auxiliary center lines: the head is straight, without tilting. But even if the head of the model being drawn is tilted forward or backward, the horizontal center lines will still be parallel and converge to a point on the horizon line. With the exception of a model with a head tilt to the right or left: for it, the vanishing point of the horizontal center lines must be selected.
The drawing begins with the constructive construction of the frontal surfaces of the head. They correspond to the frontal surface of the cube (if the human head model is abstracted to a cube model) and the rectangular frontal surface of the podium on which the plaster model of the human head is usually located.
Draw the front surface of the frontal bone of the human head (as you did for the skull) along the center line. The width of the forehead surface is approximately equal to the distance between the centers of the eye sockets.
Next, determine the depth of the axial line of the eyes by examining the head in profile and understanding how much the surface of the forehead is moved forward in relation to this axial line. On this line, find the midline point; connect to the midline passing through the surface of the forehead. Then find the extreme points of the eye sockets on the center line of the eyes and connect them to the surface of the forehead. Thus, we got a “visor” that will hang over the front surface of the front part of the head.
Determine the depth of the center line of the cheekbones relative to the front surface of the forehead. Find reference points on the center line of the cheekbones. The zygomatic line corresponds to the widest point of the facial part of the human head. If you draw a head in three-quarter view, then one point will coincide with the contour line at its most protruding place. Another point will be located on the border of rotation of the front part in space, between the frontal and lateral positions of the sides.
It’s good if at this time you can imagine the design of the skull. Connect the reference points of the cheekbones with the outer points of the eye sockets on the center line of the eyes - get a platform that moves forward. Continue the midline until it intersects the zygomatic line, and then draw it vertically down. Look again at the contour line of the front part: it goes down, with an inclination towards the axial one. Draw two lines from the supporting cheekbone points downwards, at the narrowing, until they intersect with bottom jaws. This will help us build the front vertical surface of the front of the head.
Place the front of the chin on the midline. The chin area will be “pushed” forward from the front surface of the front of the head.
Proceed to the constructive construction of the side part of the face mask. Imagine the side surface of a cube and the skull of a human head. Find the size of the zygomatic arch from the reference point to the ear. Draw a center line into the depth of the sheet, taking into account perspective. From the top of the forehead to the intersection with the axis of the cheekbone, draw a line to the ear, then down to construct the distal, inferior, and anterior portions of the mandibular bone. This way you will build the structural basis of a human head mask.
From the front surface of the frontal bone, we will continue the constructive construction of the cranium according to the idea. This is where your simple understanding of the shape of the skull, which you learned in the previous task, will be especially needed.
Pay attention to the shape of the head hairstyle. It repeats the shape of the skull, all its platforms; you just need to add thickness to the hairstyle. No matter how wavy the hair is, no matter how large the curls, they (in a generalized form) represent the shape of the skull.
The neck is shaped like a cylinder, sloping forward. This depends on the position of the cervical spine, which connects to the base of the skull. The neck ends in a sort of oblique section (with an axial line from the jugular fossa to the seventh cervical vertebra), which is located on the diamond-shaped section of the shoulder girdle. Do not get carried away in the future by identifying the sternocleidomastoid muscles in the neck - this will lead to destruction of the integrity of the form.
So, we have completed work on the structural basis of the entire human head. In other words, a foundation has been built under the future drawing, and the stronger it is, the more successful the subsequent work will be (ill. 72,73).
From the midline of the anterior surface of the frontal bone, draw the midline of the nose. Find the length of the nose, construct its front platform corresponding to the position in space of the front surfaces of the front part. Determine the depth of the nose, the base of which will be the front of the head. This is how the nose block turned out.
Don't try to detail the nose at this stage of the drawing. This can be done later, making sure that the nose block is perpendicular to the facial surface, corresponds to the midline of the person’s head, and has the correct slope of the facial platform. Otherwise, without making sure of this and losing a complete vision of the nose block, you will make your detailed work in vain. After all, it is easier to correct an error in the drawing of one generalized block of the nose than in the drawing of a nose consisting of many articulated characteristic volumes (Fig. 79,80).
This applies to the drawing of all parts of the human head. If you discover an error in a drawing too late, you still need to correct it. You cannot compromise with yourself, because this mistake will be repeated in the next drawing.
Next, start drawing the eyes. The eye is a ball inserted into the eye socket of the skull. Look at the picture: how is the place for the eye plastically organized by three surfaces (the side surface of the nose, the visor of the overhanging forehead and the inclined platform of the front part of the head)? Find the location and width of the eye on the secondary centerline. Draw part of the ball protruding from the eye socket, paying attention to the arcuate lines formed from the intersection of the ball with the hinged surface of the forehead and the front part. The ball separated the upper and lower eyelids from these surfaces.
Here I would like to draw your attention to the fact that a person’s head, like his entire figure, is symmetrical when viewed from the front. And we will mention the median center line more than once.
Draw in pairs, counting one or two. Don't draw one eye, but draw both at once; mark a reference point on the cheekbone - mark the steam room. They will be connected by a transverse axial line running parallel to the front surfaces of the head to a point on the horizon line, and there may be plenty of such lines in the drawing of the front part of the head.
Construct a block of shape that includes the nasolabial part, upper and lower lip, and chin. The median center line runs along the anterior platform of this block, from the nose to the bottom of the chin. The width of the platform increases towards the chin and corresponds to the width of the front platforms of the form parts. The block is adjacent to the front of the head, and the nose rests on it.
After constructive detailing, bring order to the linear drawing. As in the human head skull drawing, remove unnecessary lines, leaving only the lines associated with the design of the shape. Prepare the lines for aesthetic perception. Apply the laws to the head drawing aerial perspective. The darkest line is the one closest to you. Consider the character contour lines and lines of surface boundaries.
We remind you that the borders of the sides of the head shape have a soft transition and different radii. The larger the radius, the less pronounced the boundary and the more difficult it is to determine. The lighting source, chiaroscuro helps. Change the lines of the shape's edges to a soft, blurry state. To do this, you will take only chiaroscuro from light and shadow; Be sure to use aerial perspective!
Confirm the above again at simple examples, because all this is very important, and without understanding it, you simply will not be able to competently continue the drawing.
Look at the hexagonal shape. No one will be able to see it as a drawn cube because it is not three-dimensional. It lacks the concept of volume, unlike the following geometric shape. There is exactly the same difference between the drawings of students who blindly copy the model and the drawings of students who have three-dimensional thinking.
In the next row we rounded the edge of the cube. The question about the presence of a vertical line instead of a missing edge has a negative answer, because the cube does not have an edge. There is no rib, but the sides remain in place. There must be some kind of boundary here, especially since there is a difference of 90 degrees between the surfaces of the cube! Even if this boundary is not visually visible, you must set it, otherwise at the stage of constructive analysis of the form in space, you will not be able to convey it as volume.
Now let's think of the rounded edge as part of the cylinder, or rather, its fourth part. If the cube is illuminated, then a boundary between light and shadow (or glare) will appear on part of the surface of the cylinder. The difference between the border between light and shadow on a cylinder from the same border on a cube is that this border is soft (blurred) and not hard.
If in a constructive drawing, at the first stages, in the places where the form turns in space, you indicate sharp boundaries instead of soft ones, and then, when modeling the form, round them off with chiaroscuro, will this somehow destroy the form? On the contrary, it will reveal. Form is always volume in space. Space is three-dimensional, which means that a form located in space is three-dimensional.
Form has boundaries of spaces. The question is: where are these boundaries in the shape of a person’s head, since it is all so round? This question can only be answered by your constructive analysis of the human head model, and the more aware you are, the more you will see.
In order to learn to draw human head pencil, you need to learn the necessary proportions.
Male head: determining proportions
Using a grid to correctly construct the head and clarify proportions is especially useful for beginners. Despite the variety of faces, basic proportions apply to almost any race.
Full-face head - 5 cells horizontally by 7 cells vertically. Central vertical line of symmetry.
Horizontal scale
1. The width of the eye is 1/5 of the entire width of the head and equals 1 square.
2. The distance between the eyes is 1 cell
3. The distance from the edge of the head to the outer corner of the eye is 1 square.
4.The width of the eye is 1 square
5. The distance from the outer corner of the right eye to the outline of the face is 1 cell.
6. The nose, as well as the line of the base of the chin, fits into one central cell vertically
Vertical scale: full face
1.Eyes: located in the middle of the entire height of the head.
2. Hairline: 1 cell from the top border of the head.
3.Nose: 1.5 cells down from eye level.
4.Border of the lower lip: 1 cell up from the bottom point of the chin
5. Ears: from the tip of the nose to the eyebrows - 2 squares.
Horizontal scale: profile
1. Head in profile: length 7 cells and width 7 cells
2. The distance between the anterior border of the eye and the tip of the nose is 1 cell.
3. The ear width is 1 square. Its frontal part is located 5 cells further from the tip of the nose and 2 cells from the border of the head.
4. The nose protrudes half a cell from the main shape of the skull, the size of which is approximately 6.5 cells.
Women's proportions are the same as men's.


Drawing the head and facial features - exercises
Profile view:
The nose protrudes more than other facial features
The jaw protrudes no more than the forehead
The ear is located significantly further than the midline of the profile
In this angle the mouth line is quite short
Study the shape of the eye
Three-quarter view
The far eye has a shortened shape compared to the near one, because we do not see its inner corner.
The far half of the mouth is shorter than the near one
The same observations apply to eyebrows.
Front view
The eyes are located relative to each other at a distance of the length of one eye.
One side of the head is a mirror image of the other.
The widest part of the head is above the ears.
The widest part of the face is at the level of the cheekbones.
With this angle, the shape of the ears is less expressive.
Facial features "close-up"

1.Profile view
The eyelids should be slightly larger than the eyeball - otherwise the eye would not be able to close.
2. Three-quarter view
Note the significant difference in shapes. The shape of the far eye resembles a profile view, while the near one appears more complete due to the fact that the inner corner is clearly visible. The far brow arch appears shorter than the near one.
3.Front view
With this type, the eyes are mirror image each other. The distance between them is equal to the length of one eye. Please note that, as a rule, approximately 1/8 or ¼ of the iris is hidden under the upper eyelid, and the lower border of the iris almost touches the lower eyelid.

From different angles, the nose has different shapes.
1. Profile view
Pay attention to the shape of the nostril and determine its distance in relation to the tip of the nose.
2. Three-quarter view.
The profile outline of the nose remains evident; however, notice how the distance from the nostril to the tip of the nose changes.
3.Front view
Only the length of the nose and its tip are expressed here. The nostrils are also defined and emphasized - don't forget to work out the tonal relationships.
1.Profile view
In this angle, the line of lip closure is the shortest.
2. Three-quarter view
The side of the lips closest to us resembles a full-face view of the mouth, while the distant side appears shortened due to perspective contraction.
3.Front view
We are very familiar with this particular perspective. It is very important to accurately and correctly draw the line where the lips close, in otherwise, you will not achieve an exact reproduction of the shape of the mouth.
Ears - There are different configurations, just a few are shown here.

Determination of facial features.
Eyes are of paramount importance because very often they are what define a person's facial expression and make it so recognizable to us. The next most important elements are the mouth and nose.

The line where the lips close is strictly straight.
Smile: upward curve of the line.
Sadness: bending the line down
Are your lips thin or full?
Are your eyelids narrow or wide?
Eyebrow arches - curved or straight?

Proportions without a grid

1. Eye level.
2. Central axis and eye level line at right angles to the central axis.
3. The tip of the nose is a little closer to the eyes, at a distance slightly greater than a third, but less than half.
4.Central line of the mouth. Approximately one third of the distance from the tip of the nose to the chin.
5. The distance between the eyes is equal to the width of one eye.
6.Dropping straight lines from the inner corners of the eyes, they will come into contact with the edges of the nostrils.
7. By lowering straight lines from the center of the eye pupils, they will come into contact with the outer corners of the mouth.
8. Move the pencil along a horizontal line at eye level to determine the upper tips of the ears.
9. By drawing a line from the lower tips of the ears, you will find yourself in the space between the nose and mouth. Ears are bigger than you think.
10.Neck width.
The distance from eye level to the chin is equal to the distance from the outer corner of the eye to the back edge of the ear.
Exercises
Well, now let's try to draw a portrait based on the knowledge we have acquired. Let's start with female portrait- still ladies)
First, outline the general shape of the head and make sure that it relates correctly to the shape of the neck. The shape of the head can be round, elongated and narrowed. But whatever it is, you must define it at the very beginning of your work.

Visualize and decide how the hair covers the head and how it relates to its overall shape. Just indicate their position.

Now mark the basic shape of the head, starting from the eye line. Their level and size must be adjusted, as well as the location of the eyebrows.

Then proceed to sketch out the general shape of the nose determined by its angle and the degree of protrusion relative to the overall surface of the face.
Determine the length and width of the mouth, make sure that you position it correctly in relation to the chin.
At this stage, draw out the shape of the head and facial features more clearly. Then select a tonal range and outline the shadow areas.

Now work on the chiaroscuro of the face, based on the position of the head relative to the light source and the selected angle. When working, pay attention to the smooth transition of dark values into light ones. Finally, highlight the eyes.
Your portrait is ready! 
Now let's try to draw a man's portrait.
There is also an alternative method of painting a portrait: work should begin with a central line dividing the face into two symmetrical parts. Then, relative to it, facial features are outlined up to the outer boundaries. This method is used by both experienced artists and beginners.
To perform the exercise, we will choose a three-quarter turn position. First, draw a vertical line on a piece of paper, and then use two light marks to mark the overall height of the head.

Check the proportions.
1.Draw the shape of the eyes and eyebrow arches, making sure their relationships are correct. Please note that the eye closest to you will be slightly larger than the far one. Determine the point of intersection of the far brow arch with the contour of the face.
2. Now draw the nose. Using sketchy, light strokes, try to convey shadows in unlit areas as accurately as possible.
3. Check the height of the ear - with the head positioned frontally, it is the same size as the distance between the lines of the eyes and nose. However, when drawing a three-quarter turn portrait, perspective contraction occurs. Therefore, do not forget to shorten your ear a little and place it at a slight angle. Determine the position of the ear relative to the oval of the face and clarify its shape.
4. Outline the shape of the mouth. Due to the same perspective contraction, the far half of the mouth should be smaller than the near one. The nasolabial fold should expand from the nostrils to the middle of the mouth. Show off your pointed chin.

Identify facial features
1.Swipe horizontal line eye location - it should be exactly halfway between the upper and lower marks. Then show the location and shape of the eyes on it.
2. Divide the upper part of the head in half and outline the hairline.
3. Also mark the lower part of the nose - it is located exactly halfway between the line of the eyes and the lower point of the chin. Now schematically, in a few strokes, convey the shape of the nose.
4. Determine the position of the mouth. Note that the mouth is closer to the nose than the chin, so don't typical mistake: Do not place your mouth exactly in the middle of the distance between them.

Show shadow areas
1.Use a few light strokes to show the shadow areas on the side of the head facing you. Then outline a light shadow contour, drawing a pencil from the forehead along the cheekbone to the lower lip and chin. Mark the area of the neck and the contours of the falling shadows.
2.Use shadows to highlight the volume of the eyes, nose and mouth. Place a soft shadow with light shading along the hairline. Then define the outline of the face more clearly. Finish with zigzag strokes to depict the head shape at the top.
3.Once again work out the contour of the face on the right. Be careful: the chin area should not protrude too much in the frontal direction.
Work on chiaroscuro
1.Start by deepening the tones of the most accentuated areas. Carefully model the shapes with tonal nuances: in some areas, increase the contrast with the depth of tone, in others, soften the transitions, using an eraser if necessary.
2. The most emphasized in the drawing, as a rule, are the contours of the eyes (sometimes the eyebrows), the shadow area between the nose and the eye, as well as the area of the nostrils. The line where the lips close, the area under lower lip, as well as the edge of the chin (depending on lighting conditions) stand out quite sharply.
3. Define the hair strands more clearly and work out the shape of the ear. Align the position of your head relative to your shoulders.
4. Towards the end, pay attention that on the unlit side, the darker tones visually push the hair mass deeper, and the highlights highlighted with an eraser help bring the face to the foreground.
The portrait is ready.

Every aspiring artist should learn to draw a person in proportion.
The lesson was prepared based on materials from the book by B. Barber.